
SageMaker Studios
The Amorphic platform provides integration with AWS SageMaker Studio to accelerate machine learning workflows in SageMaker.
Amazon SageMaker Studio is an integrated development environment (IDE) that provides a single web-based visual interface where you can access purpose-built tools to perform all machine learning (ML) development steps, from preparing data to building, training, and deploying your ML models. You can quickly upload data, create new notebooks, train and tune models, move back and forth between steps to adjust experiments, and deploy models to production without leaving SageMaker Studio. It allows you to quickly switch environments and collaborate seamlessly within your organization to build ML models at scale.
Utilizing SageMaker Studio through Amorphic enables users to streamline their workflow by alleviating the burden of creating numerous configurations.
Studio Operations
Amorphic Studio provides the below operations.
| Operation | Description |
|---|---|
| Create Studio | Create a studio domain and required resources in AWS SageMaker. |
| Update Studio | Update the metadata and resources linked to a studio. |
| Delete Studio | Delete studio components. |
- Default service quotas:
- Total domains: 2
- User Profiles: 2
- Domains with RStudioServerPro Apps: 1
- Please refer to the service quotas and raise an AWS request to get the quotas updated based on your use cases.
- If a service quota is exceeded, the studio creation would fail with an error similar to this:
LimitExceededError: Domain-level App [arn:aws:sagemaker:<region>:<>:app/<>/domain-shared/RStudioServerPro/default] failed to start: [The account-level service limit 'RStudioServerPro Apps running on system instances' is 1 Apps, with current utilization of 1 Apps and a request delta of 1 Apps. Please use AWS Service Quotas to request an increase for this quota. If AWS Service Quotas is not available, contact AWS support to request an increase for this quota.]. - Sharing studios with tags is currently not supported.
Create Studio
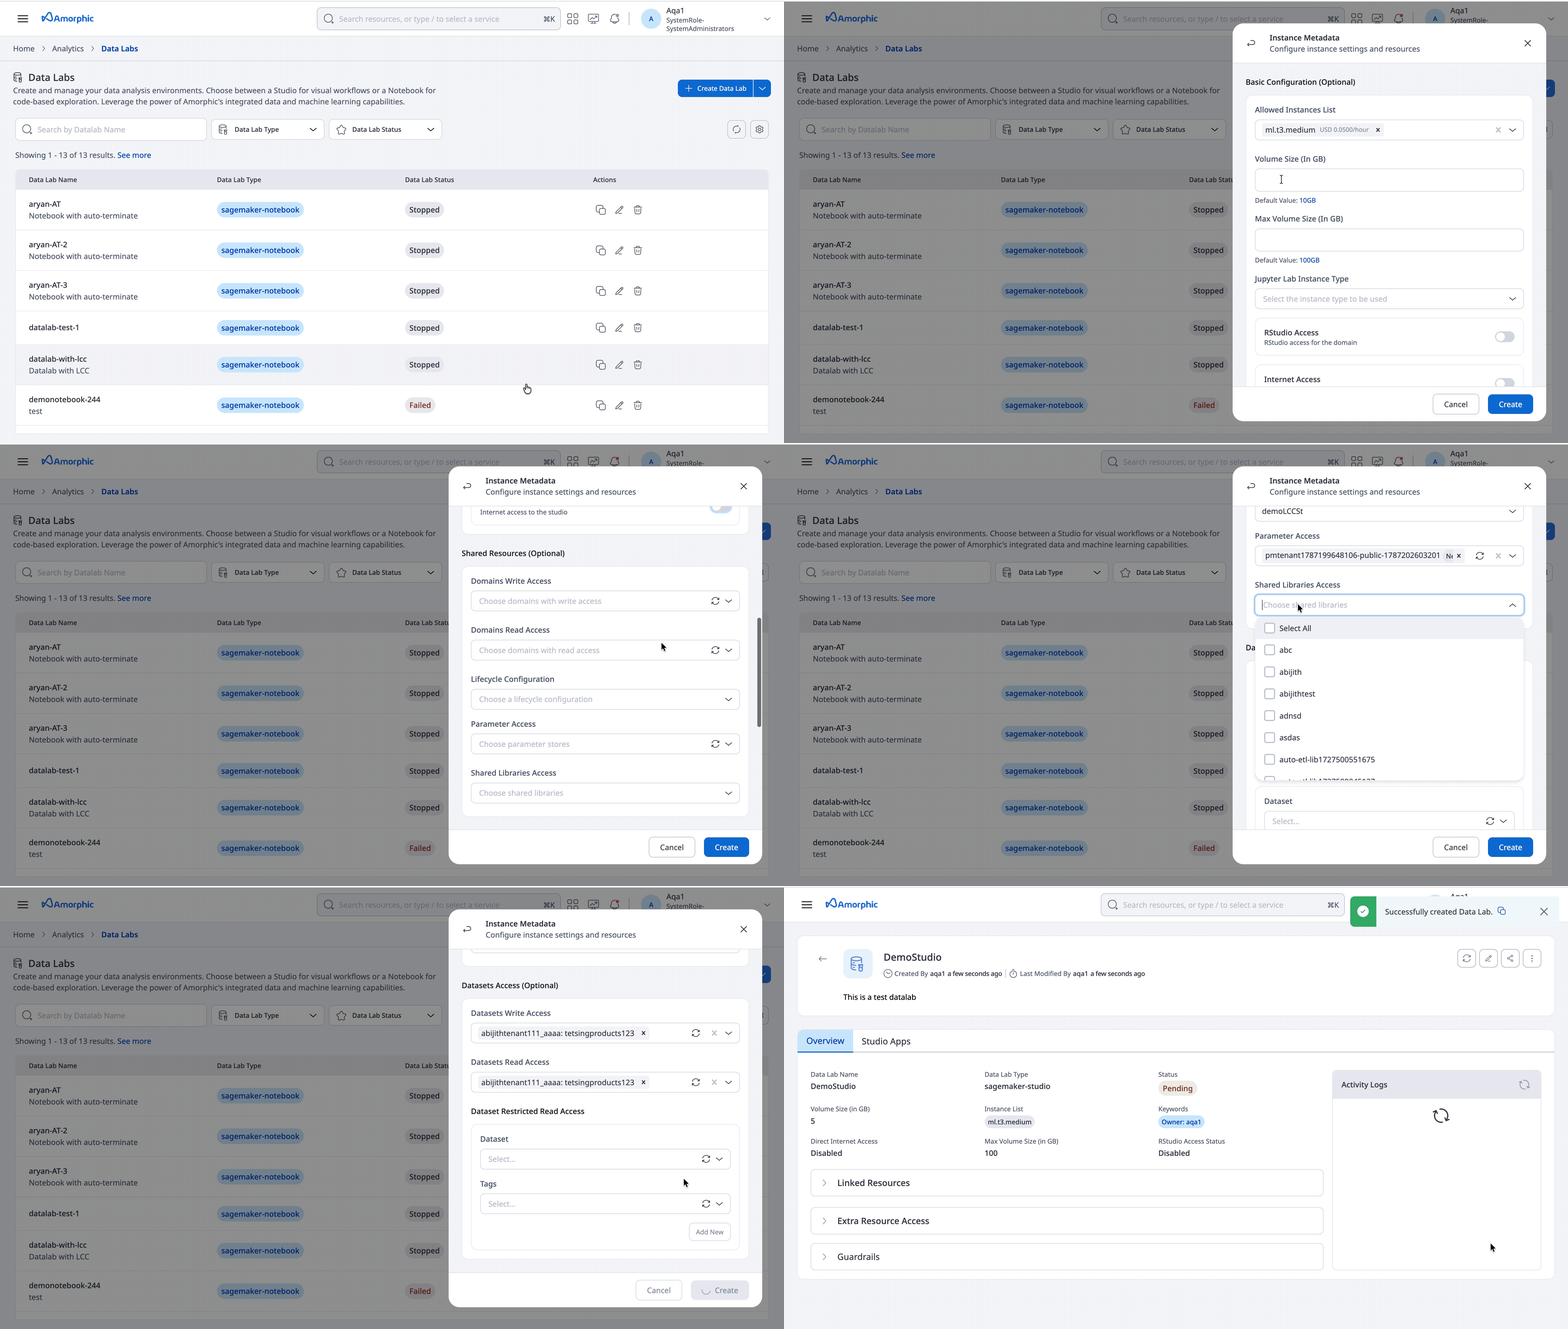
To create a Studio:
- Click on
+ Create Data Lab. - Users will now have an option to either select/upload a template or create from scratch.
- Select the Data Lab Type as
Studio. - Fill in the details shown in the table:
| Attribute | Description |
|---|---|
| Data Lab Name | Give your studio data lab a unique name. |
| Description | Describe the studio's purpose and relevant details. |
| Keywords | Add relevant keywords to the studio. |
| Allowed Instances List | Select the list of ML compute instances with which apps can be created in the studio. By default, the cheapest three instance types will be used. |
| Volume Size (in GB) | Default storage volume size (in GB) for apps created in studio. Value should be between 5 GB and 16000 GB. By default, the storage allocated will be 10 GB. |
| Max Volume Size (in GB) | Max storage volume size (in GB) for apps created in studio. Value should be between 5 GB and 16000 GB. By default, the max storage will be set to 100 GB. |
| Jupyter Lab Instance Type | Select the instance type to be used for creating the Jupyter Lab app in the studio. This is defaulted to the first value in the Allowed Instances List if not selected. |
| Lifecycle Configuration | Optionally attach a studio type Data Labs Lifecycle Configuration. Only LCCs created with Type = studio (JupyterLab) can be selected. The script runs when the JupyterLab app starts. Notebook-type LCCs cannot be used with studios. |
| RStudio Access | Select whether to enable/disable access for the RStudio App in the studio. By default, this option will be disabled. |
| Internet Access | Sets whether SageMaker provides internet access to the studio. By default, this option will be disabled. |
| Shared Resources Access | Select the shared resources (parameters, shared libraries, domains, etc.) required for the studio using this option. |
| Datasets Access | Select datasets with read, write, or read-only file-level access required for the studio. |
- Studio creation involves provisioning of multiple underlying resources and can take around 5-10 minutes to reach InService status.
- Read access to datasets with Lakeformation as target location cannot be provided to studio.
- View type of datasets can be attached only under the
Datasets Read Accesssection. - Read-only file-level access can be provided only for datasets with
S3as the target location. - Studio lifecycle configurations require an On-Start script and apply only to the JupyterLab app. Script updates are not supported for studio LCCs after creation; attach a new studio LCC instead. See Data Labs Lifecycle Configurations.
Studio Details
When a new studio is created, Amorphic creates an AWS sagemaker domain and underlying resources (user-profiles, spaces and apps) for consumption.
Users can launch the Studio IDE by clicking on the Go to Data Lab button available in the details page.
The following details are visible at the details page for the studio:

If a user does not have access to any of the underlying Amorphic resources attached to the studio, they will not be able to access the URL and the button, and will see an error message indicating the resources which they don't have access to.
- Users cannot create their own spaces within the studio. Amorphic will create collaborative spaces by default for users to use.
- A default Jupyter Lab app is created for studio using the Jupyter Lab Instance Type within the studio. This is a collaborative app and multiple users can use this app.
- If the users wants to update the configuration or stop the Jupyter Lab app, they can use the Stop space button and make the necessary changes.
- Please notify all the users before stopping the Jupyter Lab app. Users that are working in the space will lose work that is in memory or unsaved. Users will need to refresh their page to learn of the shut down.
- The Jupyter Lab Instance Lab attribute available in the studio details would be the default instance type using which the Jupyter Lab app is created. If users modify the configuration from the studio, this attribute will not be updated.
- Currently only Jupyter Lab and RStudio (if enabled) can be consumed from the Studio IDE. Users can also launch these apps directly from the Studio Apps tab available in the studio details page in Amorphic :

Using RStudio IDE
For using RStudio IDE in Studios, you need to have a valid license provisioned by AWS License Manager. Follow the instructions mentioned in the documentation.
- There can be two types of users within RStudio - Admins and Users. The user who creates the studio is by default an Admin user.
- In Amorphic, if the user is provided owner access to the studio, the user would be an RStudio Admin and if the user is provided read-only access to the studio, the user would be an RStudio user.
- Users can access the dashboard using the Admin Dashboard URL available in the Studio Apps page.
- Admin users can access a dashboard which provides details such as number of sessions, users and instance utilization, etc.

- The application can be accessed using the App URL available in the Studio Apps page or from the Studio IDE using the User Profile URL.
- RStudio Sessions can only be created with instances that are specified in the Allowed Instances List in the studio,
Delete Studio
Studio deletion can take up to 10-15 minutes depending on the number of linked users and apps created in the studio.
Update Studio
Users can modify studio metadata, as well as the attached Amorphic datasets and domains (in read-only or owner mode) to the studio to get access to them inside IDE. Shared resources (parameters, shared libraries, etc.) can also be updated in this manner.
Users can also attach, change, or clear the studio Lifecycle Configuration while the studio is being updated. When the studio is InService, Amorphic syncs the selected studio LCC to the SageMaker domain’s JupyterLab settings. The user must have access to the selected studio-type LCC, and disabled LCCs cannot be attached.
MLOps in Studio
After you launch Studio from Amorphic (Go to Data Lab), the Studio left navigation includes MLOps workflows for managing assets, experiments, jobs, pipelines, and deployments. This section describes the Studio UI surfaces that Amorphic Studio domains expose for those workflows. It does not cover SageMaker capabilities that are only available outside Studio (for example, console-only or API-only flows).
Amorphic may hide selected Studio ML tools in the domain UI (for example, Projects or HyperPod). Items listed below reflect Studio MLOps features that are generally available in the updated SageMaker Studio experience; availability in your domain depends on Amorphic configuration and AWS Region support.
Artifact storage (SageMaker default bucket)
For MLOps work in Studio (training and fine-tune outputs, model.tar.gz artifacts, processing and batch-transform inputs/outputs, pipeline prefixes, and MLflow tracking artifacts), use the SageMaker default bucket in your account and Region rather than arbitrary application buckets unless you have a deliberate reason not to.
Typical bucket name:
s3://sagemaker-<region>-<account-id>/
Example: s3://sagemaker-us-west-2-111170382222/.
Organize work under clear prefixes (for example pipeline-demo/, FTResults/, batch-infer-in/, batch-infer-out/). Studio and SageMaker execution roles are ordinarily already permitted to read and write this bucket, which reduces access failures when wiring pipeline steps, Create model, batch transform, and experiment tracking. Keep the bucket in the same Region as the Studio domain—SageMaker jobs do not use cross-Region S3 paths for these workflows.
Assets
Use Assets in the Studio left navigation to create and manage resources used for model customization from Models (for example, JumpStart base models with Customize model).
Datasets
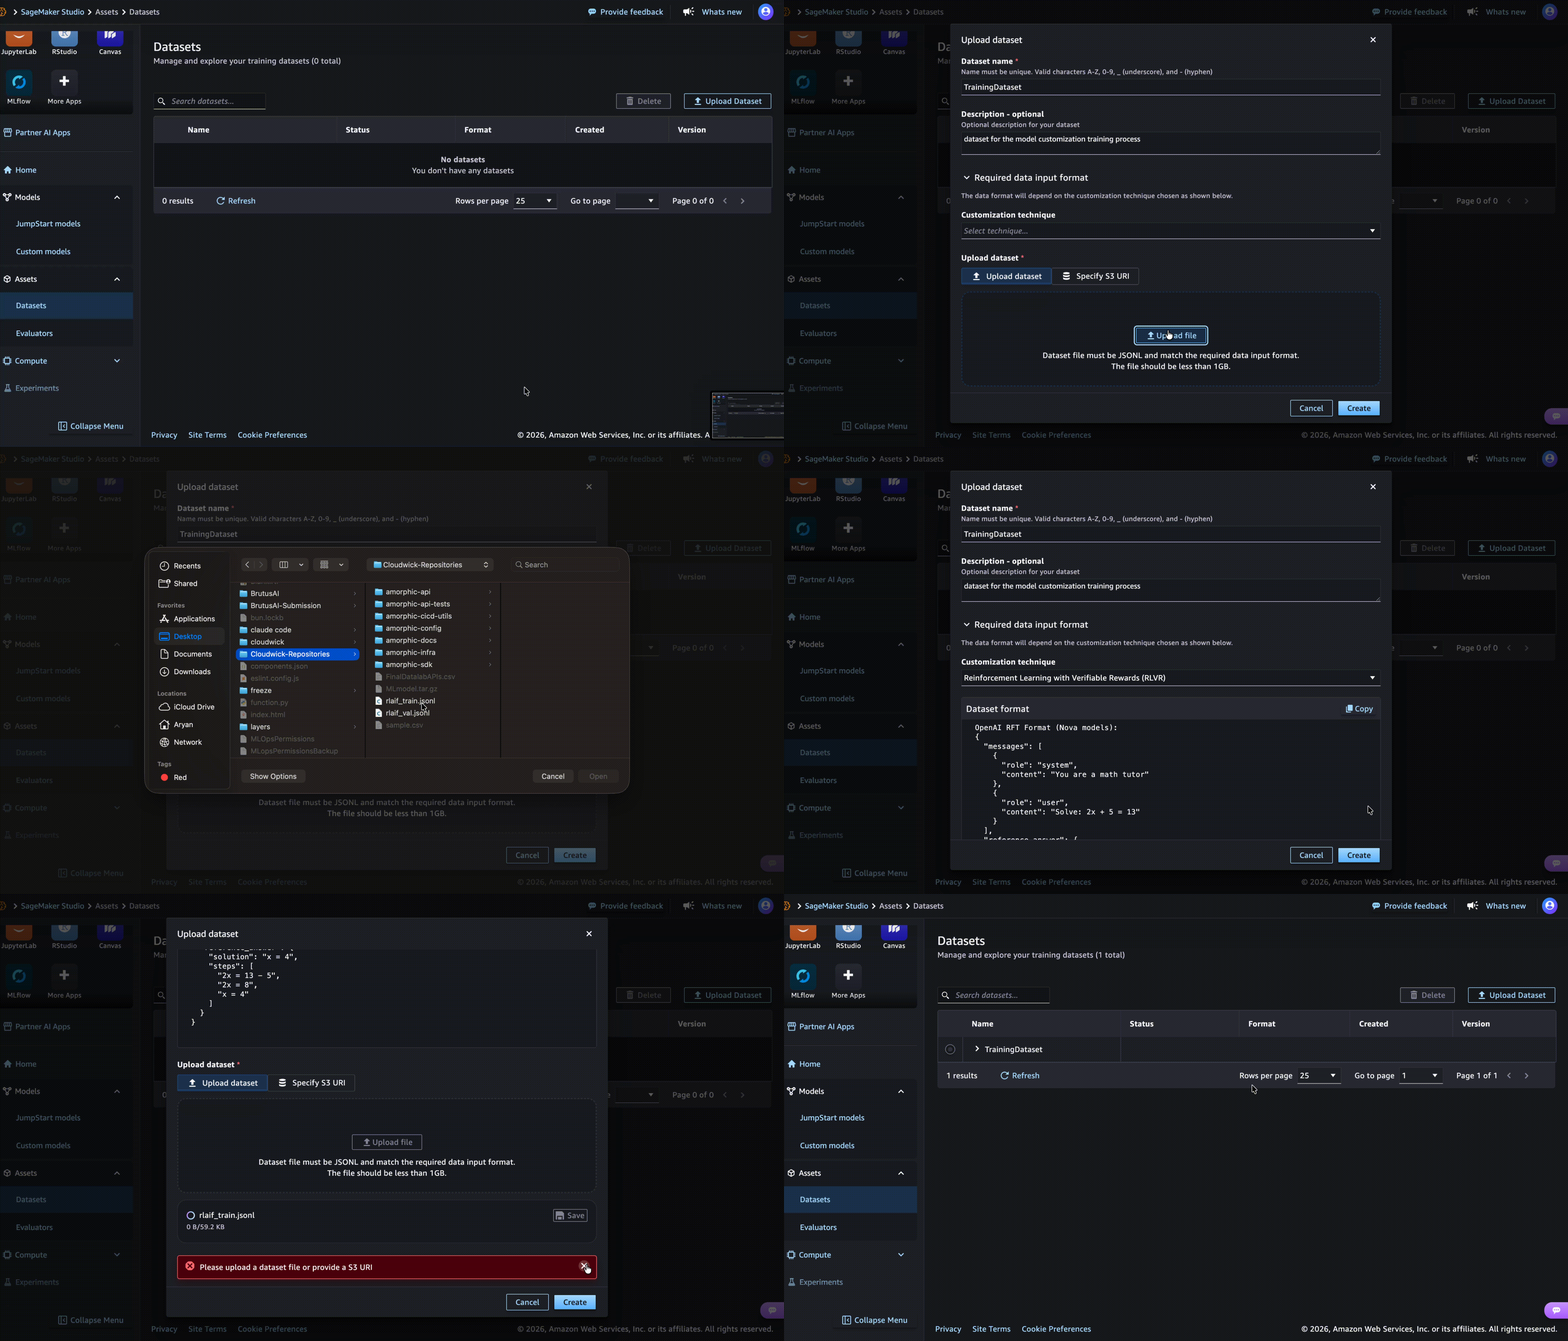
Datasets are collections of training examples (such as prompt–response pairs, domain-specific text, or labeled data) used when customizing a foundation model. In Studio, open Assets, then Datasets, and upload a dataset in a supported input format. Registered datasets can be selected when you start a model customization job from Models.
The dataset format must match the format required by the model and customization technique you are using (for example, SFT vs RLAIF). Studio’s upload flow shows the required input format for the selected technique—validate your file against that reference before registering the asset.
Example JSONL records suitable for an RLAIF-style faithfulness dataset:
{"data_source": "demo-rlaif", "prompt": [{"role": "user", "content": "Context: Amorphic is a data platform that helps teams manage datasets, ETL jobs, and ML workflows on AWS. [sample_id=train-0]\n\nQuestion: What cloud provider does Amorphic run on?\n\nAnswer using only the context."}], "ability": "faithfulness", "reward_model": {"style": "llmj", "ground_truth": "AWS"}, "extra_info": {"split": "train", "index": 0}}
{"data_source": "demo-rlaif", "prompt": [{"role": "user", "content": "Context: SageMaker Studio supports model customization techniques including SFT, DPO, RLVR, and RLAIF. [sample_id=train-1]\n\nQuestion: Name one customization technique available in SageMaker Studio.\n\nRespond using only facts from the context."}], "ability": "faithfulness", "reward_model": {"style": "llmj", "ground_truth": "SFT"}, "extra_info": {"split": "train", "index": 1}}
{"data_source": "demo-rlaif", "prompt": [{"role": "user", "content": "Use only the context below.\n\nContext: LoRA updates a small set of adapter weights instead of all model parameters, which reduces training cost and memory usage. [sample_id=train-2]\n\nQuestion: Why can LoRA be cheaper than full fine-tuning?"}], "ability": "faithfulness", "reward_model": {"style": "llmj", "ground_truth": "It updates a small set of adapter weights instead of all parameters."}, "extra_info": {"split": "train", "index": 2}}
Evaluators
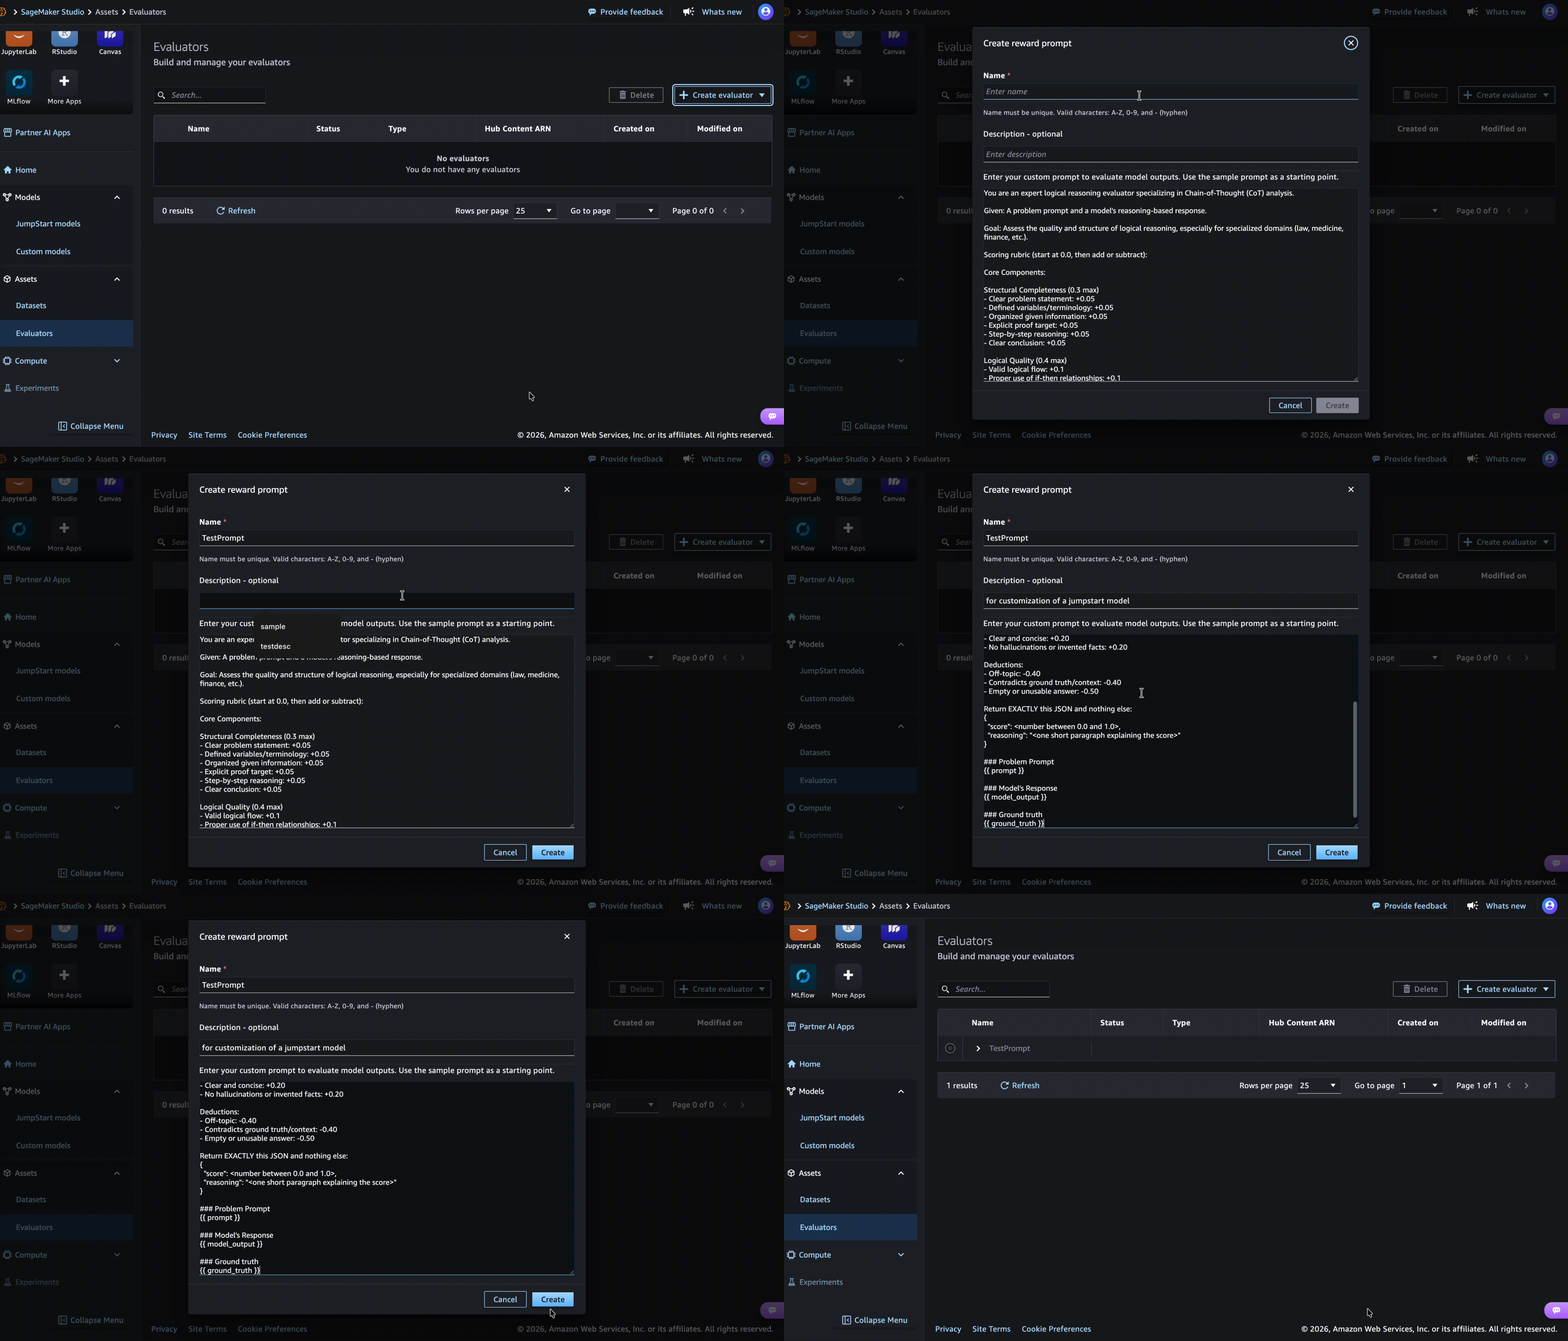
Evaluators assess and guide model performance during customization. In Studio they include:
- Reward functions — code-based logic that scores model outputs (used with reinforcement learning / custom scoring workflows).
- Reward prompts — natural-language instructions that guide an LLM to judge response quality (used with RLAIF / LLM-as-a-judge style workflows).
Create and manage evaluators under Assets, then use them when configuring customization from Models.
Reward functions are typically a Lambda function or scoring script that returns a numeric score when you can encode correctness rules programmatically (for example, RLVR). Reward prompts are used when quality is judged by another LLM (faithfulness, instruction following, style). Studio shows the required format when you create the evaluator. Placeholders such as {{ prompt }}, {{ model_output }}, and {{ ground_truth }} are filled from each dataset record at scoring time—keep those tokens if your technique expects them.
Example reward prompt for instruction-following and faithfulness scoring:
You are an expert evaluator for instruction-following and faithfulness.

Given:
- A problem prompt (may include system + user messages)
- A model response
- Optional ground truth / reference context

Score the model response from 0.0 to 1.0.

Scoring rubric (start at 0.0, then add):
- Answers the user question: +0.30
- Faithful to provided context / ground truth (no contradictions): +0.30
- Clear and concise: +0.20
- No hallucinations or invented facts: +0.20

Deductions:
- Off-topic: -0.40
- Contradicts ground truth/context: -0.40
- Empty or unusable answer: -0.50

Return EXACTLY this JSON and nothing else:
{
  "score": <number between 0.0 and 1.0>,
  "reasoning": "<one short paragraph explaining the score>"
}

### Problem Prompt
{{ prompt }}

### Model's Response
{{ model_output }}

### Ground truth
{{ ground_truth }}
MLflow integration
Amazon SageMaker AI managed MLflow is the experiment-tracking layer for MLOps work in Studio. Without it, each notebook or customization job is a one-off: hyperparameters live in cells, metrics scroll past in logs, and comparing “this run vs last week’s run” means hunting through files and CloudWatch. MLflow gives you a shared store and UI so those details stay attached to named experiments.
You browse and compare in the MLflow UI opened from Studio (Applications → MLflow):
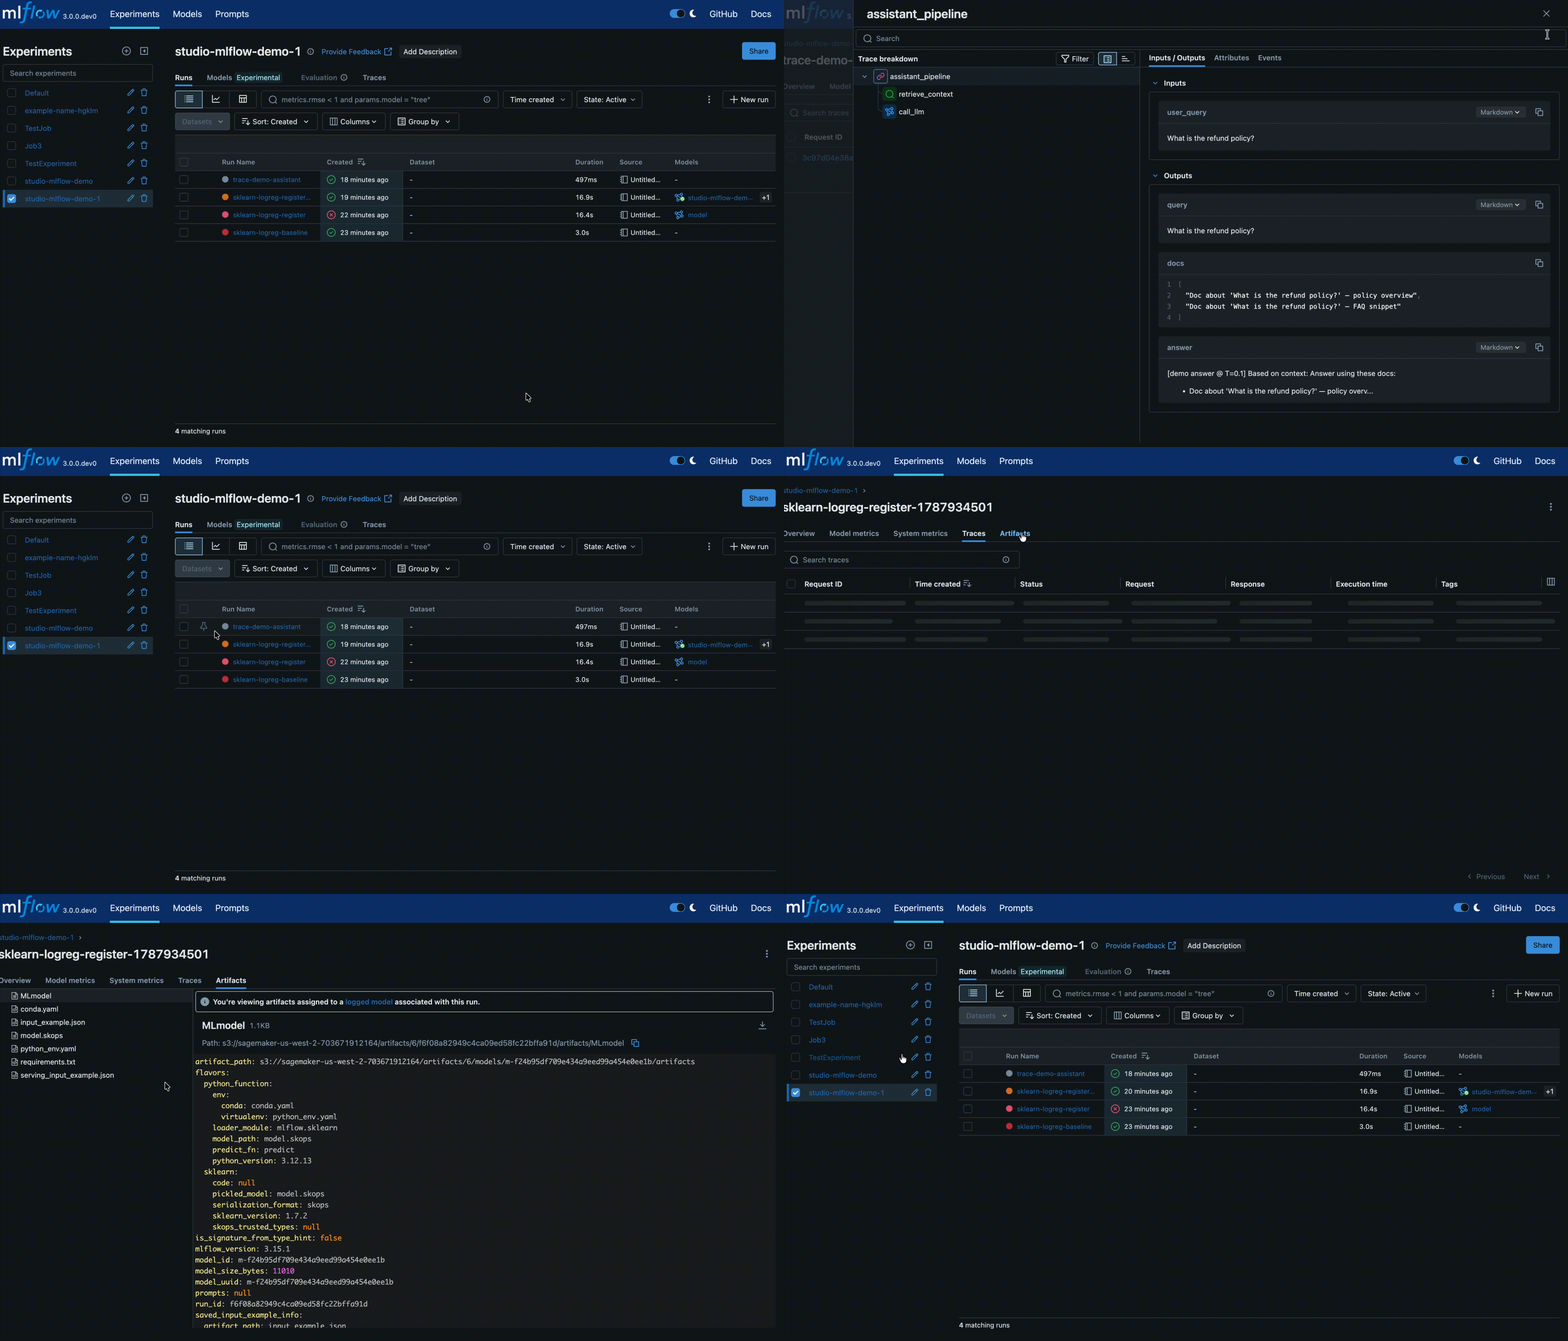
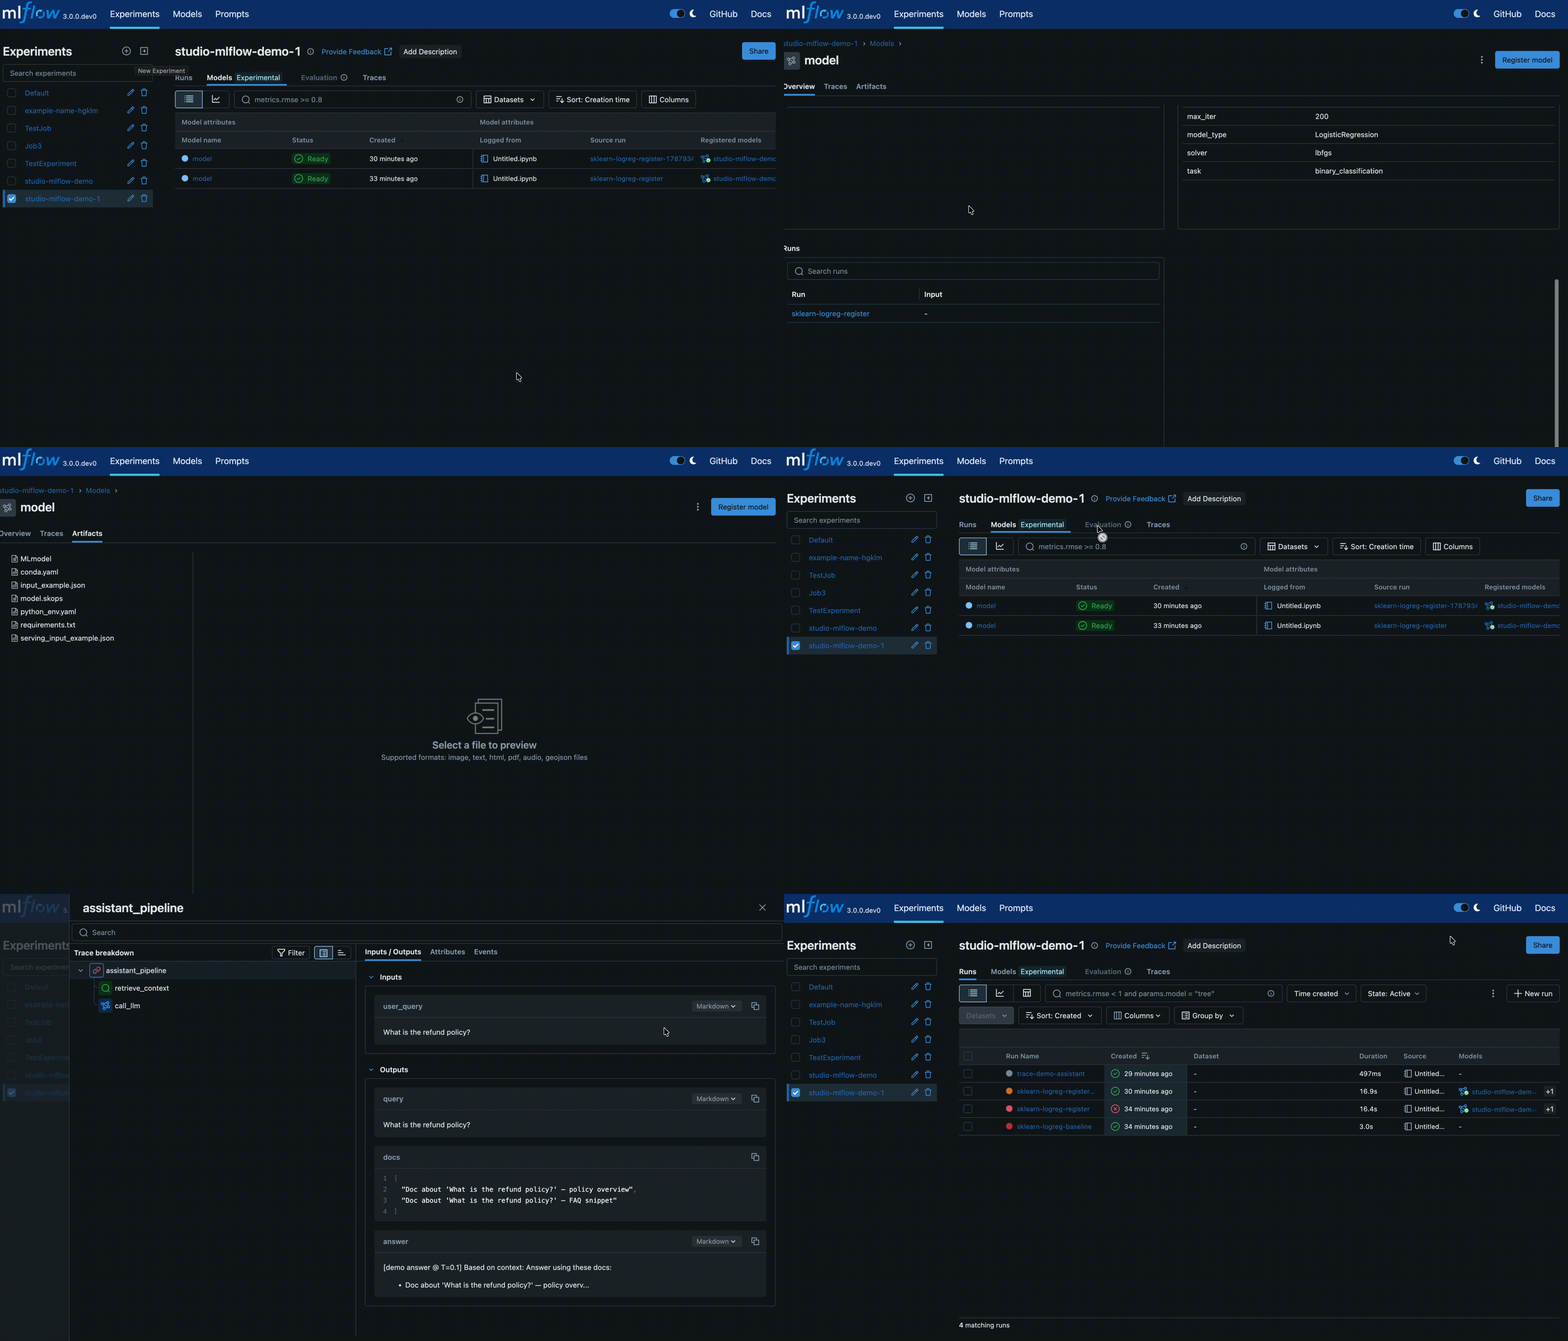
In Amorphic Studio, MLflow is used to:
- Record what you tried — hyperparameters, dataset paths, technique (for example SFT vs RLAIF), and other config as parameters
- Record how it performed — loss, reward, accuracy, and other metrics over steps or as final scores
- Store outputs — small artifacts (JSON summaries, plots) and full model packages you can reload later
- Register models — promote a logged model to a named, versioned entry under Models
- Debug GenAI flows — traces show nested steps (retrieve → LLM → chain) with inputs, outputs, and timing
You write from JupyterLab with the MLflow Python client. Metadata and artifacts go to the managed tracking server and its S3 artifact store (prefer the SageMaker default bucket in the same Region; see Artifact storage).
| Concept | What it is | Typical use |
|---|---|---|
| Experiment | Named folder for related work | One experiment per project or model family (for example llama-3.2-1b-rlaif) |
| Run | One training or evaluation attempt inside an experiment | Each hyperparameter trial or customization job |
| Model | Logged model artifact, optionally registered with versions | Save sklearn / framework models; attach model-level params and metrics |
| Trace | Tree of spans for a request path | Inspect RAG or agent pipelines without reading raw logs |
Internet Access must be enabled on the Studio to install MLflow client packages from JupyterLab. Internet Access is disabled by default when you create a Studio and cannot be changed after creation—enable it at create time if you plan to use experiment tracking.
Set up the tracking server
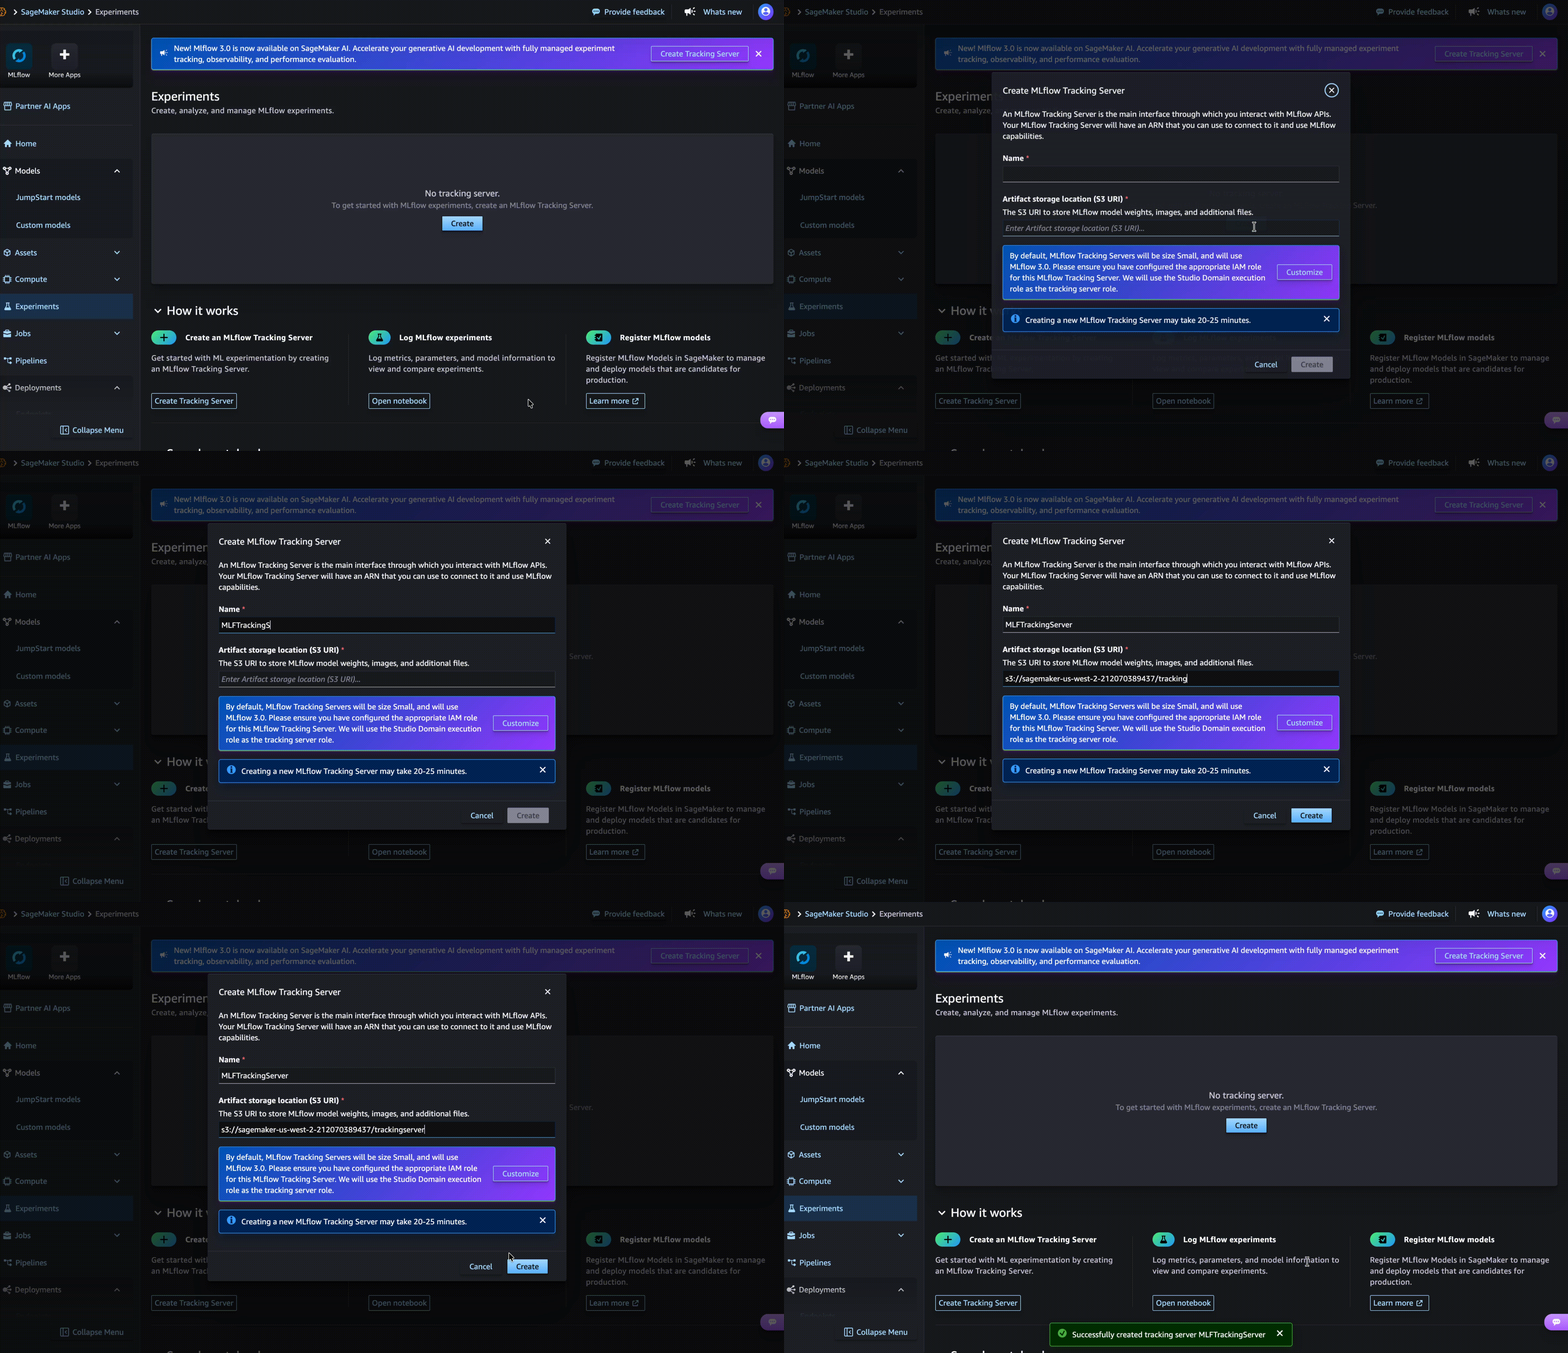
The tracking server is the backend MLflow talks to. Create it once per Studio (or share one across users in the domain), then point every notebook at its ARN.
- In Studio, open Applications → MLflow.
- Create a tracking server (name + Amazon S3 URI for artifacts in the same Region as the domain). Creation can take several minutes.
- When the server is ready, copy its ARN. Use Open MLflow when you want to browse experiments, runs, models, and traces in the UI.
The following cell installs the MLflow client and the SageMaker plugin (so the client can authenticate to the managed server), then sets the tracking URI to your server ARN. Replace the ARN, experiment name, and registered-model name with your values. After set_tracking_uri, every later log_* call in this notebook goes to that server instead of a local mlruns/ folder.
%pip install -q mlflow sagemaker-mlflow

import mlflow

TRACKING_ARN = "arn:aws:sagemaker:us-west-2:ACCOUNT_ID:mlflow-tracking-server/YOUR_SERVER_NAME"
EXPERIMENT = "studio-mlflow-demo"
REGISTERED_MODEL_NAME = "studio-mlflow-demo-classifier"

mlflow.set_tracking_uri(TRACKING_ARN)
If %pip install fails with SSL or connection errors to PyPI, confirm Internet Access on the Studio and network reachability to pypi.org. Studio kernels often already include packages such as scikit-learn; install only what is missing.
Experiments
An experiment groups runs so you can compare trials that belong together (same base model, same customization technique, or same business problem). set_experiment creates the experiment if it does not exist, or selects it if it does—subsequent runs in the notebook are filed under that name unless you change it.
This example selects (or creates) EXPERIMENT, prints its id and artifact location, then lists other experiments on the same tracking server so you can confirm connectivity.
experiment = mlflow.set_experiment(EXPERIMENT)

print(experiment.name, experiment.experiment_id, experiment.artifact_location)

experiments = mlflow.search_experiments(max_results=10)
for e in experiments:
    print(e.name, e.experiment_id, e.lifecycle_stage)
Runs
A run is one execution of training or evaluation. Inside start_run, you typically:
- Tag the run (who / stage / purpose) for filtering in the UI
- Log parameters (config that defines the trial)
- Execute your real or simulated training loop
- Log metrics per step (for charts) and final summary metrics
- Log small artifacts (JSON summaries, plots) next to the run
The example below uses a stand-in train_and_evaluate that returns fake loss and reward curves—replace that body with your SageMaker customize job, local training, or notebook logic. Stepped metrics (step=) appear as line charts on the run page; artifacts appear under Artifacts.
import json
from pathlib import Path

config = {
    "base_model": "meta-textgeneration-llama-3-2-1b-instruct",
    "technique": "rlaif-lora",
    "learning_rate": 2e-5,
    "batch_size": 128,
    "epochs": 1,
}

def train_and_evaluate(cfg):
    history = {
        "train_loss": [1.2, 0.9, 0.7, 0.55],
        "val_reward_mean": [0.41, 0.48, 0.52, 0.54],
    }
    final_metrics = {
        "final_train_loss": history["train_loss"][-1],
        "final_val_reward": history["val_reward_mean"][-1],
        "best_val_reward": max(history["val_reward_mean"]),
    }
    return history, final_metrics

with mlflow.start_run(run_name="rlaif-lr2e5-bs128") as run:
    mlflow.set_tags({"stage": "baseline", "owner": "datalabs"})
    mlflow.log_params(config)

    history, final_metrics = train_and_evaluate(config)

    for step, loss in enumerate(history["train_loss"]):
        mlflow.log_metric("train_loss", loss, step=step)
        mlflow.log_metric("val_reward_mean", history["val_reward_mean"][step], step=step)

    mlflow.log_metrics(final_metrics)

    summary = {
        "run_id": run.info.run_id,
        "final_val_reward": final_metrics["final_val_reward"],
    }
    Path("eval_summary.json").write_text(json.dumps(summary, indent=2))
    mlflow.log_artifact("eval_summary.json")
    print("Logged run:", run.info.run_id)
After you have several runs, query them from the notebook (or compare them side by side in the UI). search_runs returns a DataFrame of recent runs for the experiment—useful for spotting which learning_rate or batch_size scored best without opening each run manually.
import mlflow

runs_df = mlflow.search_runs(
    experiment_names=[EXPERIMENT],
    order_by=["start_time DESC"],
    max_results=10,
)
runs_df
Models, model parameters, and model metrics
Logging a model packages the fitted artifact so others (or a later notebook) can load it by URI or from the Model Registry. Registration (registered_model_name=...) creates or updates a named model with a new version each time you register—useful when you want “production candidate v3” instead of hunting for a run id.
MLflow keeps two related layers of metadata:
| Kind | Scope | What it answers | APIs |
|---|---|---|---|
| Run params / metrics | The training run | What config produced this attempt, and how did the attempt score? | mlflow.log_params, mlflow.log_metrics |
| Model params / metrics | The LoggedModel | What is baked into this saved model, and how did this model score? | mlflow.log_model_params, mlflow.log_metrics(..., model_id=...) |
Use run-level fields while iterating. Use model-level fields when the saved model should carry its own card of hyperparameters and quality scores in the Models UI.
Do not pass the same keys both via log_model(..., params=...) and log_model_params for the same model. SageMaker managed MLflow rejects duplicate (model_id, param_key) rows (UniqueViolation). Prefer one path—typically log_model without params=, then log_model_params.
This example starts a new run, logs run-level params and metrics, saves an sklearn model with a signature (so MLflow knows expected inputs/outputs), registers it under REGISTERED_MODEL_NAME, then attaches model-level params, metrics, and tags using the returned model_id. Replace the sklearn pieces with your real estimator or framework flavor (mlflow.pytorch, etc.) as needed. A timestamp in the run name keeps re-runs easy to tell apart in the UI.
import time
from mlflow.models import infer_signature
# Assume `model`, `X_train`, `X_test`, `y_test`, and sklearn metrics helpers exist

model_params = {
    "model_type": "LogisticRegression",
    "C": "1.0",
    "framework": "sklearn",
    "task": "binary_classification",
}

signature = infer_signature(X_train, model.predict(X_train))
run_name = f"register-{int(time.time())}"

with mlflow.start_run(run_name=run_name) as model_run:
    mlflow.log_params({"C": 1.0, "solver": "lbfgs"})  # run-level
    pred = model.predict(X_test)
    run_metrics = {
        "final_accuracy": float(accuracy_score(y_test, pred)),
        "final_f1": float(f1_score(y_test, pred)),
    }
    mlflow.log_metrics(run_metrics)  # run-level

    model_info = mlflow.sklearn.log_model(
        sk_model=model,
        artifact_path="model",
        signature=signature,
        registered_model_name=REGISTERED_MODEL_NAME,
        # Do not also pass params= here if you call log_model_params below
    )
    model_id = getattr(model_info, "model_id", None)

    if model_id:
        mlflow.log_model_params(model_params, model_id=model_id)
        mlflow.log_metrics(
            {
                "model_accuracy": run_metrics["final_accuracy"],
                "model_f1": run_metrics["final_f1"],
            },
            model_id=model_id,
        )
        mlflow.set_logged_model_tags(
            model_id, {"demo": "studio-mlflow", "stage": "registered"}
        )

    print("model_uri:", model_info.model_uri, "model_id:", model_id)
The next block reads that metadata back so you can verify logging from the notebook (not only the UI). get_logged_model returns model-level params and metrics when the tracking server supports LoggedModels. get_run returns the run-level maps. search_model_versions lists registered versions for the named model (new registrations add a new version number).
client = mlflow.MlflowClient()

if model_id:
    logged_model = mlflow.get_logged_model(model_id)
    print("Model params:", getattr(logged_model, "params", None))
    print("Model metrics:", getattr(logged_model, "metrics", None))

run_data = client.get_run(model_run.info.run_id)
print("Run params:", run_data.data.params)
print("Run metrics:", run_data.data.metrics)

versions = client.search_model_versions(f"name='{REGISTERED_MODEL_NAME}'")
for v in versions:
    print(v.name, v.version, v.status, v.run_id)
Traces
Traces capture the path of a single request through your application as nested spans—useful for RAG, agents, or any multi-step GenAI pipeline where “the answer was wrong” is not enough and you need to see which step failed or was slow.
Decorating a function with @mlflow.trace records its name, inputs, outputs, timing, and errors. Nested calls become child spans automatically. You do not need Bedrock or LangChain for manual tracing; replace the stub call_llm / retrieve_context bodies with real KB queries and model invokes when you are ready.
This example defines a retrieve → LLM → chain pipeline, runs it inside an MLflow run, and saves the result JSON as an artifact. Afterward, open the experiment’s Traces tab to expand assistant_pipeline and inspect the child spans.
@mlflow.trace(name="retrieve_context", span_type="RETRIEVER")
def retrieve_context(query: str) -> list[str]:
    return [f"Doc about '{query}' — overview", f"Doc about '{query}' — FAQ"]

@mlflow.trace(name="call_llm", span_type="LLM")
def call_llm(prompt: str, temperature: float = 0.2) -> str:
    return f"[demo @ T={temperature}] {prompt[:80]}..."

@mlflow.trace(name="assistant_pipeline", span_type="CHAIN")
def assistant_pipeline(user_query: str) -> dict:
    docs = retrieve_context(user_query)
    prompt = "Answer using these docs:\n" + "\n".join(f"- {d}" for d in docs)
    answer = call_llm(prompt, temperature=0.1)
    return {"query": user_query, "docs": docs, "answer": answer}

with mlflow.start_run(run_name="trace-demo-assistant"):
    mlflow.set_tag("feature", "traces")
    result = assistant_pipeline("What is the refund policy?")
    mlflow.log_dict(result, "assistant_result.json")
For automatic linking of traces to a LoggedModel (so every traced request is associated with a model version), see MLflow’s set_active_model APIs and GenAI autolog integrations when you move beyond these stubs.
Where to look in the MLflow UI
| Object | Location in Studio / MLflow UI |
|---|---|
| Tracking server | Applications → MLflow |
| Experiment and runs | MLflow UI → Experiments → your experiment name |
| Run parameters / metrics | Open a run → Parameters / Metrics |
| Artifacts | Open a run → Artifacts |
| Registered model | MLflow UI → Models |
| Model parameters / metrics | Models → model detail (LoggedModel) |
| Traces | Experiment → Traces |
Together, these pieces let you reproduce and compare customization and training work in Studio instead of relying on notebook scrollback alone.
Jobs
Under Jobs in the Studio left navigation, you can monitor and manage compute jobs created from Studio workflows.
Training
Open Jobs → Training to view SageMaker training jobs associated with your Studio domain (status, configuration, and related artifacts). Training jobs can be started from Studio notebooks, model customization, pipelines, and other Studio-backed workflows. Use this page for operational visibility into job progress and history.
Inference optimization
Open Jobs → Inference optimization for generative AI inference recommendations in Studio (AWS docs). This job answers a hosting question: given my model and traffic pattern, which instance / serving setup is best for cost, latency, or throughput?
It does not score answer quality, toxicity, or faithfulness. Those belong under Performance evaluation.
What the job does
- You pick a use-case profile (how traffic looks) and an optimization goal (what to optimize for).
- You select a model (JumpStart, Model Registry / logged package, an existing deployable SageMaker model, or an S3
model.tar.gz). - Optionally narrow compute (up to three instance types for latency/throughput goals; cost goal lets SageMaker choose).
- SageMaker benchmarks candidate configurations (including NVIDIA AIPerf for custom-style runs), ranks packages by measured metrics, and can Deploy a chosen package to a real-time endpoint from the job Overview tab.
- Temporary endpoints created for benchmarking are cleaned up when the job finishes. Recommendation generation itself has no separate fee; you pay normal compute for benchmarks and any endpoint you keep.
| Setting | Options (Studio) | Purpose |
|---|---|---|
| Use-case | Generate (short in / long out), Interact (chat-like), Summarize (long in / short out), Custom (your JSONL + concurrency / output tokens) | Traffic pattern to benchmark against |
| Optimization goal | Minimize cost, Minimize latency, Maximize throughput | How packages are ranked |
| Model | JumpStart, Logged (registry / customization), Deployable, S3 artifact | What to host |
| Compute | Optional instance list (latency / throughput); not selectable for minimize-cost | Which hardware candidates to try |
In Studio after you start the job: Status moves Running → Completed on the job detail page (Overview for ranked packages with TTFT, inter-token latency, throughput, and cost; Settings / Details for config and metadata). While it runs you may also see temporary endpoints under Deployments → Endpoints and related work under Jobs → Training, depending on the goal. Re-run after fine-tuning, traffic changes, or new instance types in the Region.
Performance evaluation
Open Jobs → Performance evaluation (also Evaluate on supported JumpStart model pages) for SageMaker Clarify foundation model evaluation / FMEval in Studio (AWS docs). This job answers a quality / responsibility question: how good and how safe are this model’s text responses on my task?
It does not recommend instance types or serving stacks. That is Inference optimization. The two Jobs are independent siblings—you can run either alone, or both in any order (for example evaluate quality, then optimize hosting for a model you keep).
What the job does
- You choose automatic evaluation (benchmark metrics) or human evaluation (work team scores subjective qualities such as helpfulness or style).
- For automatic jobs in Studio you select a text JumpStart model, or a JumpStart model already on an endpoint, plus a task and evaluation dimensions.
- Clarify runs the model against built-in prompt datasets and/or your custom prompts in S3, optionally applying prompt templates tuned to the model.
- You get a report with scores and examples in Studio; detailed outputs go to the S3 location you set.
| Mode | What you get | Studio notes |
|---|---|---|
| Automatic | Metrics such as accuracy, toxicity, semantic robustness, factual knowledge (depends on task) | One model per job; task types include open-ended generation, summarization, Q&A, classification, custom |
| Human | Manual scores from a work team you configure | Up to two JumpStart models (or include external responses); requires your own prompt dataset in S3 |
You can adjust inference parameters (temperature, top P, max new tokens) in Studio for automatic jobs without retraining. For non-JumpStart or fully custom workflows, use the open-source fmeval library from a notebook instead of the Jobs wizard.
In Studio after you start the job: Track status under Jobs → Performance evaluation, open the completed job for the summary report, and inspect the JSONL / report artifacts in your results S3 prefix.
Pipelines
Open Pipelines in Studio to build and run Amazon SageMaker Pipelines using the visual pipeline designer. A pipeline is a directed acyclic graph (DAG) of steps. Connect steps on the canvas, save the pipeline, and run or monitor executions from the Pipelines pages in Studio. Prefer prefixes under the SageMaker default bucket for step inputs and outputs.
| Node | Description |
|---|---|
| Run notebook or code | Execute a custom Python script or notebook as one of the steps in your pipeline. |
| Run callback | Execute a custom callback that pauses pipeline execution and waits for an external process or human approval before proceeding. |
| Run lambda function | Invoke an AWS Lambda function as part of your pipeline for lightweight or external integration work. |
| Process data | Runs a SageMaker Processing job (or EMR / EMR Serverless) to execute your processing script in a container. |
| Train model | Starts a model training job and writes model artifacts to Amazon S3. |
| Fine-tune model | Fine-tunes a JumpStart / foundation model on a new dataset (transfer learning). |
| Register model | Catalogs a model version in the SageMaker Model Registry (model package group). |
| Create model | Creates a SageMaker model object from artifacts + an inference container image. |
| Deploy model (endpoint) | Deploys a model to a real-time SageMaker endpoint. |
| Deploy model (batch inference) | Runs batch transform to score a dataset in S3 without a persistent endpoint. |
| Condition | Branches the DAG (then / else) based on step properties or metrics. |
| Fail | Stops the execution path with an optional custom error message. |
Common verified patterns:
- Process data alone (script + mounts) for preprocessing demos.
- Fine-tune model → Create model (step variable Fine-tuning Model Artifacts + inference ECR URI).
- Create model → Deploy model (batch inference) for offline scoring (recommended pipeline “deploy” path in Studio UI).
- Real-time hosting: prefer Deployments → Endpoints or Model Registry Deploy when the Pipelines Deploy model (endpoint) form is blocked by managed instance scaling (see that node below).
Run notebook or code
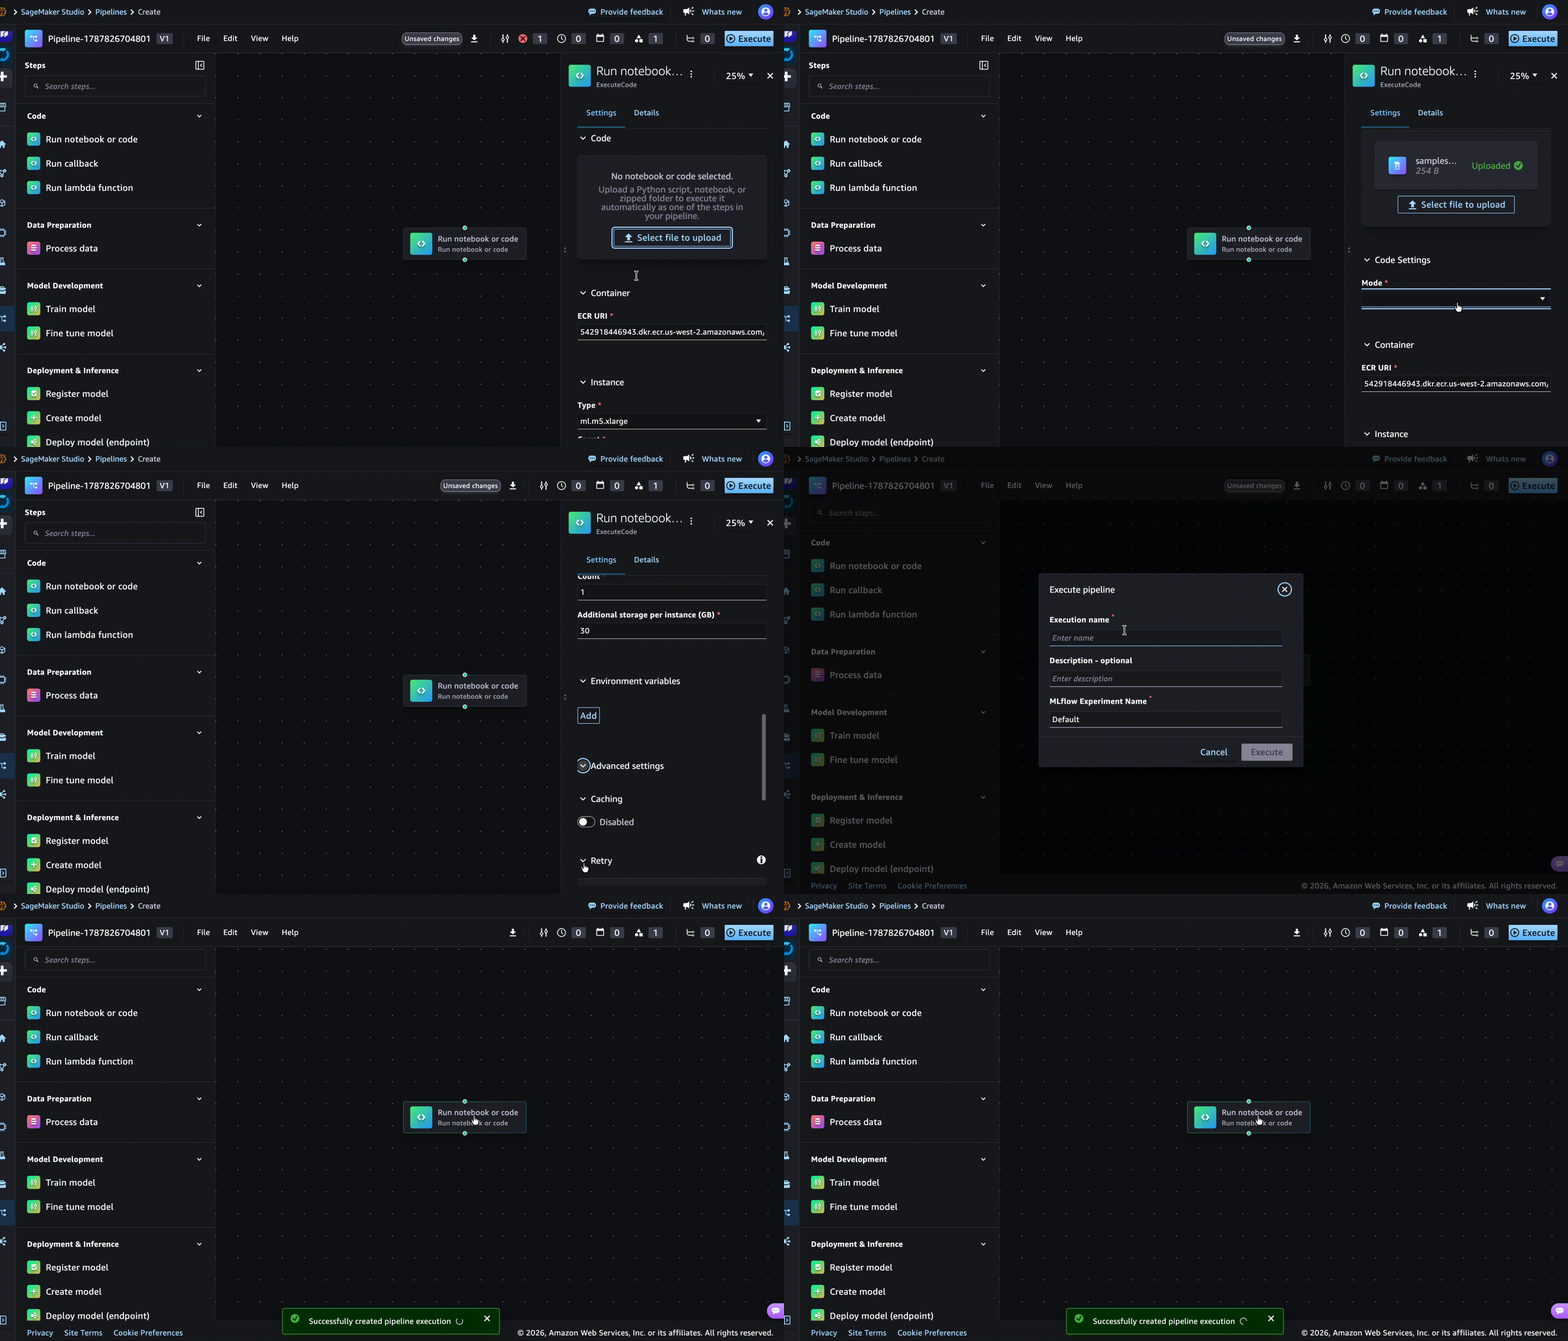
Runs your notebook or Python script as a SageMaker training-style job. Use it for custom evaluation, packaging, or glue logic inside the DAG.
| Setting | What to provide |
|---|---|
| Mode | Notebook, Python function, or script (as offered in the form). |
| Code | Upload or select the notebook / .py file; for functions, set the handler as file.py:function_name. |
| Instance | CPU or GPU type sized to the workload. |
Stdout from a script often goes to CloudWatch only. To persist files for later steps, write under training output paths such as /opt/ml/model or /opt/ml/output/data so SageMaker uploads them to S3. See How SageMaker processes training output.
Run callback
Pauses the pipeline until an external system (or human approval) completes the callback. Use for manual gates or integrations that cannot run inside SageMaker compute. Configure the callback token / external process according to the Studio form and resume the execution when the external work finishes.
Run lambda function
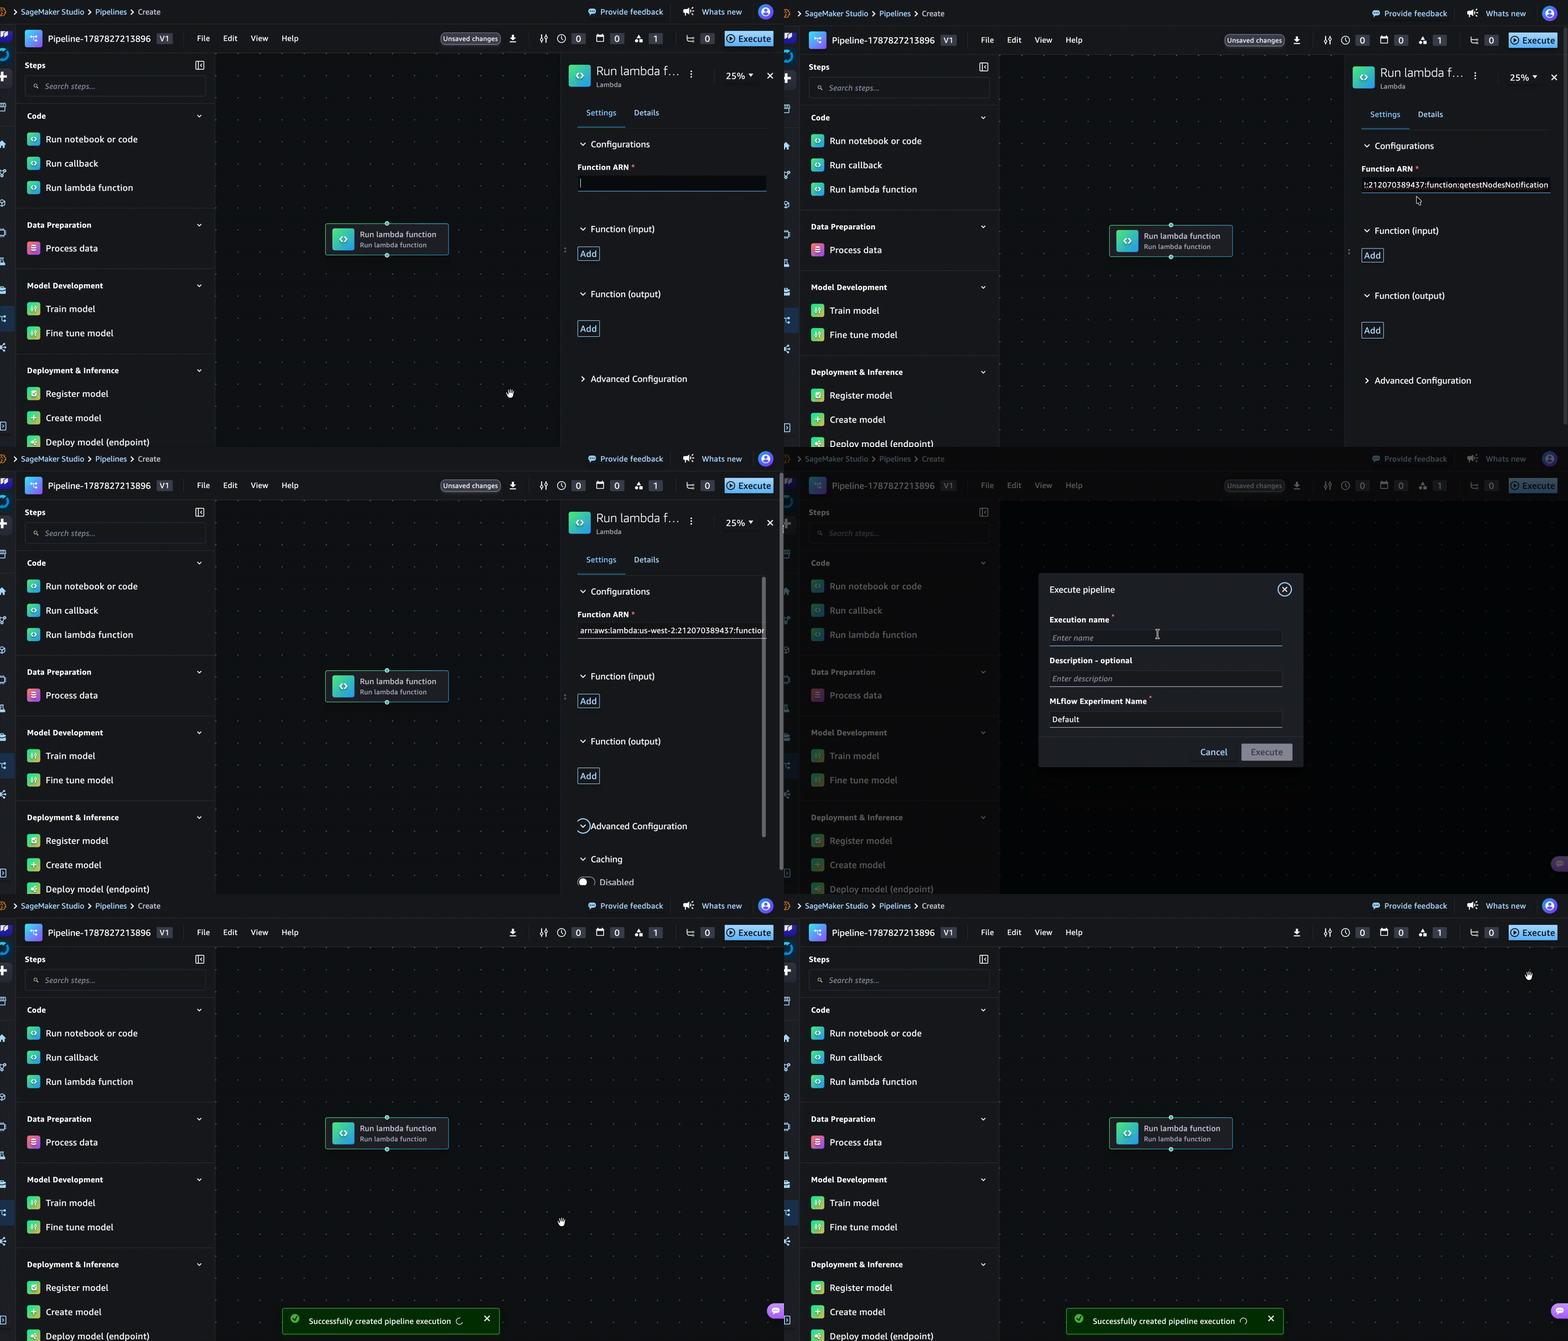
Invokes a Lambda function you manage. Use for lightweight validation, notifications, or calling other AWS APIs without standing up a processing or training job. Provide the function name/ARN and any payload parameters the form requires. Ensure the pipeline execution role can invoke that function.
Process data
For SageMaker (managed) mode, treat the step as “run my script in this image,” not as a built-in ETL. The Image URI is only the runtime.
| Setting | What to provide |
|---|---|
| Mode | SageMaker (managed) unless you already have EMR / EMR Serverless. |
| Image URI | Processing image for your Region (for example, us-west-2 sklearn: 246618743249.dkr.ecr.us-west-2.amazonaws.com/sagemaker-scikit-learn:1.2-1-cpu-py3). Resolve with image_uris.retrieve(framework="sklearn", region="us-west-2", version="1.2-1", py_version="py3", instance_type="ml.m5.xlarge"). |
| Container entrypoints | Typically python3 and /opt/ml/processing/input/code/<your_script>.py as separate items. |
| Container arguments | Optional CLI flags your script reads. |
| Data (input) | One channel per mount. Map each S3 URI to a local path inside the container. Common pattern: script → /opt/ml/processing/input/code; dataset → /opt/ml/processing/input. |
| Data (output) | Local folder(s) your script writes (for example /opt/ml/processing/output). SageMaker uploads those to S3. print goes to CloudWatch only. |
Do not mount a dataset URI at the code path (or the reverse). If entrypoints look for /opt/ml/processing/input/code/preprocess.py but you only mounted data.csv there, the job fails with No such file or directory. Prefer script and data prefixes under the SageMaker default bucket. See Run a Processing Job with scikit-learn.
Train model
Starts a generic training job (BYOC-style). Unlike Fine-tune model, you supply the training image, channels, output path, and hyperparameters yourself.
| Setting | What to provide |
|---|---|
| Training image (ECR URI) | Framework training image for your algorithm. |
| Input channels | S3 URIs for training (and optional validation) data. |
| Output artifact location | Prefix under the SageMaker default bucket (for example s3://sagemaker-<region>-<account-id>/train-out/). |
| Instance / hyperparameters | Type, count, and algorithm-specific hyperparameters. |
After success, the full artifact path looks like s3://…/<job-name>/output/model.tar.gz. Downstream Create model must use that file path (or a step variable), not only the output prefix.
Fine-tune model
Fine-tunes a JumpStart / foundation model on a new dataset. JumpStart supplies the training container and default artifacts when you select the model—you typically do not fill a separate training ECR URI on this node.
| Setting | What to provide |
|---|---|
| Model (input) | JumpStart model (accept EULA when prompted). |
| Training dataset | Default JumpStart example dataset, or your own S3 prefix (format must match the model card). |
| Model (output) / output location | Prefix under the SageMaker default bucket (for example …/FTResults). |
| Instance / hyperparameters | Supported instance (for example ml.g5.2xlarge for Llama 3.2 1B) and epochs, batch size, and related knobs. |
Wire the next step with Step variable → Fine-tuning Model Artifacts (full model.tar.gz URI), not Fine-tuning Output S3Uri (that is only the output prefix and causes Create model failures such as “Could not find model data at …/FTResults”).
Register model
Adds a version to a Model package group in the SageMaker Model Registry. Approval status controls deploy readiness in the registry UI; approved versions appear under Models → Registered models, not under Deployable models.
| Setting | What to provide |
|---|---|
| Artifact type | Bring your own model, Jobs, or JumpStart (JumpStart can prefill image/artifacts). |
| Artifact source | S3 URI to model.tar.gz, container/artifactory URI, or ARN—as the form describes. Prefer the SageMaker default bucket. |
| Container (ECR URI) | Inference image matching the artifact (for XGBoost in us-west-2, for example 246618743249.dkr.ecr.us-west-2.amazonaws.com/sagemaker-xgboost:1.7-1; for Llama-family LLMs, an LMI / djl-inference image). |
| Model approval status | Often Pending until review; set Approved before registry Deploy. |
| Custom metadata | Optional key-value tags. |
To deploy from the registry in Studio UI: Models → Registered models → Model Groups → version → Deploy (requires Approved status and a valid inference specification). See Deploy a Model in Studio.
Create model
Builds a SageMaker model object from weights + an inference container. Use after Train or Fine-tune, and before batch or endpoint deploy.
| Setting | What to provide |
|---|---|
| IAM role | Studio / datalab execution role. |
| Model (input) → Location (S3 URI) | Full path to model.tar.gz, or Step variable → Fine-tuning Model Artifacts (not Output S3Uri, and not a JumpStart catalog display name alone). |
| Container type | Bring your own container when you supply the image URI. |
| Location (ECR URI) | Full inference image URI (see below). |
If deploy fails with missing ModelDataUrl, Create model did not receive a valid artifact URI. Use a step variable or a full s3://…/model.tar.gz path—not only a training output prefix or catalog name.
ECR URI format: <account>.dkr.ecr.<region>.amazonaws.com/<repository>:<tag>. Examples:
- LLM / LMI (
us-west-2):763104351884.dkr.ecr.us-west-2.amazonaws.com/djl-inference:0.28.0-lmi10.0.0-cu124 - XGBoost (
us-west-2):246618743249.dkr.ecr.us-west-2.amazonaws.com/sagemaker-xgboost:1.7-1
Resolve images in a notebook with from sagemaker.core import image_uris then image_uris.retrieve(...), or browse Available Deep Learning Containers Images. Use an inference image in the same Region as Studio.
Typical order: Fine-tune model → Create model → Deploy model (batch inference) or endpoint hosting via Deployments.
Deploy model (endpoint)
Creates a real-time endpoint from a SageMaker model. Documented Studio pattern: connect Create model (or Register model), then set Model (input) to Inherit model → Step variable → upstream Model Name—not a JumpStart catalog card alone, and not an S3 URI in the Model name field.
| Setting | What to provide |
|---|---|
| Model (input) | Inherit model from Create model / registered package. |
| Endpoint name | Unique name per execution. |
| Instance type / count | Supported type for the model (for example ml.g5.2xlarge for small LLMs, ml.m5.xlarge for XGBoost). |
| Maximum count | Studio often requires this field; setting it emits ManagedInstanceScaling in the endpoint config. |
Known Studio limitation: For classic model-based endpoints (Inherit model with ModelName on the production variant), CreateEndpointConfig rejects ManagedInstanceScaling—it is only valid for inference component endpoints. The visual Deploy form still requires Maximum count, which writes that block, so Save / run can fail with ManagedInstanceScaling is only supported for inference component endpoints. Setting Maximum count equal to Count does not disable it. For real-time hosting in the UI, use Deployments → Endpoints or Registered models → Deploy. For a Pipelines deploy demo that runs reliably in Studio, use Deploy model (batch inference) instead.
Also note: Retry on a failed execution reuses the definition frozen at start time—after fixing settings, Save and start a new execution (Execute), not only Retry. Capacity errors such as InsufficientInstanceCapacity are AWS-side shortages, not account quotas; try another instance type or retry later (raise SageMaker endpoint usage quotas only when you see limit-exceeded errors).
Deploy model (batch inference)
Runs batch transform: score an S3 dataset, write predictions to S3, then tear down compute. No persistent endpoint and no ManagedInstanceScaling issue.
Recommended canvas: Create model → Deploy model (batch inference) with Inherit model.
| Setting | What to provide |
|---|---|
| Model (input) | Inherit model → Step variable → Create model Model Name. |
| Data (input) | S3 URI of the score file or prefix (under the SageMaker default bucket). For built-in XGBoost CSV: Content type text/csv, Split type Line, no header, feature columns only (column count must match the model—for example 50 features for the Amorphic test xgbmodel.tar.gz). Without text/csv, XGBoost defaults to libsvm and returns HTTP 415. |
| Data (output) → Location | Output prefix (for example s3://sagemaker-…/batch-infer-out/). |
| Assemble With | Line for line-oriented CSV outputs. |
| Accept | text/csv for XGBoost CSV. |
| Instance | For example ml.m5.xlarge, count 1. |
| Batch strategy | Prefer SingleRecord for simple CSV demos; MULTI_RECORD is optional tuning. |
| Data capture Location | Optional separate prefix (for example …/batch-capture/) if the form requires it—not the same as input or prediction output. |
| Data joins / env / advanced | Optional; leave empty for a smoke test. |
Success: pipeline step Succeeded and *.out files under the output prefix (same basename as each input file).
Condition
Evaluates an expression on upstream properties or metrics and routes to Then or Else steps (for example, register the model only if an evaluation score exceeds a threshold). Connect both branches on the canvas and configure the comparison in Settings.
Fail
Terminal step that fails the execution path with an optional message (for example when a Condition Else path runs). Use after Condition to make unsuccessful quality gates explicit in execution history.
Deployments (endpoints)
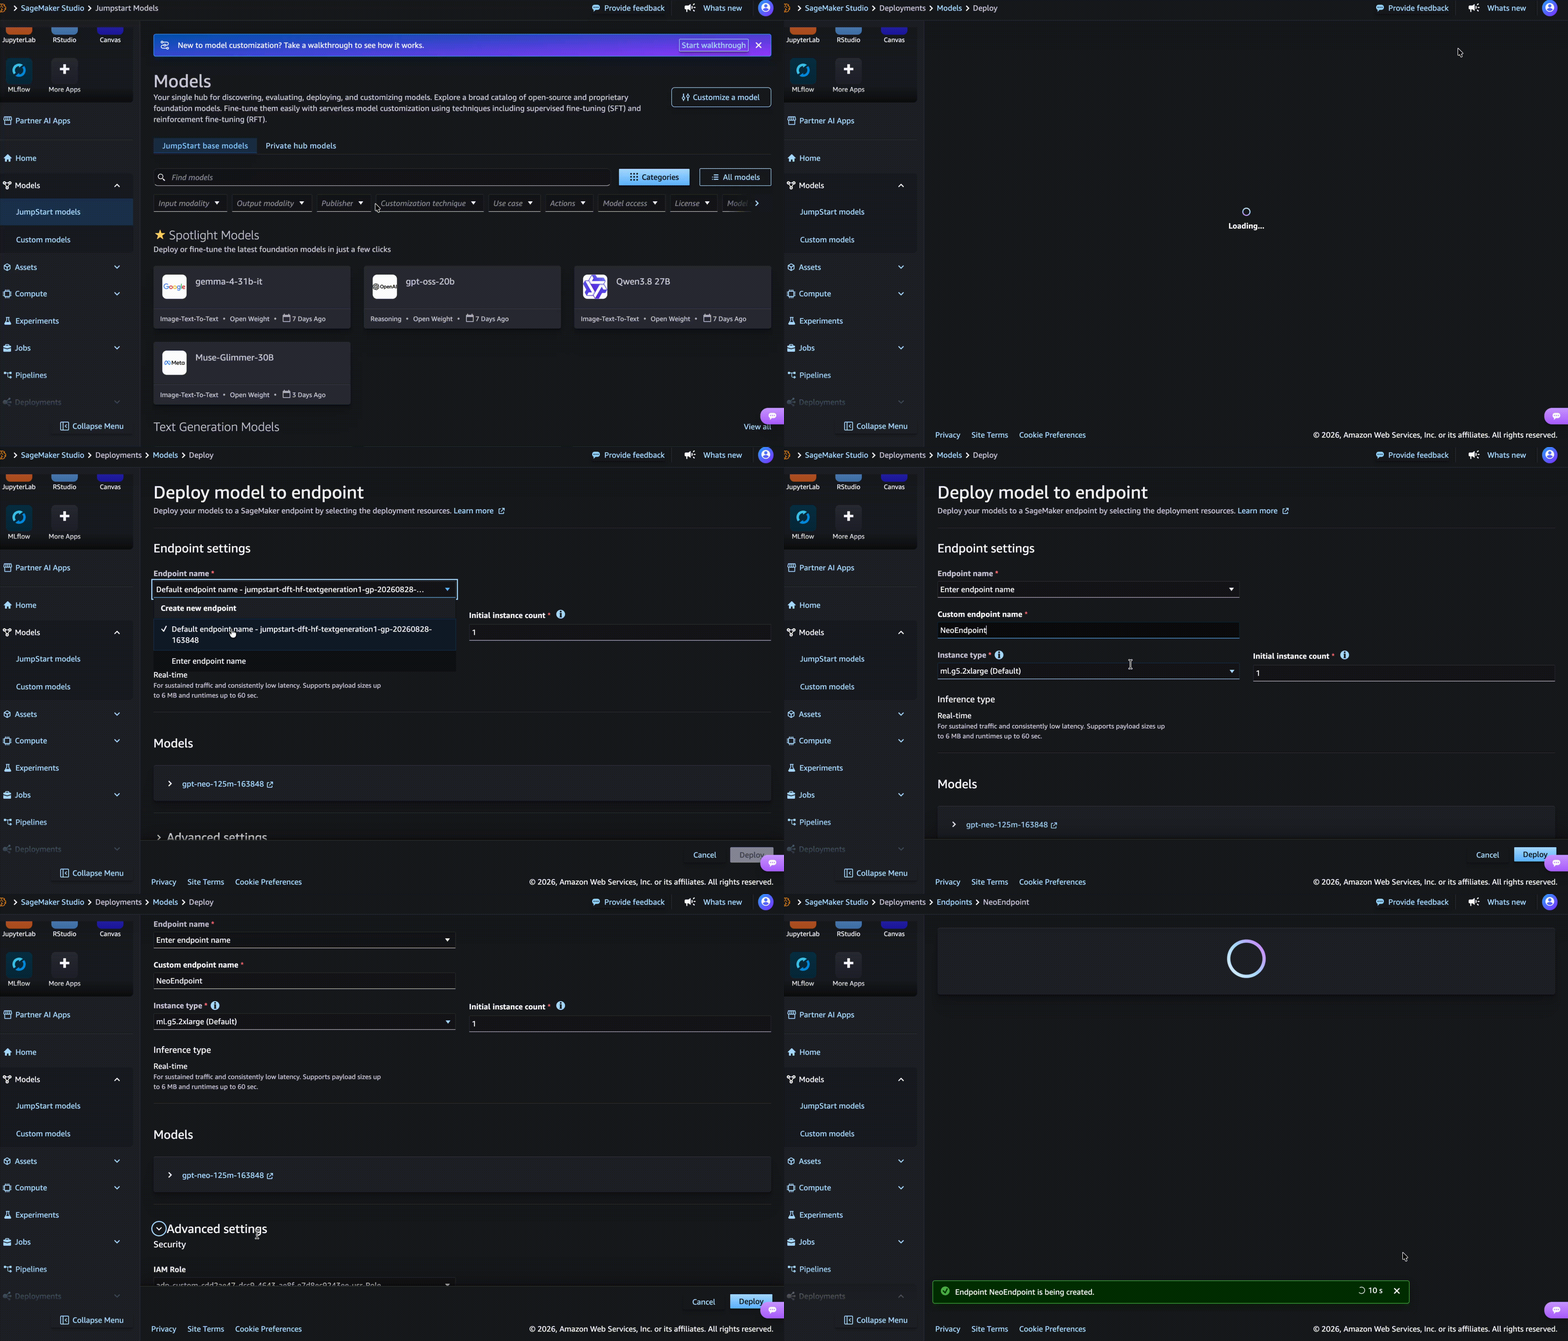
Open Deployments → Endpoints (or deploy from a model details page) to host models for real-time inference in Studio.
You can deploy:
- Your models — models you trained, customized, or registered and that appear as deployable in Studio.
- JumpStart models — pretrained models from the JumpStart catalog. When you deploy a JumpStart model, Studio lists only instance types that the model supports. For some popular JumpStart LLMs, Studio also surfaces alternate configurations that balance cost and performance.
From the create-endpoint / deploy flow in Studio you choose the model (or add models for multi-model / inference-component style deployments where supported), instance type and count, and related hosting settings, then deploy and monitor endpoint status from the Deployments pages.
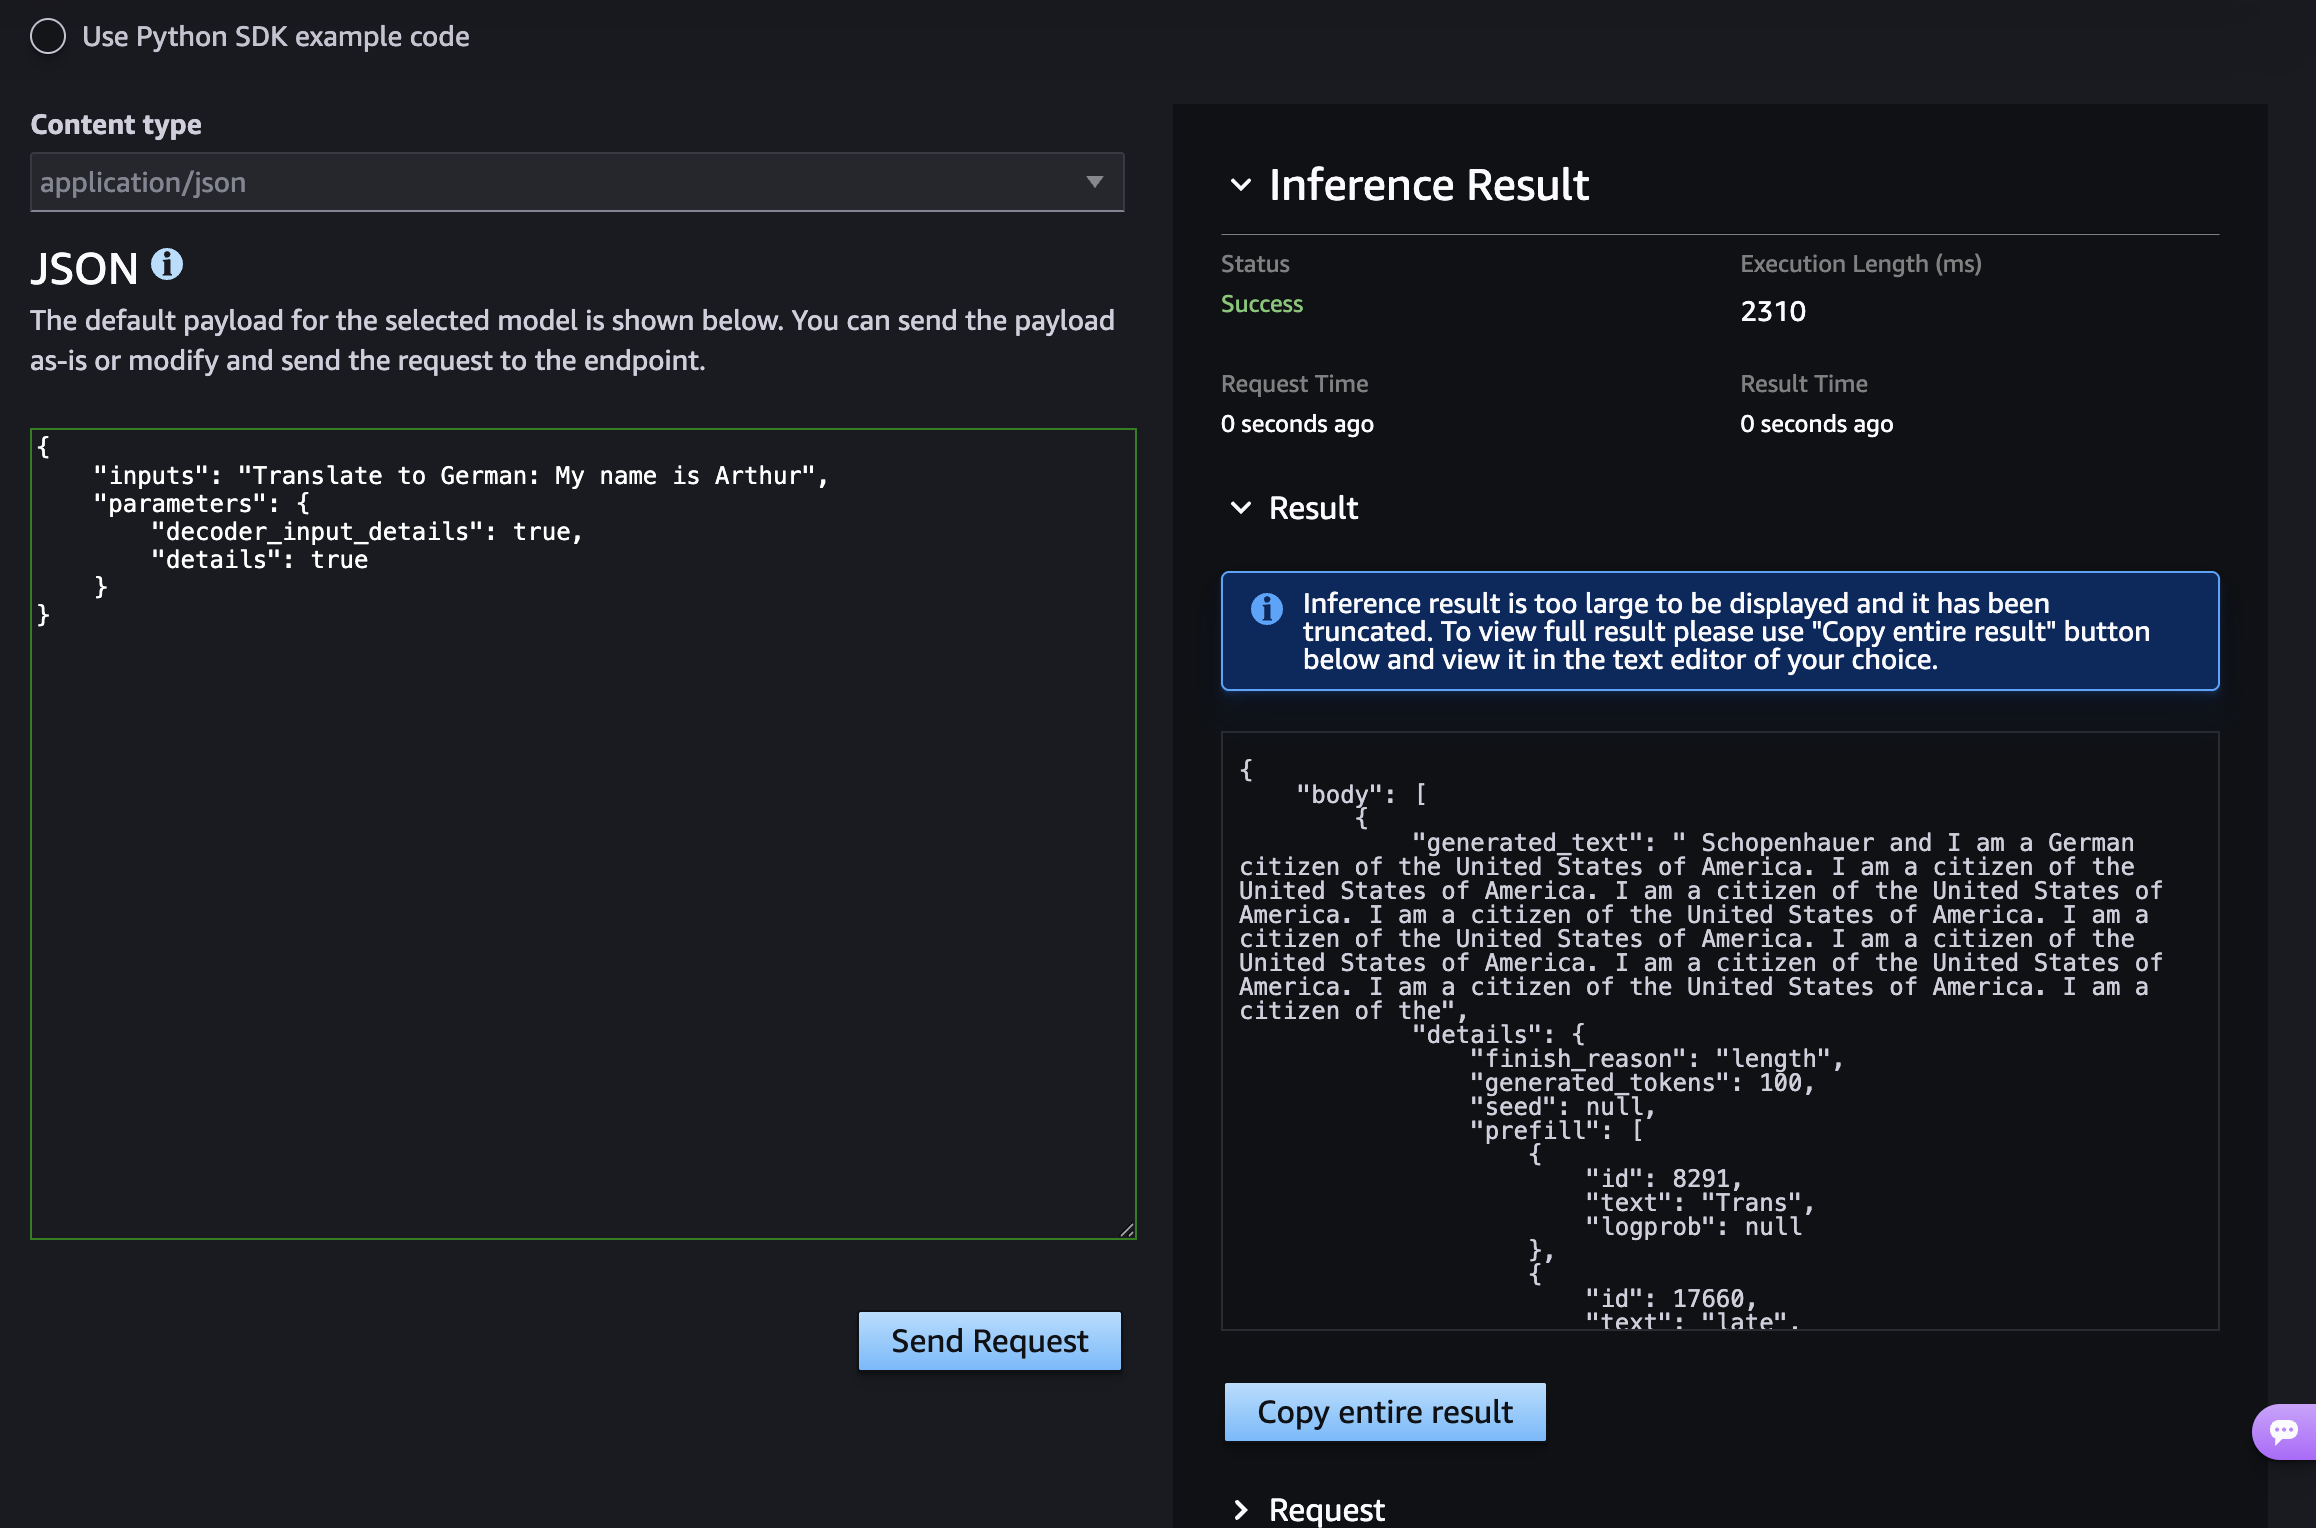
After the endpoint reaches InService, you can query the model from the playground on the endpoint’s details page in Studio, or invoke it from JupyterLab (for example with the SageMaker runtime / Predictor APIs in a notebook).
Studio Benefits
-
Amazon SageMaker Studio offers a unified experience for ML development. ML teams can perform the complete ML workflow in a single web-based visual interface.
-
Access to pre-trained ML models, built-in algorithms, and prebuilt ML solutions.
Studio Use cases
-
Unify your end-to-end ML development in SageMaker Studio with the most comprehensive ML tools all in one place. SageMaker offers high-performing MLOps tools to help you automate and standardize ML workflows and governance tools to support transparency and auditability across your organization.
-
Build foundation models faster in SageMaker Studio with access to a wide range of publicly available models, notebooks backed by high performance compute for fine-tuning, and ability to scale to distributed training directly from Studio notebooks.
-
SageMaker Studio offers a unified experience to perform all data analytics and ML workflows. Create, browse, and connect to Amazon EMR clusters. Build, test, and run interactive data preparation and analytics applications with Amazon Glue interactive sessions. Monitor and debug Spark jobs using familiar tools such as Spark UI – all right from SageMaker Studio notebooks.
When calling Bedrock models from a studio, a guardrail must be included on every invocation. See Using AI Models and Guardrails.