
SageMaker Notebooks
Amorphic platform provides a way to host Jupyter/IPython notebooks, which are interactive, web-based environments that allow users to create and share documents that contain live code, equations, visualizations, and narrative text.
Notebook Operations
Amorphic provides the following operations for Notebook Data Labs :
| Operation | Description |
|---|---|
| Create Notebook | Creates a notebook in AWS SageMaker and other necessary AWS resources. |
| View Notebook | View the details of an existing notebook. |
| Start Notebook | Start a stopped notebook. |
| Stop Notebook | Stop a running notebook. |
| Schedule Notebook | Create time-based schedules to start and/or stop a notebook. |
| Clone Notebook | Clone a new notebook from an existing notebook. |
| Delete Notebook | Delete an existing notebook. |
| View/Download Notebook Logs | View logs for a notebook instance. |
How to Create a Notebook?

To create an Notebook Data Lab:
- Click on
+ Create Data Lab. - Users will now have an option to either select/upload a template or create from scratch.
- Select the Data Lab Type as
Notebook. - Fill in the details shown in the table:
| Attribute | Description |
|---|---|
| Data Lab Name | Give your notebook data lab a unique name. |
| Description | Describe the notebook's purpose and relevant details. |
| Keywords | Add relevant keywords to the notebook. |
| Cost Tags | Select the cost tags that need to be attached to the newly created Data Lab for cost monitoring. |
| Instance Type | Choose the type of ML compute instance to launch the notebook. Users can select from the list of allowed notebook instance types. By default, the instance type used will be ml.t2.medium. |
| Volume Size (In GB) | ML notebook storage volume size in GB. Value should be between 5 GB and 16000 GB. By default, the storage allocated will be 10 GB. |
| Root Access | Select this option to enable root access to the notebook instance. By default, this option will be disabled. |
| Interactive Sessions | User can select this option to enable or disable Glue sessions for the notebook instance. By default, this option will be disabled. When enabling the feature, ensure that you select the system-generated Lifecycle Configuration "enable-glue-session-v2" |
| Internet Access | This setting controls whether the notebook instance can access the internet. If you disable this option, the notebook instance can only access resources inside your VPC and will not be able to use Amazon SageMaker training and endpoint services (unless you set up a NAT Gateway in your VPC). By default, this option will be disabled. |
| Shared Resources Access | Select the shared resources (parameters, shared libraries, domains, etc.) required for the notebook using this option. |
| Lifecycle Configuration | Name of the Lifecycle Configuration to use for the notebook instance. By default, this option will be set as N/A. For sessions enabled notebooks, Please manually select the system-generated LCC named "enable-glue-sessions-v2" |
| Datasets Access | Select datasets with read, write, or read-only file-level access required for the notebook. |
| Code Repository | Select the code repositories required for the notebook. Here, the user can provide access to one Default Code Repository along with multiple Additional Code Repositories. |
- For getting AI powered code suggestions, users can attach the
enable-code-whispererlifecycle configuration to the notebook. Users can then navigate to the Data Lab URL and select the "Resume Suggestions" option from theCode Whispererextension available in the bottom left corner of the Jupyter Lab UI. - While providing Domain Access to the notebook, users will also need to have read/write access to all the datasets (existing and newly created if any) under the selected domains.
- If you grant
read-onlyaccess to domains, you won't be able to queryLake Formationdatasets within that domain. However, you'll still have access to the files via S3 APIs. - To utilize GitLab, GitHub or Bitbucket code repositories in an internet-disabled notebook, it is necessary to whitelist the application proxy with the corresponding repository domains.
- View type of datasets can be attached only under the
Datasets Read Accesssection. - Read-only file-level access can be provided only for datasets with
S3as the target location.
Enabling root access could compromise NIST compliance. It is recommended to disable root access unless absolutely necessary.
You can set up or create a new notebook instance and use your IPython notebook to perform model training. You can call Python SageMaker SDK to create a training job.
Once a training job is created, you can use the S3 model location information to create a model in the Amorphic portal. For accessing the datasets inside the IPython notebooks, you can check the dataset details for the S3 location information.
For the purpose of creating a SageMaker model in the notebook, the user can use the ml-temp S3 bucket. Amorphic Notebooks have write access to the ml-temp bucket (for example, s3://cdap-us-west-2-484084523624-develop-ml-temp). Please note that this S3 bucket is almost the same as the dataset S3 path, except for the ml-temp at the end. This ml-temp bucket can be used to create a training job and upload a model tar file. This model file location can then be used to create a model using the "Artifact Location" of Amorphic model (see model creation section).
Your data will be stored under ml-temp/<notebook id>/ in the S3 bucket.
You can use the S3 location mentioned here to read the files related to the training dataset and save the output SageMaker model tar file for Amorphic model object creation purpose.
Notebook Details
Amorphic Notebook Data Labs contain all the following information:
| Type | Description |
|---|---|
| Data Lab Name | Resource name which uniquely identifies a notebook. |
| Description | A brief description of the notebook. |
| Status | Status of the notebook. List of possible statuses include : Pending, InService, Stopping, Stopped and Deleting. |
| Volume Size (in GB) | The size of the ML storage volume attached to the notebook instance (in GB). |
| Instance Type | Instance type of the SageMaker Notebook instance. |
| Sessions | Flag to identify whether glue sessions are enabled for the notebook instance. |
| Keywords | Keywords associated with the notebook. |
| Lifecycle Configuration | Name of the lifecycle configuration attached to the notebook instance. |
| Direct Internet Access | Sets whether SageMaker provides internet access to the notebook instance. |
| Root Access | Shows whether root access is enabled for the notebook instance. |
| Estimated Cost | Approximate cost incurred since the creation/last modified time. |
| Linked Resources | List of all resources linked to the notebook. |
| Extra Resource Access | List of all resources linked to the notebook. |
| Message | The Message field displays information based on the notebook's status. |
| Data Lab URL (Go to Data Lab) | URL to connect to the Jupyter server from notebook instance. |
| Activity Logs | List of all activities performed on the notebook. |
- If the notebook status is failed, the Message field displays failure information.
- If you do not have all the datasets, code repositories and views access required for the notebook, the Notebook URL will not be displayed and the Message field will show missing resource access information.
Following details are displayed for a Notebook :

In the details page, Estimated Cost of the notebook is also displayed to show the approximate cost incurred since the creation/last modified time.
Edit Notebook
The Edit Notebook page follows the same sequence as the create page. Users can choose to update the following configurations :
- Basic Configuration: You can use this section to update all the basic details of the notebook (description, volume size, lifecycle configuration, etc.) .
- Resource Access: You can use this section to update the resources linked to the notebook.
Interactive SessionsandInternet Accesscannot be modified once the notebook is created.- The Notebook must be in Stopped state in order to edit compute configurations (Volume Size, Instance Type, Root Access, etc).
- From version 3.3, a user-initiated update (e.g., editing the description or saving the configuration) will automatically upgrade older notebooks from deprecated JupyterLab 1/3 to JupyterLab 4 before AWS ends support on February 28, 2026. Backups are recommended before updating.
Start Notebook
When a notebook is in the stopped state (stopped either manually or by a notebook schedule), user has an option to resume or start the notebook again. The option is available in the UI and can be triggered by pressing the Start Data Lab play button icon situated beside the share button.
Stop Notebook
If an notebook is in running state, user is provided with the option to stop it. This feature is useful to reduce incurring costs on running notebooks. The option is available in the UI and can be triggered by pressing the Stop Data Lab button situated beside the share button.
To stop a notebook automatically at a configured time, create a stop-type notebook schedule.
Clone Notebook
To help create notebooks with similar configurations, an option to clone an existing notebook is available. Be sure that the name is different while going through the metadata. The option is available in the UI and can be triggered by pressing the clone option from the drop down that appears after clicking on the three dots situated at the extreme right of the notebook menu bar.
Delete Notebook
If you have sufficient permissions, you can delete the notebook. Deleting a notebook is an asynchronous operation. When triggered, the status will change to Deleting and the notebook will be deleted from AWS SageMaker. Once the notebook is deleted from AWS SageMaker, the associated metadata will also be removed. Any notebook schedules created for the datalab are cleaned up as part of deletion.
The notebook must be in Stopped state in order to perform the delete operation on it.
Notebook Schedules
Notebook schedules automatically start and/or stop a SageMaker Notebook datalab at a configured time. Use them to make a notebook available during working hours and stop it afterward to reduce cost. A stop-only schedule replaces the former Auto Stop feature for automatic cost control.
Schedules are available only for Notebook datalabs (not Studios). They are time-based start/stop windows, not job schedules: there is no run-now, clone, or schedule execution history. For job, data pipeline, and event schedules, see Schedules.
Notebook schedules are also distinct from Lifecycle Configurations, which are shell scripts that run when a notebook is created or started.
Viewing schedules requires at least read access to the datalab. Creating, updating, enabling, disabling, or deleting a schedule requires editor or owner access.
Auto Stop has been deprecated and replaced by the auto start/stop schedules functionality described in this section. Configure a stop-only schedule, or a start+stop window, instead of the former Auto Stop timer on notebook create/edit. Existing auto stop schedules that are yet to fire have been migrated to priority 1 stop-only schedules within the new framework.
Stopped notebooks will still incur costs. It is recommended to delete the notebook if it is no longer required.
Schedule attributes
| Attribute | Description |
|---|---|
| Schedule Name | Unique name for the schedule within the datalab. Must start with a letter and can contain letters, numbers, and underscores (3–120 characters). |
| Description | Optional description of the schedule (maximum 500 characters). |
| Priority | Rank that decides which schedule wins when multiple schedules on the same notebook would conflict (for example, a stop firing while another high priority window is active will do nothing). Use it to prefer business-hours windows over cost-saving stops, or one recurring pattern over another. A lower number is higher priority (1 is the highest). Priorities are unique; creating or changing a priority reorders the other schedules on that datalab. On create, the value must be between 1 and (existing schedule count + 1). On update, it must be between 1 and the current schedule count. The user can see the current schedule count in the notebook schedules listing page, above the list. A datalab can have at most 20 schedules. |
| Enabled | Whether the schedule will fire. Disabling a schedule stops future start/stop actions without deleting the schedule. |
| Start expression | Optional at create. If included, this expression stays on the schedule for its lifetime and can only be modified, not added or removed later. |
| Stop expression | Optional at create. If included, this expression stays on the schedule for its lifetime and can only be modified, not added or removed later. |
| Active | Whether this window schedule currently owns the notebook’s active start window (set when its start fires as the highest-priority window; cleared on its stop or if a higher-priority window takes over). Shown for window schedules (both start and stop). This is not the same as Enabled: Enabled means the schedule will fire; Active means it is the current window in effect. |
Priority example: A priority 1 window schedule is active (notebook is in its start window). A priority 2 stop-only schedule fires at the same time. The notebook is not stopped—the higher-priority (P1) window wins over the lower-priority (P2) stop.
At least one of Start or Stop is required when you create a schedule. That choice sets the schedule shape for life: start-only, stop-only, or a window (both). Use a stop-only schedule when you only need automatic stop (the replacement for Auto Stop). Use a window (both start and stop) when the notebook should come up and shut down on a recurring pattern.
Schedule expression fields
Each Start or Stop expression uses the following fields. All times are in UTC.
| Field | Description |
|---|---|
| Schedule Type | one-time, daily, weekly-recurring, or monthly-recurring. Chosen at create time for that side and cannot be changed later. |
| Schedule Time | Time of day in HH:MM:SS (UTC). |
| Schedule Date | Required for one-time expressions (YYYY-MM-DD, must be in the future). Must not be provided for recurring types. |
| Recurrence Days | Required for weekly-recurring (1–7, Monday–Sunday) and monthly-recurring (1–31). Must not be provided for one-time or daily. |
- After create, you cannot add a Start or Stop expression that was not originally defined, and you cannot remove one that was. You can only change the values of existing expressions (time, date, or recurrence days). The expression type cannot be changed.
- Notebook schedules do not support run-now, clone, or execution history.
Create a schedule
To create a notebook schedule:
- Open the notebook datalab details page.
- Open the Schedules tab.
- Select
Add New Schedule(orCreate Schedule). - Provide a name, priority, and enabled state.
- Configure at least one of Start or Stop. If you need both start and stop, include both now — you cannot add the missing side later. In that case you would have to create a new schedule matching your requirements.
- Save the schedule.
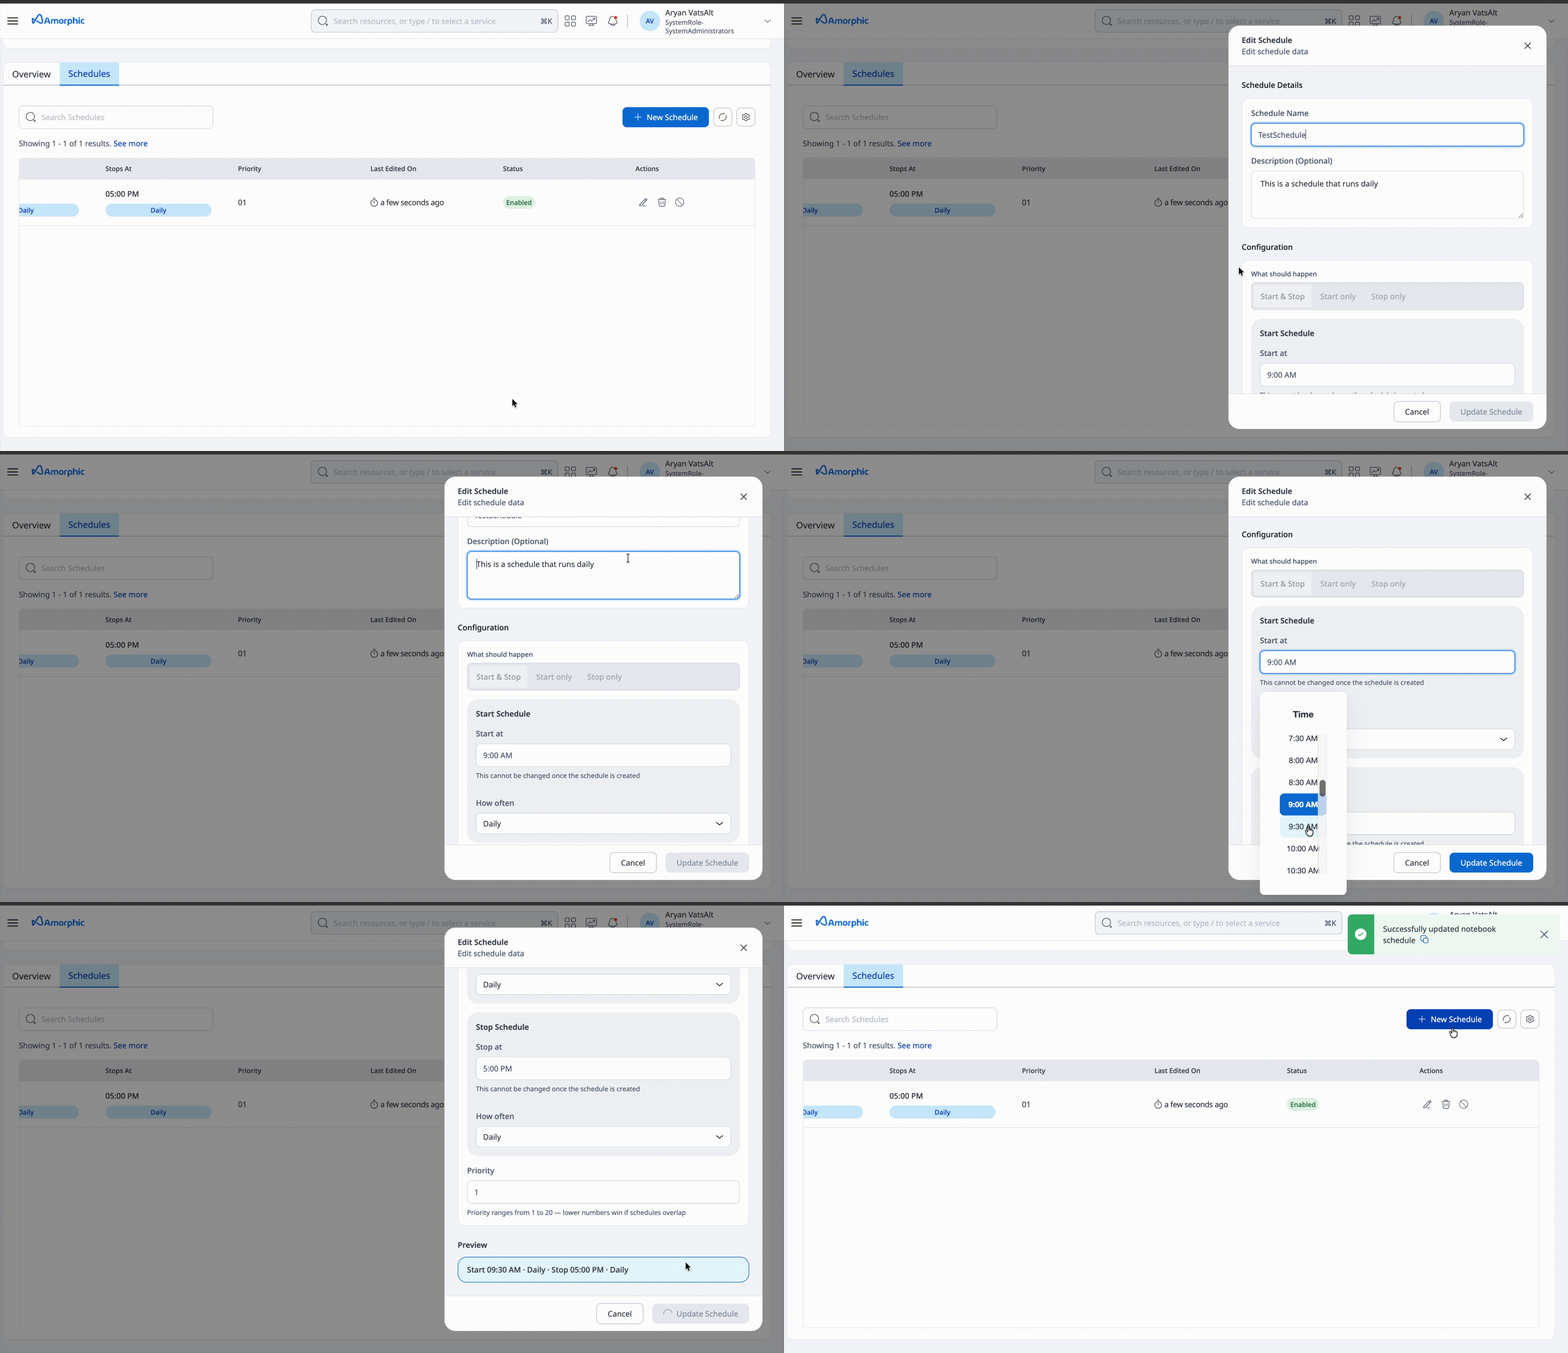
Update a schedule
You can update the schedule name, description, priority, enabled state, and the values of existing Start/Stop expressions.
You cannot:
- Add a Start or Stop expression that was not created with the schedule.
- Remove a Start or Stop expression that already exists.
- Change the Schedule Type of an existing expression (for example, from daily to weekly).
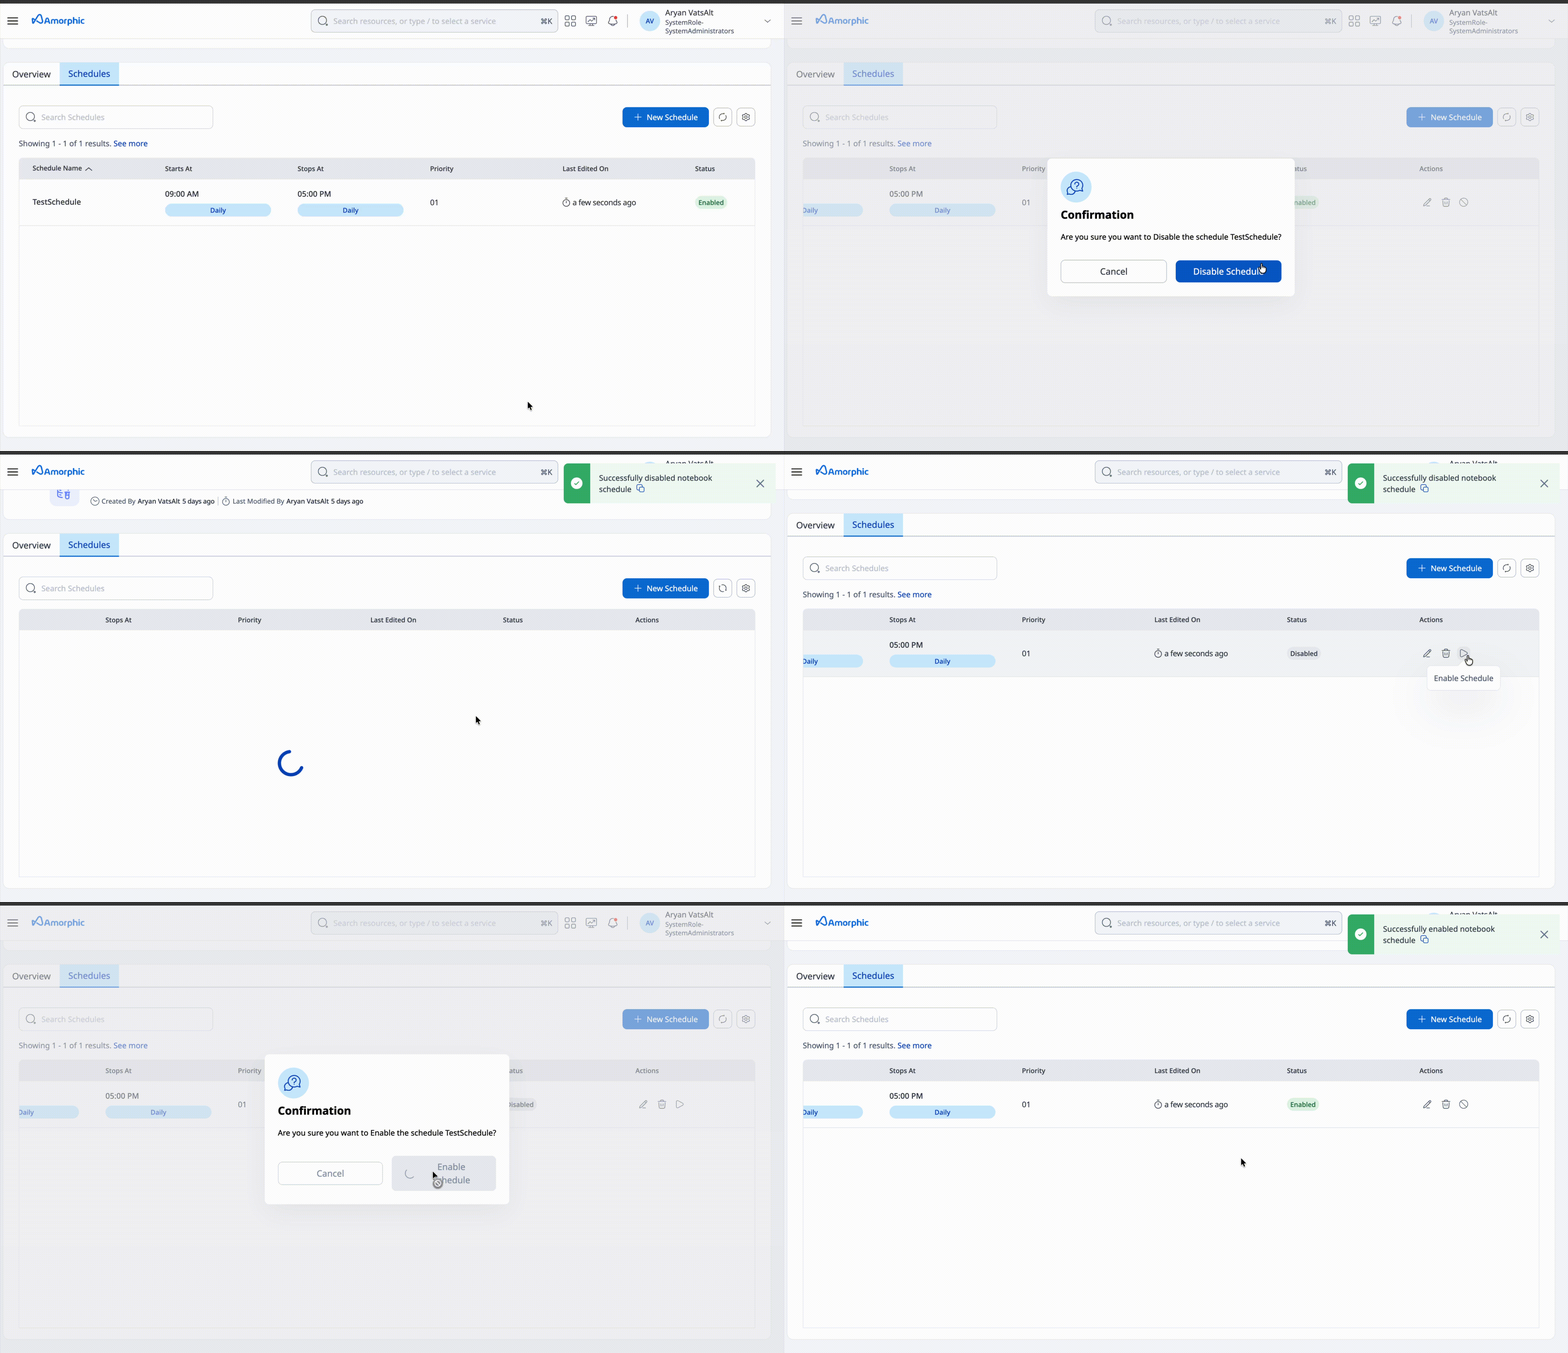
Enable or disable a schedule
Enable a schedule so that its start and/or stop actions fire at the configured time. Disable it to pause future fires without deleting the schedule.
- Open the schedule from the notebook Schedules tab.
- Choose Enable or Disable.
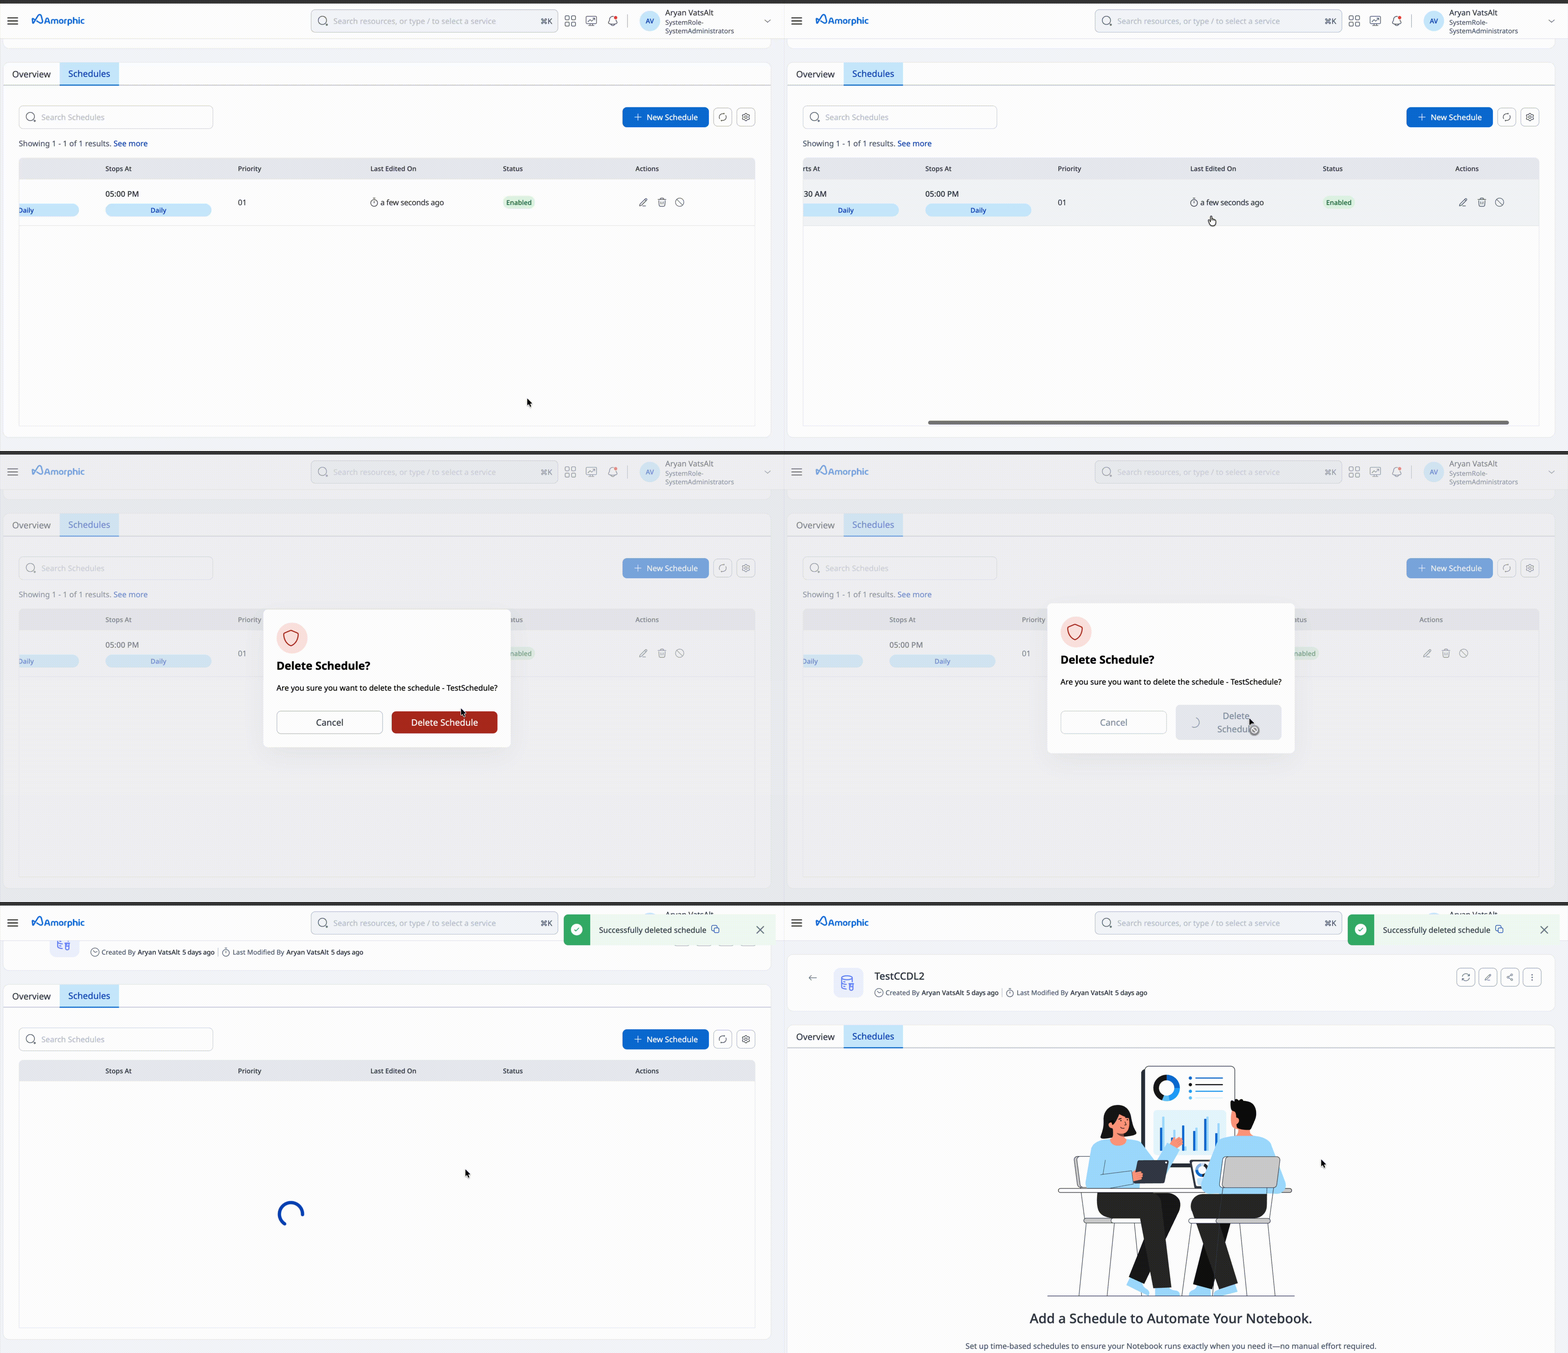
Delete a schedule
- Open the schedule from the notebook Schedules tab.
- Choose Delete and confirm.
Deleting the notebook also deletes all of its schedules.
Notifications
When a schedule actually starts or stops the notebook, Amorphic sends email and push notifications. If the notebook is already in the target state (already running on start, or already stopped on stop), the action is skipped and no notification is sent. If start or stop fails after retries, a failure notification is sent.
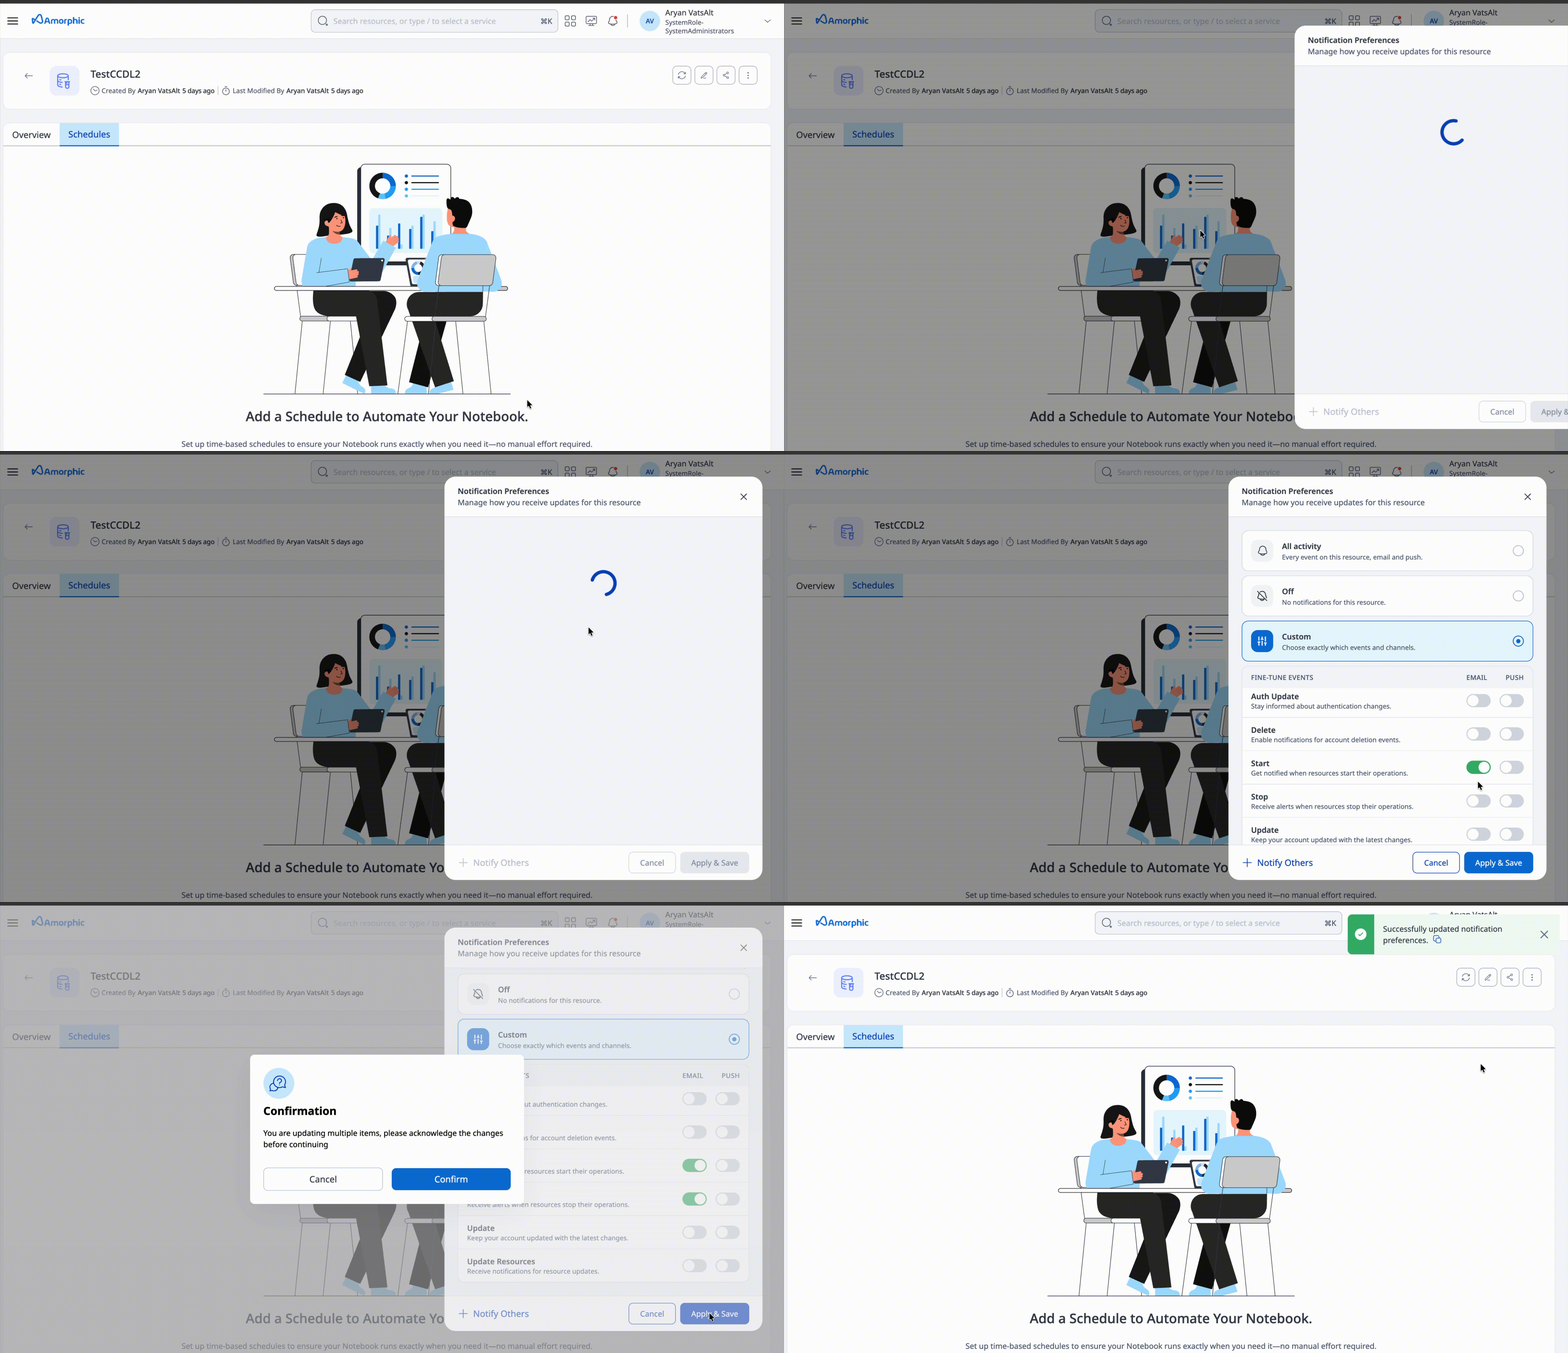
These alerts use the datalab Start and Stop notification categories. They are not a separate schedule-notification type. You must manually subscribe to Start and/or Stop for that datalab (and have Alert Preferences enabled) or you will not receive these emails.
To subscribe:
- Open the notebook datalab.
- Open Notification Settings from the action menu.
- Subscribe to the Start and/or Stop categories for email and/or push.
See Notification Settings — Datalabs for the full list of datalab notification categories.
Notebook Logs
Downloadable logs are now available for notebooks. There can be one or three different types of logs available, depending on the type of notebook being used.
For Interactive Sessions enabled notebooks, there are three types of logs: Creation Logs, Start Logs and Jupyter Logs. For Interactive Sessions disabled notebooks, there is only one type of logs, Jupyter Logs.
The following example shows how to access the creation logs for a Interactive Sessions enabled notebook.

Update Extra Resource Access
To provide dataset, domain, parameter, or shared library access to a notebook in large numbers without hitting IAM inline policy size limits, refer to Provide extra resource access to Jobs and Data Labs.
Glue Session Operations
Amorphic Notebook Data Lab provides operations stated below for an interactive sessions enabled notebook.
| Operation | Description |
|---|---|
| Create Glue Session | Create a Glue session for a notebook. |
| Stop Glue Session | Stop an existing Glue session for a notebook. |
| Delete Glue Session | Delete an existing Glue session for a notebook. |
| View & Download Logs for Glue Session | View and download logs of a Glue session for a notebook. |
Before initiating a Glue session, users also have the ability to configure spark settings using imperative magic commands provided by AWS. Below are some beneficial magic commands provided for user reference. For more information visit the link
| Magic Command | Type | Description |
|---|---|---|
| %help | shows generic help message with many possible commands and their explanation. | |
| %list_sessions | lists all the glue sessions. | |
| %status | show the current glue session status and configuration. | |
| %stop_session | stops the current glue sessions straight from the notebook. | |
| %number_of_workers | int | The number of workers of a defined worker_type that are allocated when a job runs. worker_type must be set too. The default number_of_workers is 5. |
| %worker_type | int | Standard, G.1X, or G.2X. number_of_workers must be set too. The default worker_type is G.1X. |
| %iam_role | String | Specify an IAM role ARN to execute your session with. Default from ~/.aws/configure |
| %additional_python_modules | List | Comma separated list of additional Python modules to include in your cluster (can be from PyPI or S3). |
| %extra_py_files | List | Comma separated list of additional Python files from Amazon S3. |
| %extra_jars | List | Comma-separated list of additional jars to include in the cluster. |
Create Glue Session

The user must create a notebook instance with Interactive Sessions enabled as described in the steps for creating a notebook.
Once the notebook instance is active (if the notebook status is stopped, the user must start the notebook), the user can find the notebook URL link on the details page (Go to Data Lab) and on opening one the link, the user gets redirected
to the Jupyter server. The user then has to create a new Jupyter notebook with Glue Pyspark kernel.
If the user wants to import external libraries or shared libraries into the notebook, use the below Jupyter magics before starting a glue session:
%extra_py_filesfollowed by comma separated list of s3 locations for python files.%extra_jarsfollowed by comma separated list of s3 locations for jar files.%additional_python_modulesfollowed by comma separated list such as "awswrangler,pandas==1.5.1,pyarrow==10.0.0" for external python packages.
For additional details on the magic commands available the user can run the magic command %help.
Users can copy the S3 locations from the notebook details page and ETL libraries page for external and shared libraries respectively for glue enabled notebooks.
An example for adding extra python shared library to the session is shown below, for the amorphicutils library.
# copy the path from "Home -> Transformation -> ETL Library -> Details -> (hover over package path and click copy - use the version you need)"
%extra_py_files s3://<amorphic-etl-bucket>/common-libs/<library-id>/libs/python/amorphicutils.zip
Amorphic also supports external libraries which follow the following pattern, again for the amorphicutils library.
%extra_py_files s3://etl-bucket/<notebook-id>/libs/amorphicutils.zip
The following code example will help the user create a glue session for the notebook.
import sys
from awsglue.transforms import *
from awsglue.utils import getResolvedOptions
from pyspark.context import SparkContext
from awsglue.context import GlueContext
from awsglue.job import Job

glueContext = GlueContext(SparkContext.getOrCreate())
With interactive sessions enabled, notebooks offer the capability to execute SQL commands using Magic commands
%%sql
select * from table
Once the glue session is created, all active, stopped and failed sessions of the notebook can be viewed in the sessions tab of the notebook details page.
Stop Glue Session

Delete Glue Session

If an interactive sessions enabled notebook is stopped, all the glue sessions associated with the notebook will also be deleted.
View & Download Logs for Glue Session

Notebook use case
A use case for Amorphic Notebook Data Lab could be, a company that wants to use machine learning to predict customer churn.
The company can set up a new notebook instance on the Amorphic platform and use IPython notebooks to perform model training. They can call the Python SageMaker SDK to create a training job using the customer churn data stored in the S3 bucket.
Once the training job is complete, the company can use the S3 model location information to create a model in the Amorphic portal. They can access the customer churn dataset inside the IPython notebooks using the dataset details and S3 location information. The ml-temp bucket can be used to create the SageMaker model and upload the model tar file, which can then be used to create a model object in the Amorphic portal.
The company can use the S3 location mentioned in the use case to read the files related to the customer churn dataset and save the output SageMaker model tar file for Amorphic model object creation. This allows the company to effectively train a machine learning model to predict customer churn and use it in their business processes.
When calling Bedrock models from a notebook, a guardrail must be included on every invocation. See Using AI Models and Guardrails.
- Recently, AWS announced that users of SageMaker service can only access the commercial Anaconda repository without requiring a commercial license until February 1, 2024. After this date, customers will need to determine their own Anaconda license requirements for continued use (refer official AWS documentation). If you are making use of Anaconda channels within your notebooks, you may need to evaluate your specific needs concerning the Anaconda license to ensure compliance and prevent any interruptions in your code (refer Anaconda's Terms of Service).
- Should you have already procured the necessary licenses, you can make use of the command
conda config --add channels defaultsto add Anaconda's commercial channels. - If you wish to continue using Anaconda without having to procure a license, there are a few free channels that you can use that are run by volunteer communities and offer best effort security (Ex:
conda,conda-forge,Bioconda). These can work well for research projects, prototypes, and education. However, they are not recommended for use in sensitive environments.
Query View in Notebook
A view can be queried in notebook using two different methods
Using python 'awswrangler' package: If the notebook has internet enabled, then the user can download the awswrangler python package into the notebook using the below command. Do note that any other python packages can be uploaded this way (or via requirements.txt).
# This example sets the packages up for a Glue session with version 4
%additional_python_modules awswrangler==3.4.0,pandas==1.5.3,numpy==1.22.0,pyarrow==8.0.0
%glue_version 4.0
Once the package is installed, the user can query the view by using the following code snippet
#imports
import pandas as pd
import awswrangler as wr
import boto3

# get the aws region
boto3_session = boto3.session.Session()
region_name = boto3_session.region_name

ssm_client = boto3.client('ssm', region_name)
athena_bucket_name = ssm_client.get_parameter(Name="SYSTEM.S3BUCKET.ATHENA")["Parameter"]["Value"]

# To set notebook_id user are required to run the following in a new cell and retrieve the id(ResourceName) from there.
# Or can retrieve it from Amorphic's Datalab page.
# ```!cat /opt/ml/metadata/resource-metadata.json```  -->  {"ResourceArn": "arn:aws:sagemaker:::notebook-instance/<notebook_id>", "ResourceName": "<notebook_id>"}
notebook_id = "<>"

# glue sessions disabled notebook has notebook_type -> sagemaker
# glue sessions enabled notebook has notebook_type -> sagemaker-glue-session
notebook_type = "<>"

# set the database name & view name to query the data from
domain_name = "<>"
view_name = "<>"

# set the quey output loc -> s3://AthenaBucket/NotebookType/NotebookId/
df_athena = wr.athena.read_sql_query(f"SELECT * FROM {domain_name}.{view_name}", database=domain_name, ctas_approach=False, s3_output=f"s3://{athena_bucket_name}/{notebook_type}/{notebook_id}/")
Using boto3 S3-Athena client: If the notebook has internet disabled or a view is queried inside a conda_glue_pyspark kernel in glue sessions enabled notebook, then the user should prefer using the below script.
#imports
import boto3

# get the aws region
boto3_session = boto3.session.Session()
region_name = boto3_session.region_name

#boto3 clients
athena_client = boto3.client("athena")
ssm_client = boto3.client('ssm', region_name)
athena_bucket_name = ssm_client.get_parameter(Name="SYSTEM.S3BUCKET.ATHENA")["Parameter"]["Value"]

# To set notebook_id user are required to run the following in a new cell and retrieve the id(ResourceName) from there.
# Or can retrieve it from Amorphic's Datalab page.
# ```!cat /opt/ml/metadata/resource-metadata.json```  -->  {"ResourceArn": "arn:aws:sagemaker:::notebook-instance/<notebook_id>", "ResourceName": "<notebook_id>"}
notebook_id = "<>"

# glue sessions disabled notebook has notebook_type -> sagemaker
# glue sessions enabled notebook has notebook_type -> sagemaker-glue-session
notebook_type = "<>"

# set the database name & view name to query the data from
database_name = "<>"
view_name = "<>"

# set the quey output loc -> s3://AthenaBucket/NotebookType/NotebookId/
query_output_loc = f"s3://{athena_bucket_name}/{notebook_type}/{notebook_id}/"

#initiate the query through athena client
queryStart = athena_client.start_query_execution(
    QueryString = f'SELECT * FROM {database_name}.{view_name}',
    QueryExecutionContext = {
        'Database': database_name
    },
    ResultConfiguration = { 'OutputLocation': query_output_loc}
)

# after starting the execution of the query, user should wait for s3athena to process the equation
queryExecution = athena_client.get_query_execution(QueryExecutionId=queryStart['QueryExecutionId'])
results = athena_client.get_query_results(QueryExecutionId=queryStart['QueryExecutionId'])