
Workflows
What is an ER Workflow?
An ER (Entity Resolution) Workflow is a configurable process that performs entity resolution on input datasets to identify and merge duplicate records, ultimately generating a unified master dataset. A workflow orchestrates the entire entity resolution pipeline, from matching records across different sources to applying survivorship rules that determine which values to keep when merging records.
For example, a supplier matching workflow might take supplier records from procurement systems, finance systems, and ERP systems, match them based on business rules, and produce a single Unified Master Record for each unique supplier with the best available data from all sources.
How does an ER Workflow work?
MDM Workflows are responsible for performing entity resolution on the input datasets and ultimately generating the unified master dataset. The workflow process consists of four main stages:
-
Workflow Details: Define the workflow name, description, and entity mappings that link source datasets to their entity schemas.
-
Matching Technique: Configure how records are matched using either rule-based or machine learning-based matching, define matching rules with match keys, and specify output field configurations.
-
Survivorship Rules: Define strategies for selecting values when multiple source records are merged into a unified master record. This includes default governance strategies, source priorities, and attribute-specific rules.
-
Output Data: Configure where the resolved records are written—either to a new dataset or an existing Amorphic Gold Zone dataset.
Once configured, workflows can be run manually or automatically (depending on the processing cadence), and they process input records to identify matches, apply survivorship logic, and produce unified master records for stewardship and downstream use.
CSV input requirements
When using CSV files as workflow input:
- First row must be headers. The first row must contain the column names (schema headers). These headers are required for schema registration and attribute mapping.
- Use underscores, not spaces. In Amorphic Data Platform, column names that contain spaces are automatically converted to underscores during schema registration. Headers in your CSV should use underscores and match the schema defined in Amorphic. Using spaces (e.g.,
member id,full name) will not match the registered schema (e.g.,member_id,full_name), causing schema mapping or ingestion errors and workflow run failures.
Valid example (recommended):
member_id,full_name,patient_ref_id,policy_number,insurance_plan,effective_date,group_id
MEM-5001,mIchAEl thOrnTon mD,PID-1000,POL-99123,Premium Gold,2022-01-01,GRP-A1
Invalid example (causes schema mismatch and workflow failure):
member id,full name,patient ref id,policy number,insurance plan,effective date,group id
MEM-5001,mIchAEl thOrnTon mD,PID-1000,POL-99123,Premium Gold,2022-01-01,GRP-A1
File formats and casing
Use supported input file formats (e.g., CSV) and consistent casing for column headers. Header names are case-sensitive for schema mapping—use the same casing as in your Amorphic entity schema to avoid mapping errors.
How to create an ER Workflow
Rule-based workflow
Ml matching based workflow
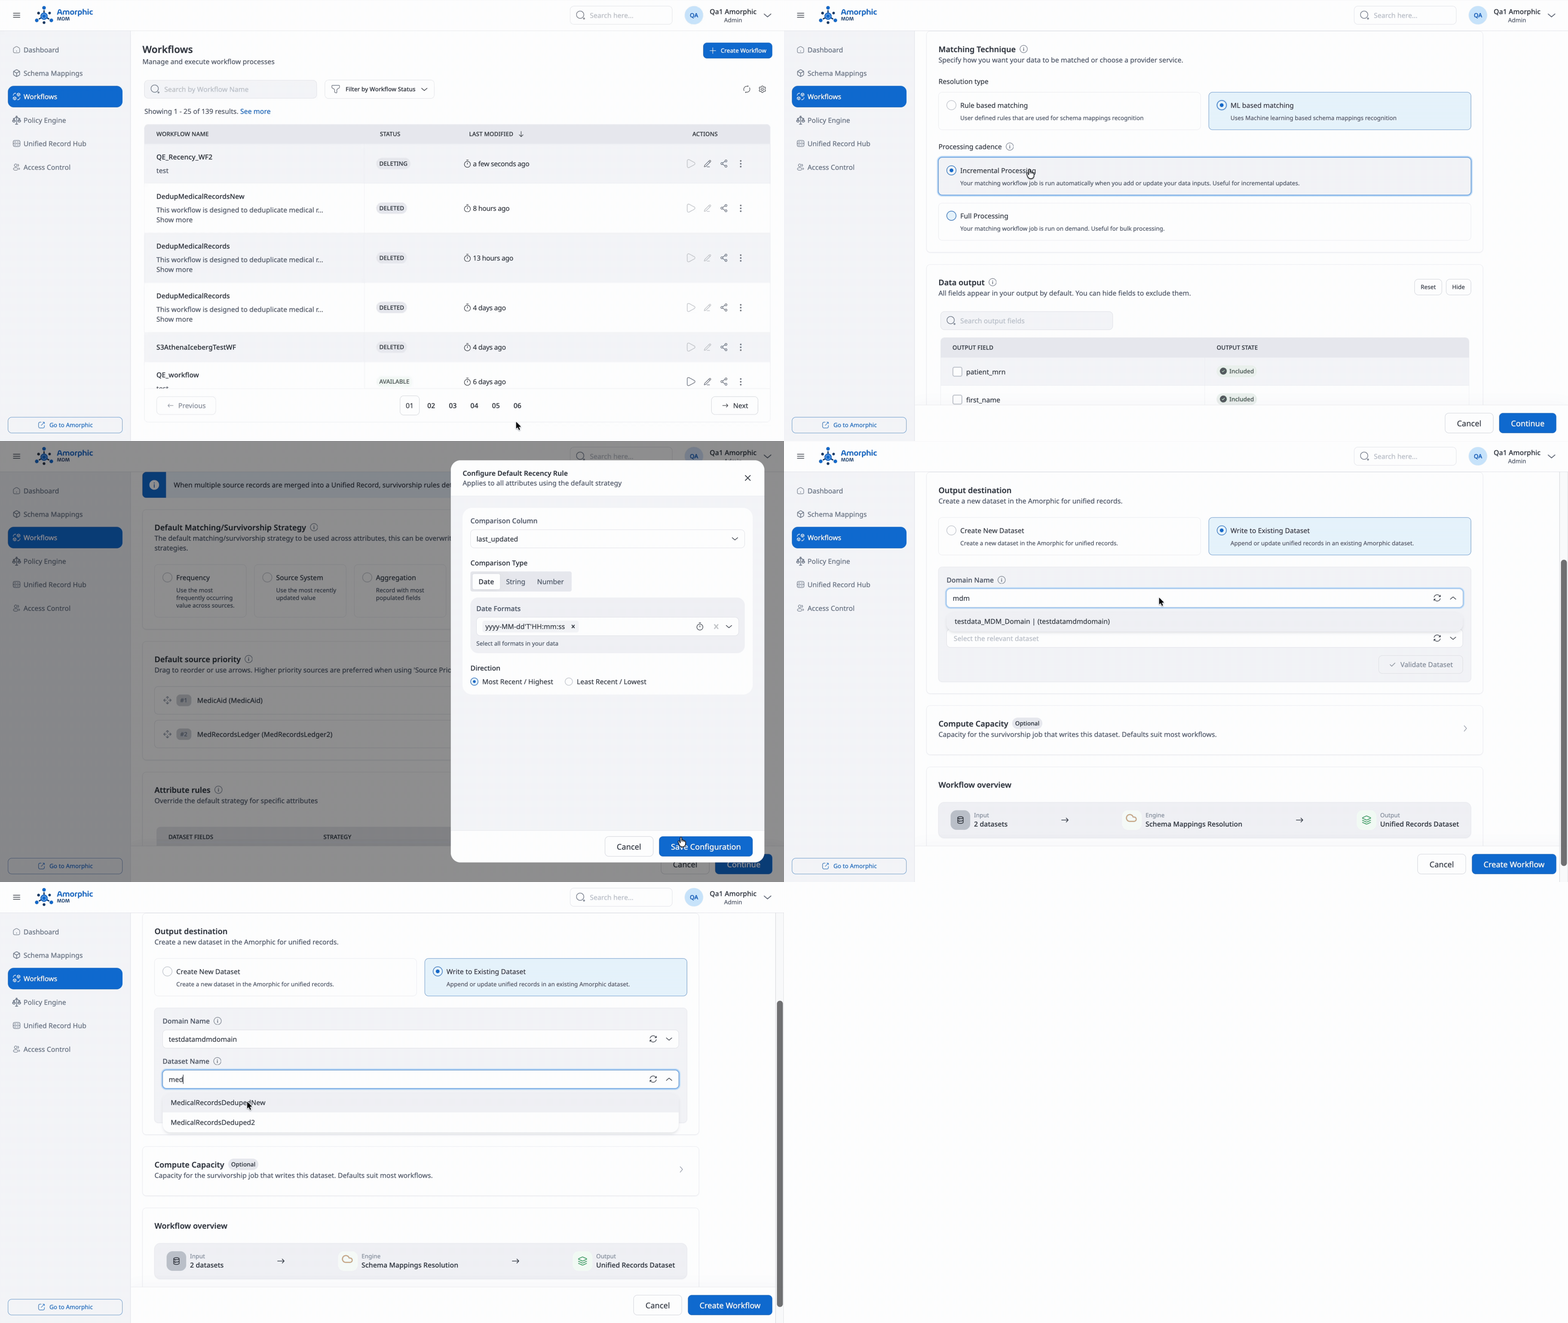
Follow these steps to create an ER Workflow:
Step 1: Workflow Details
-
Enter Workflow Name: Provide a unique, descriptive name for your workflow (e.g.,
supplier_matching_workflow,customer_data_reconciliation). Use a naming convention that indicates the purpose or domain so workflows are easy to identify and manage. The workflow name can only contain upper(A-Z) and lowercase(a-z) letters, numbers(0-9), hyphens(-), and underscores(_). The Workflow name must be between 1-255 characters. -
Add Description (Optional): Optionally provide a description that explains the purpose or scope of this workflow. For example, "Primary workflow for matching supplier records from procurement and finance systems." The description can have 1-255 characters.
-
Add Entity Mapping: Add entities that link a source dataset to its entity schema for matching. You can select multiple entities, and each entity represents a mapping between a dataset and the entity structure that will be used for matching.
- Select one or more entities from the available list
- Each entity mapping connects a source dataset to its corresponding entity schema
- You can add multiple entities to process data from different sources in a single workflow
NoteRequired attribute types for ML matching workflows
While selectig a schema mapping for an ML–based matching workflow, the souce dataset must contain at least one of the columns mentioned below mapped to it's appropriate Attribute Type in the Schema Mapping.
- Any name related column mapped to attribute type FULL_NAME. OR
- Any phone number related column mapped to attribute type FULL_PHONE. OR
- Any email address related column mapped to attribute type EMAIL. OR
- Any address related column mapped to attribute type FULL_ADDRESS. OR
- Any Date of Birth related column mapped to attribute type DATE and match key as Date of Birth.
Step 2: Matching Technique
Configure how your data will be matched and processed:
Matching Method
-
Resolution Type: Choose how you want your data to be matched:
- Rule-based matching: Use customized rules to find exact matches. Suitable when you have clear business rules for matching records.
- Machine learning-based matching: Use machine learning models to help find a broader range of matches. Suitable when you need to identify matches that may not be exact but are likely the same entity.
-
Rule Type (Required for Rule-based matching): Choose the complexity level of your matching rules.
- Simple: Suitable for exact matching and schema mappings with multiple data columns mapped to the same input types. Use this when you need straightforward matching logic.
- Advanced: Suitable for fuzzy matching, exact matching, and schema mappings with data columns mapped one-to-one with input types. Use this when you need complex rule conditions with operators like
Exact(),Fuzzy(), and logical operators (AND,OR).
The current version of the application supports only Simple rule type.
-
Processing Cadence: Determine how often to run your matching workflow job:
- Manual: Your matching workflow job is run on demand. Useful for bulk processing when you want full control over when the workflow executes.
- Incremental Processing: Your matching workflow job is run on incremental demand. Useful for bulk processing of new or updated records.
- Automatic/Full Processing: Your matching workflow job is run automatically when you add or update your data inputs. Useful for incremental updates. This option is available only for rule-based matching.
-
Normalize Data (Optional): Check this option to normalize data values before matching. This is recommended for better accuracy, as it standardizes formats, removes extra spaces, and handles case variations.
Normalization is supported only for NAME, ADDRESS, PHONE, and EMAIL_ADDRESS. To normalize related attributes, assign them to the corresponding groupName in your entity schema:
- NAME: Assign
NAME_FIRST,NAME_MIDDLE, andNAME_LASTto the NAME groupName. - ADDRESS: Assign
ADDRESS_STREET1,ADDRESS_STREET2,ADDRESS_STREET3,ADDRESS_CITY,ADDRESS_STATE,ADDRESS_COUNTRY, andADDRESS_POSTALCODEto the ADDRESS groupName. - PHONE: Assign
PHONE_NUMBERandPHONE_COUNTRYCODEto the PHONE groupName.
- NAME: Assign
-
Attribute Matching: Choose how records can be matched:
- One-to-One: Each record can only match with one other record. Use this when you expect a single match per record.
- Many-to-Many: Records can match with multiple other records. Use this when a single record might legitimately match with multiple records.
-
Comparison Type (For Simple Rule Type): Choose how to compare similar data stored in different input fields:
- Single Input Field: Limit comparison within a single input field, when similar data stored across multiple input fields should not be matched.
- Multiple Input Fields: Find any combination of matches across data stored in multiple input fields, regardless of whether the data is in the same or different input field.
Matching Rules
Define match criteria by creating matching rules. You can create up to 15 rules for Simple rule type, or up to 25 rules for Advanced rule type.
-
Rule Name: Provide a descriptive name for each rule, such as
exact_tax_match,duns_match, orfuzzy_name_match. -
Match Keys (For Simple Rule Type): Select the match keys that define the matching criteria for this rule. Match keys are attributes that have been configured in your entity schema. You can select multiple match keys, and records will match if they satisfy the criteria for all selected keys.
- For example, you might select "Address" and "Email Address" as match keys
- Each rule must have a unique set of match keys
- You can add or remove match keys using the dropdown
-
Rule Condition (For Advanced Rule Type): Define the rule condition using a syntax that supports functions and logical operators:
- Use
Exact(field_name)for exact matching - Use
Fuzzy(field_name, threshold)for fuzzy matching with a similarity threshold (e.g.,Fuzzy(supplier_name, 0.85)) - Combine conditions with
ANDandORoperators - Example:
Exact(tax_id)orFuzzy(supplier_name, 0.85) AND Exact(country)
- Use
-
Rule Priority: Rules are evaluated in priority order from top to bottom. Use the up/down arrows or drag handles to reorder rules. Higher priority rules are evaluated first.
-
Add or Remove Rules:
- Click "+ Add Another Rule" to create additional matching rules
- Click "Remove" to delete a rule
- Click "Reset rule" to clear the current rule configuration
Each rule must have a unique set of match keys (for Simple rule type) or a unique rule condition (for Advanced rule type). The system will validate this and display an error if duplicate rules are detected.
- Do not use Unique Id as a match key. Matching on unique identifiers is not supported and can lead to incorrect behavior.
- Rule-based matching only: The attribute types IPV4, IPV6, and MAID are not supported for rule-based matching. Use machine learning–based matching if you need to match on these types.
Data Output
Configure which fields appear in your output:
-
Search Entities: Use the search field to filter and find specific entities or fields.
-
Output Fields: All fields appear in your output by default. For each field, you can:
- Include: The field will be included in the output (default state)
- Hide: Exclude the field from the output
- Hash: Mask sensitive data by hashing the field values
Step 3: Survivorship Rules
When multiple source records are merged into a unified master record, survivorship rules determine which value wins for each attribute.
Default Governance Strategy
Set the fallback strategy when no attribute-specific rule is defined:
-
Frequency: Use the most frequently occurring value across sources. This strategy selects the value that appears most often across all matched records.
-
Source System: Use the value from the highest priority source based on the configured source priority order. This strategy relies on the source priority configuration.
-
Aggregation: Record with aggregate values from all sources depending on data type. Use when you want to combine or prefer the most complete record.
Default Source Priority
Configure the default precedence order for resolving conflicts when using Source System strategy:
-
Source List: View all data sources that are part of your entity mappings.
-
Reorder Sources: Drag to reorder or use the up/down arrows to set priority. Higher priority sources (lower numbers) are preferred when using 'Source Priority' strategy.
-
Source Information: Each source displays:
- Source name and dataset name
- Record count
- Current priority number
-
Most Recent/Recency: Use most recently updated value
Attribute Rules
Override the default strategy for specific attributes:
-
Attribute List: View all attributes from your entity schema that will be included in the unified master record.
-
Assign Strategy: For each attribute, select a survivorship strategy:
- Source Priority: Use value from highest priority source
- Frequency: Use most frequently occurring value
- Most Recent/Recency: Use most recently updated value
- Aggregation: Aggregate values from all sources
- Minimum Value: Use the minimum value across sources
- Maximum Value: Use the maximum value across sources
-
Set Attribute Priority: For attributes using "Source Priority" strategy, you can set a custom source priority order. Check "Set this priority for all 'Source Priority' fields" to apply the same priority order to all Source Priority attributes.
The strategy you choose as Default Governance Strategy is used as the prefilled value for all attribute-level rules. You can override the strategy for individual attributes as needed. Recency can be set as the default governance strategy for the whole workflow, or only for selected attributes.
Configure Recency
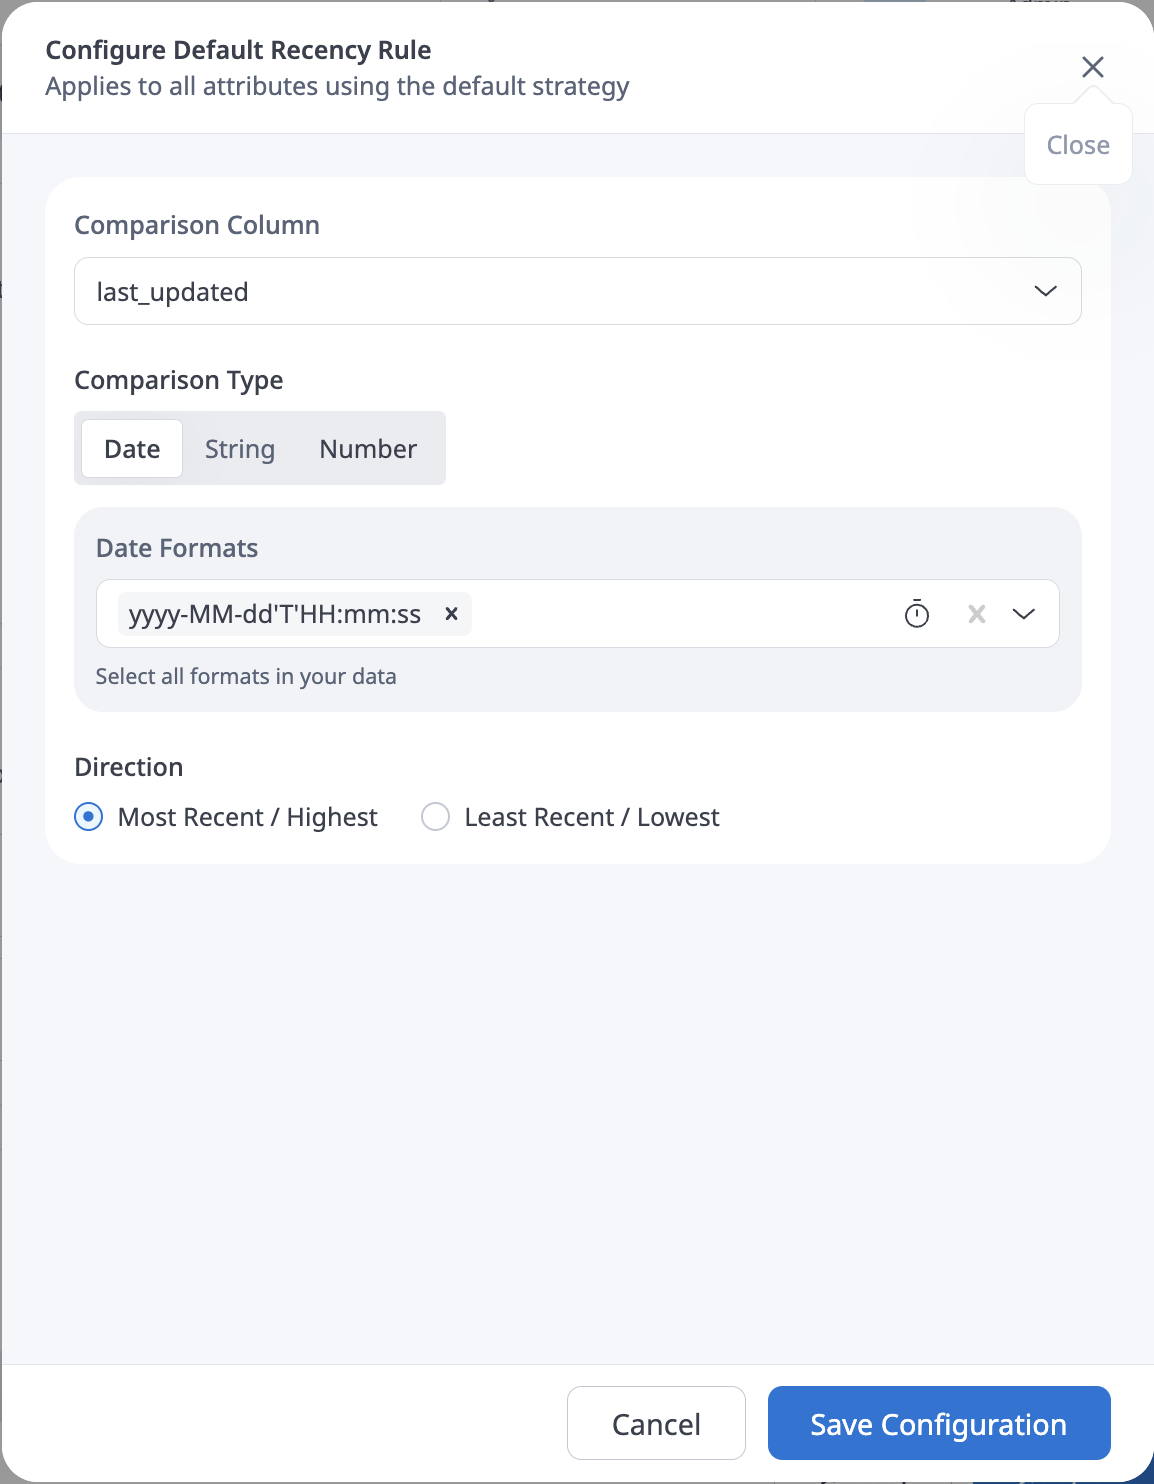
When you choose Recency (as Default Governance Strategy or for a specific attribute), open Configure Recency Rule to define how “recent” is determined. For an attribute-level rule, the dialog shows which attribute you are configuring (for example, customer_name).
Configure the following:
-
Comparison Column: Select the column used to measure recency (for example,
last_updated). Survivorship compares this column across the matched source records to decide which attribute value wins—not necessarily the attribute column itself. -
Comparison Type: Choose how values in the comparison column are interpreted:
- Date — Treat the column as a date/time
- String — Lexicographic comparison
- Number — Numeric comparison
-
Date Formats (shown when Comparison Type is Date): Select every date format that appears in your data (for example,
yyyy-MM-dd,yyyy-MM-dd'T'HH:mm:ss). Use Select all formats in your data so parsing succeeds across mixed source formats. -
Direction: Choose which side of the comparison wins:
- Most Recent / Highest — Prefer the newest date, or the highest string/number value
- Least Recent / Lowest — Prefer the oldest date, or the lowest string/number value
Recency is available both as a Default Governance Strategy and as an attribute-specific override. Default Recency applies to attributes that do not have their own strategy; attribute-level Recency lets you pick a different comparison column, type, formats, or direction per field.
Strategy Reference
The following survivorship strategies are available:
| Strategy | Description |
|---|---|
| Source System/Source Priority | Uses configured source rank order. The value from the highest priority source is selected. |
| Most Recent/Recency | Value from most recently updated record. The system uses the record's last update timestamp. |
| Frequency | Use most frequently occurring value across all matched records. |
| Aggregation | Record with most populated fields, or aggregate values from all sources depending on data type. |
| Minimum Value | Use the minimum value across sources. Applicable to numeric and date fields. |
| Maximum Value | Use the maximum value across sources. Applicable to numeric and date fields. |
Confidence Thresholds (Only for ML Matching based workflows)
Configure automatic processing thresholds:
-
Automatically Process Records: Set a confidence threshold (e.g., 95%+) for records that will be automatically processed without manual review.
-
Records Requiring Review: Set a threshold (e.g., below 94%) for records that require manual review before being included in the unified master dataset.
Step 4: Output Data
Configure where the resolved records are written:
Output Destination
-
Create New Dataset: Create a new dataset in the Amorphic Gold Zone for resolved records.
- Domain Name: Enter the domain name for the new dataset (e.g.,
SupplierData,CustomerRecords) - Dataset Name: Enter a unique dataset name (e.g.,
gold_suppliers,customer_unified_master_records) - Description: Optionally provide a description explaining the purpose of this dataset
- Target Location: Select the storage location (e.g.,
DynamoDB,S3)
- Domain Name: Enter the domain name for the new dataset (e.g.,
-
Write to Existing Dataset: Append or update records in an existing Amorphic Gold Zone dataset.
- Domain Name: Select the domain from the dropdown
- Dataset Name: Select the existing dataset from the dropdown
- Validate Dataset: Click to validate that the selected dataset exists and is accessible
When using a pre-created Amorphic DynamoDB dataset as the target dataset, ensure that the PartitionKey is set to GoldenId. See DynamoDB Datasets for creating and configuring DynamoDB datasets.
A dedicated output dataset for each workflow is recommended. If the user assigns the same output dataset to several workflows, metrics and review items (read from the shared output DynamoDB table) will combine data from all of those workflows together, which is misleading. Using separate datasets keeps each workflow’s metrics and review items easy to find and interpret.
Compute Capacity
Compute Capacity is an optional panel that sets the capacity for the survivorship job that writes the output dataset. The defaults suit most workflows.
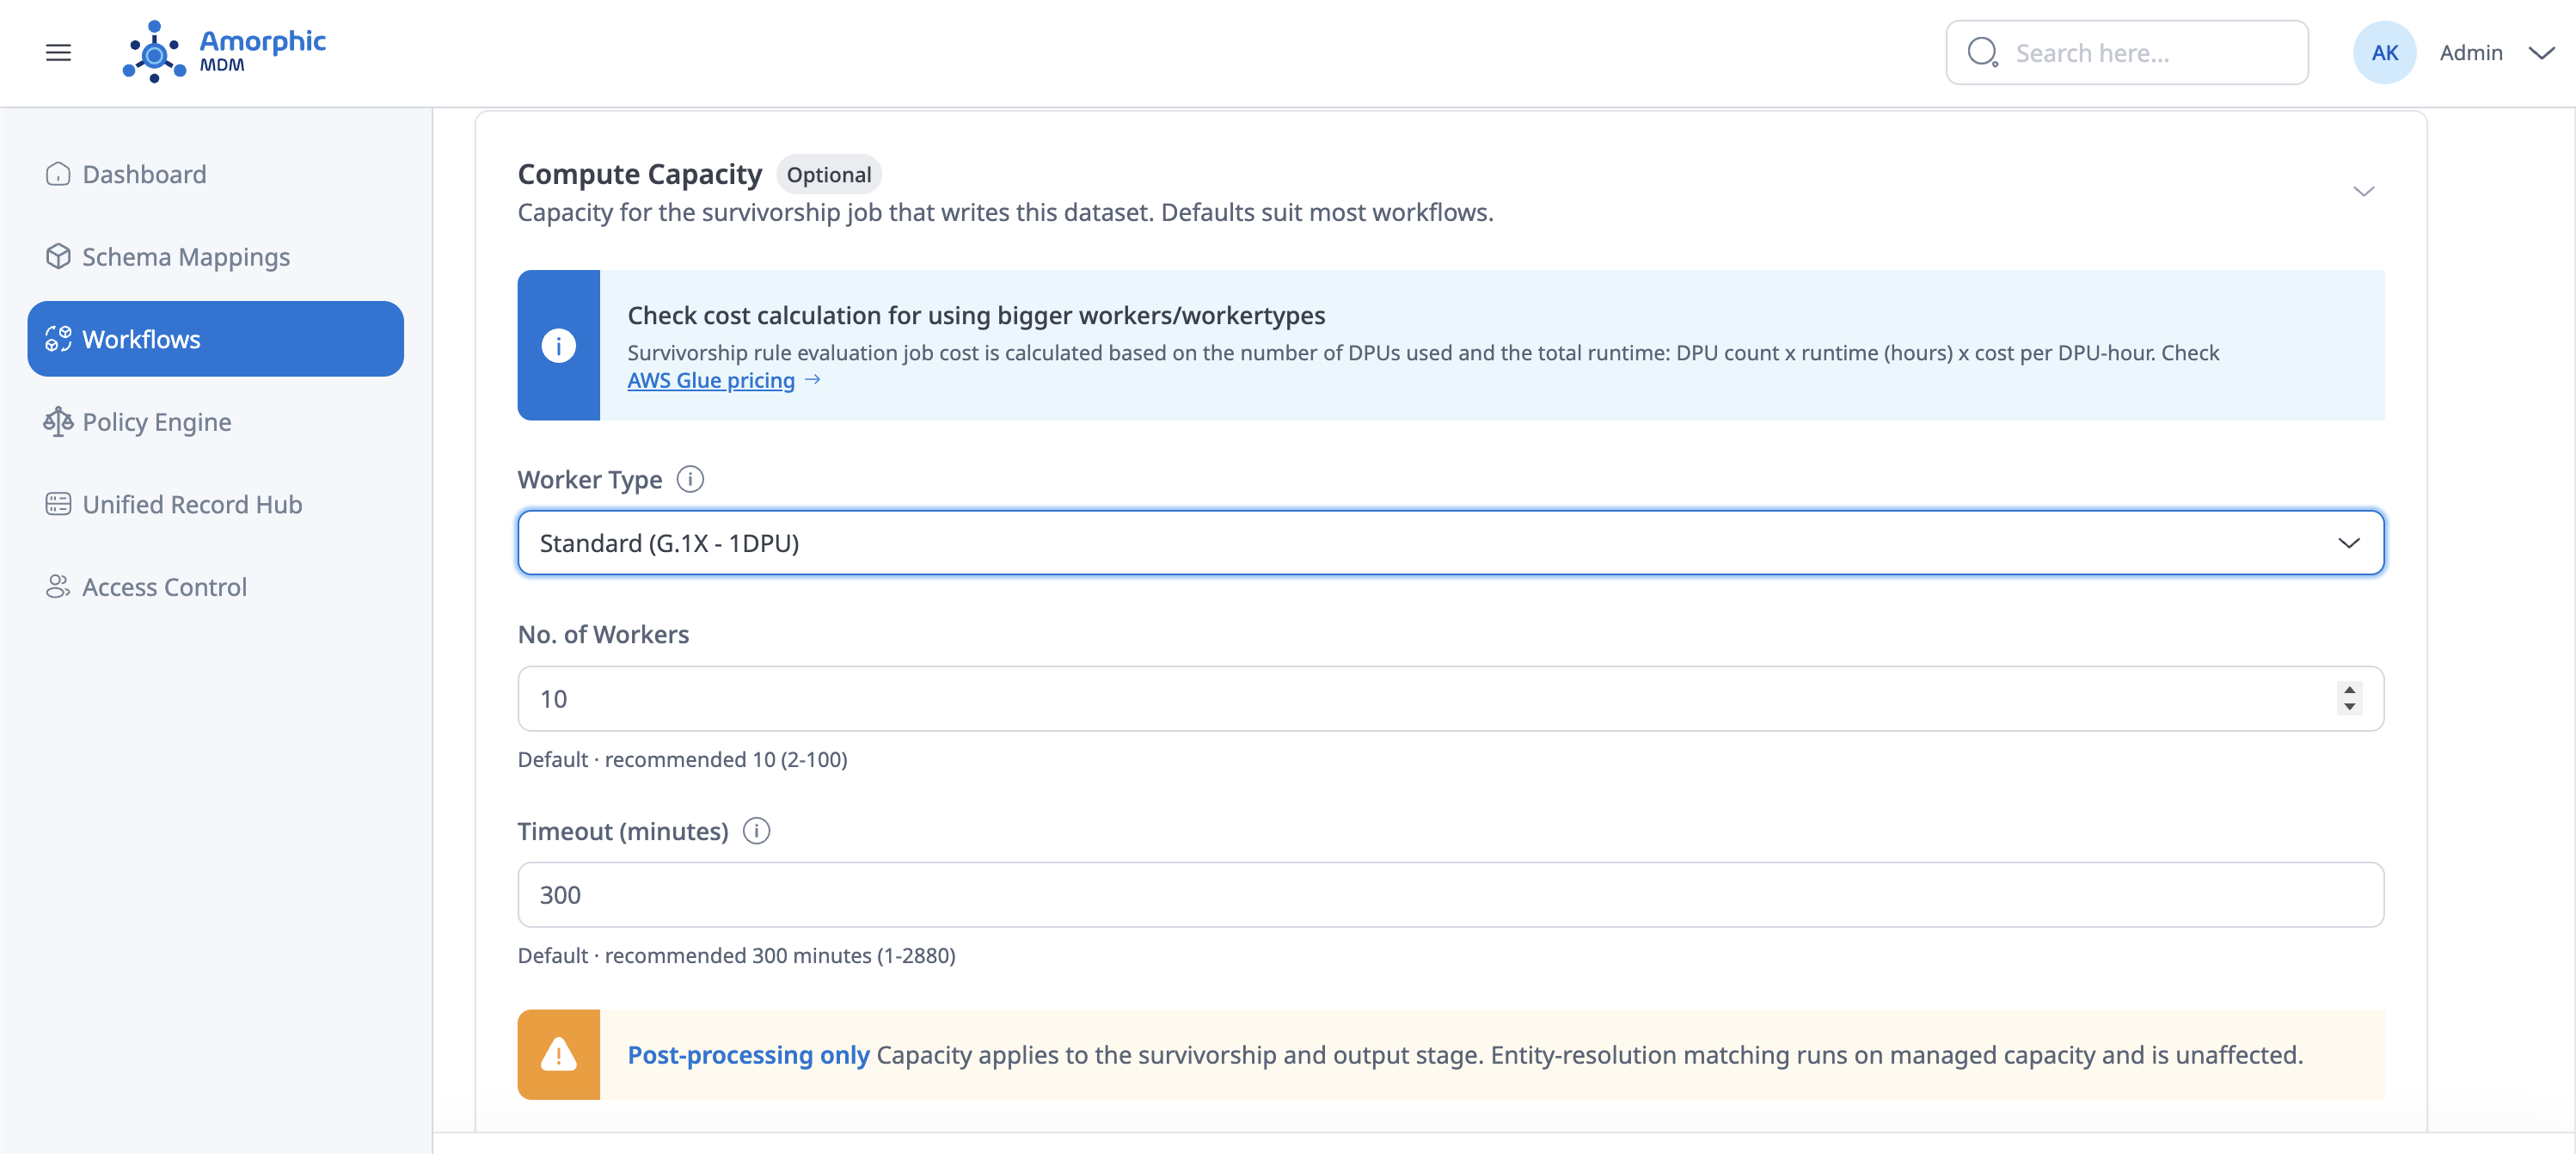
| Setting | Accepted values | Default |
|---|---|---|
| Worker Type | G.1X, G.2X, G.4X, G.8X, G.12X, G.16X, R.1X, R.2X, R.4X, R.8X. The dropdown lists each type with its DPU count, for example Standard (G.1X - 1DPU). | G.1X |
| No. of Workers | A whole number from 2 to 100 | 10 |
| Timeout (minutes) | A whole number from 1 to 2880 (48 hours) | 300 |
Compute Capacity applies to the survivorship and output stage. Entity resolution matching runs on AWS managed capacity and is unaffected by these settings, so raising the worker count does not make the matching step faster.
Values set here become the workflow's stored capacity, used by every run unless a run overrides them. They can be changed at any time by editing the workflow. To raise the capacity for a single run without changing the stored values, edit it in the run dialog instead; see Compute Capacity for a single run.
Choosing a worker type. The G series is general-purpose compute. The R series provides the same DPU count per worker with double the memory, which is the right choice for a job that fails on executor memory rather than on CPU. Raising the worker count or moving to a larger worker type increases the Glue cost per hour, but reduces execution time and helps avoid memory and timeout failures on large workloads.
G.12X, G.16X, and the R series are not available in every Region. Glue rejects an unsupported worker type when the job is created or updated, so an unavailable combination fails at configuration time rather than part-way through a run.
The survivorship job is billed on DPU-hours: DPU count × runtime in hours × cost per DPU-hour. See AWS Glue pricing for the rate, and FAQs for worked examples and guidance on what to change when a large workflow fails on memory or times out.
Workflow Overview
The workflow overview displays a visual representation of your workflow:
- Input: Shows the number of datasets that will be processed
- Engine: Entity Resolution engine that performs the matching and survivorship
- Output: The Gold dataset where resolved records are written
Completing Workflow Creation
Once all four steps are completed:
- Review your configuration in the workflow overview
- Click "Create Workflow" to save and create the workflow
- The workflow will be created with "Active" status and can be run immediately
- Click "Cancel" at any time to discard your changes
After creating a workflow, you can edit it at any time. However, changes to certain configurations (like entity mappings) may require re-running the workflow to take effect.
Data Engineers and Admins can create, edit, and run workflows. Data Stewards and App Viewers can only view workflows.
How to run an ER Workflow
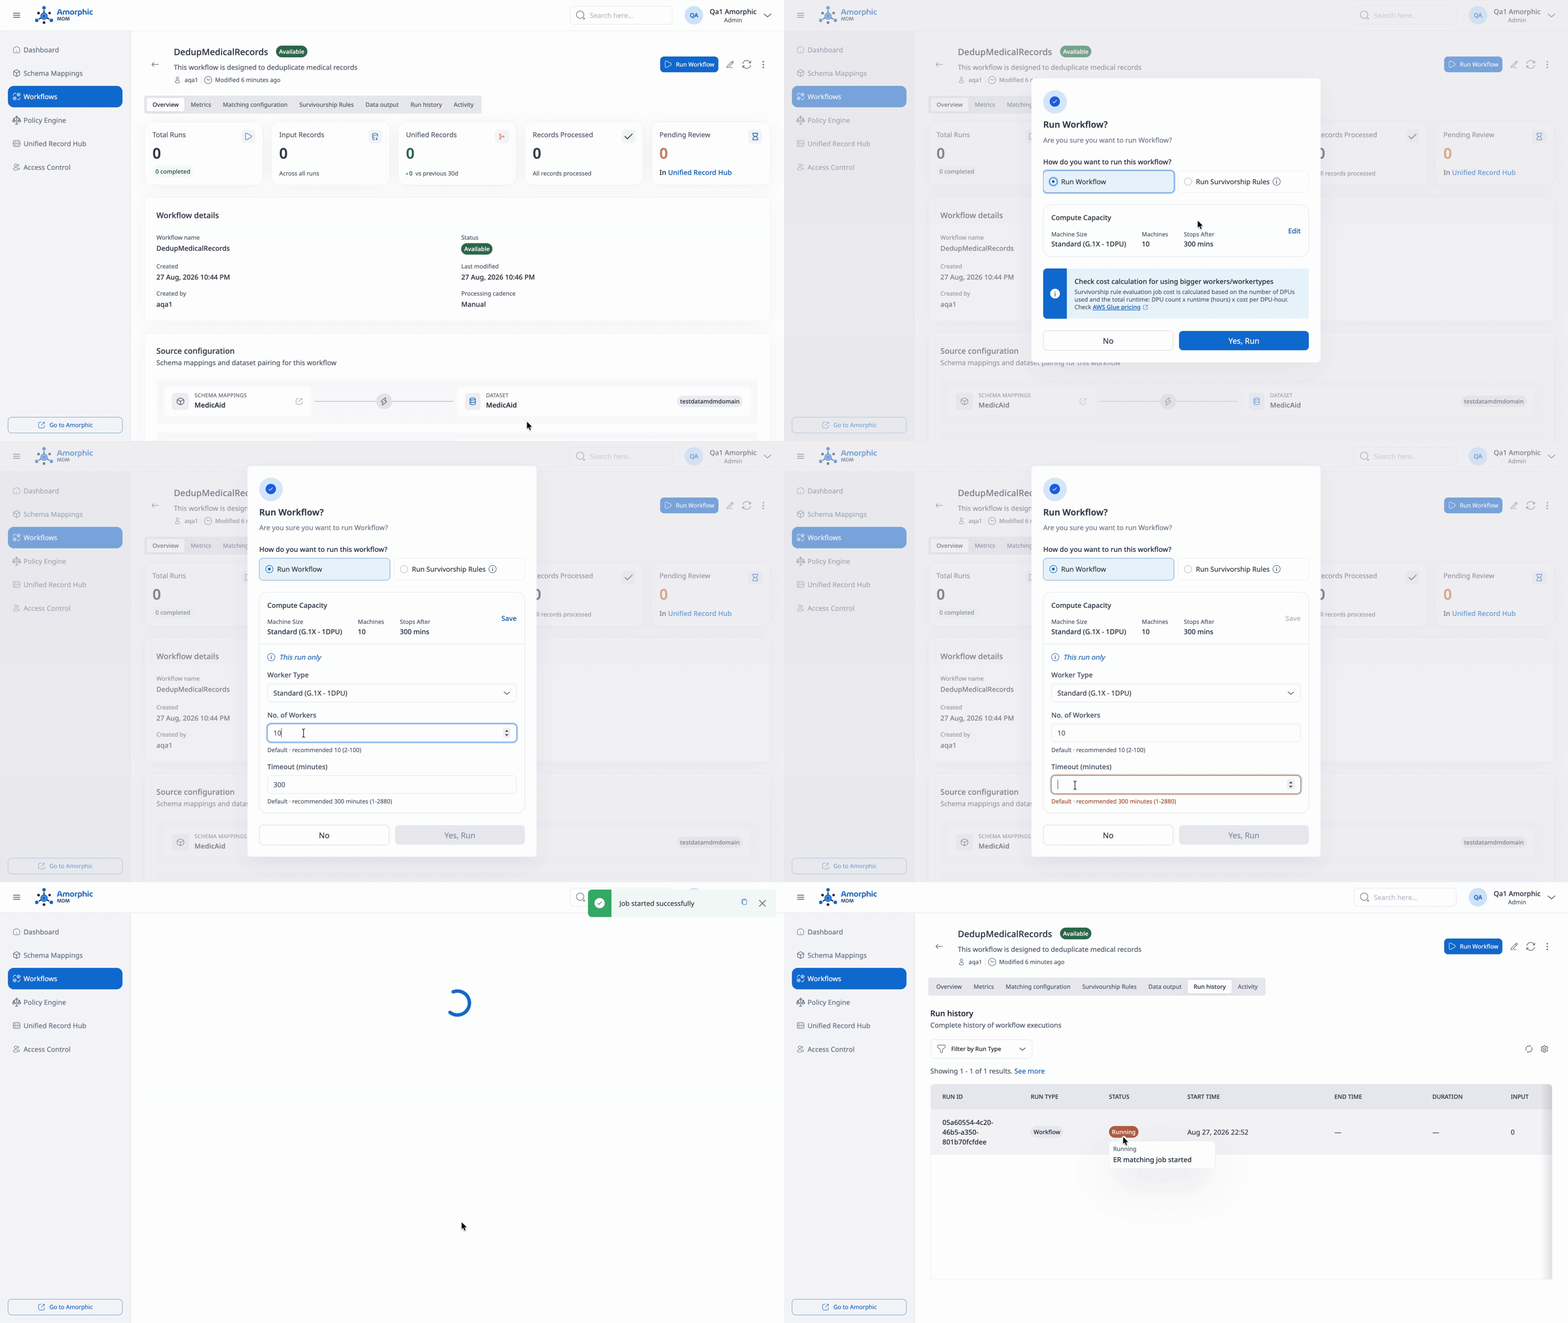
You can run an ER Workflow in several ways depending on the configured processing cadence:
Manual Execution
For workflows with Manual or Incremental Processing cadence:
- Navigate to the Workflows page
- Find the workflow to run in the workflows list
- Select the Play icon in the Actions column, or open the workflow details page and select Run Workflow
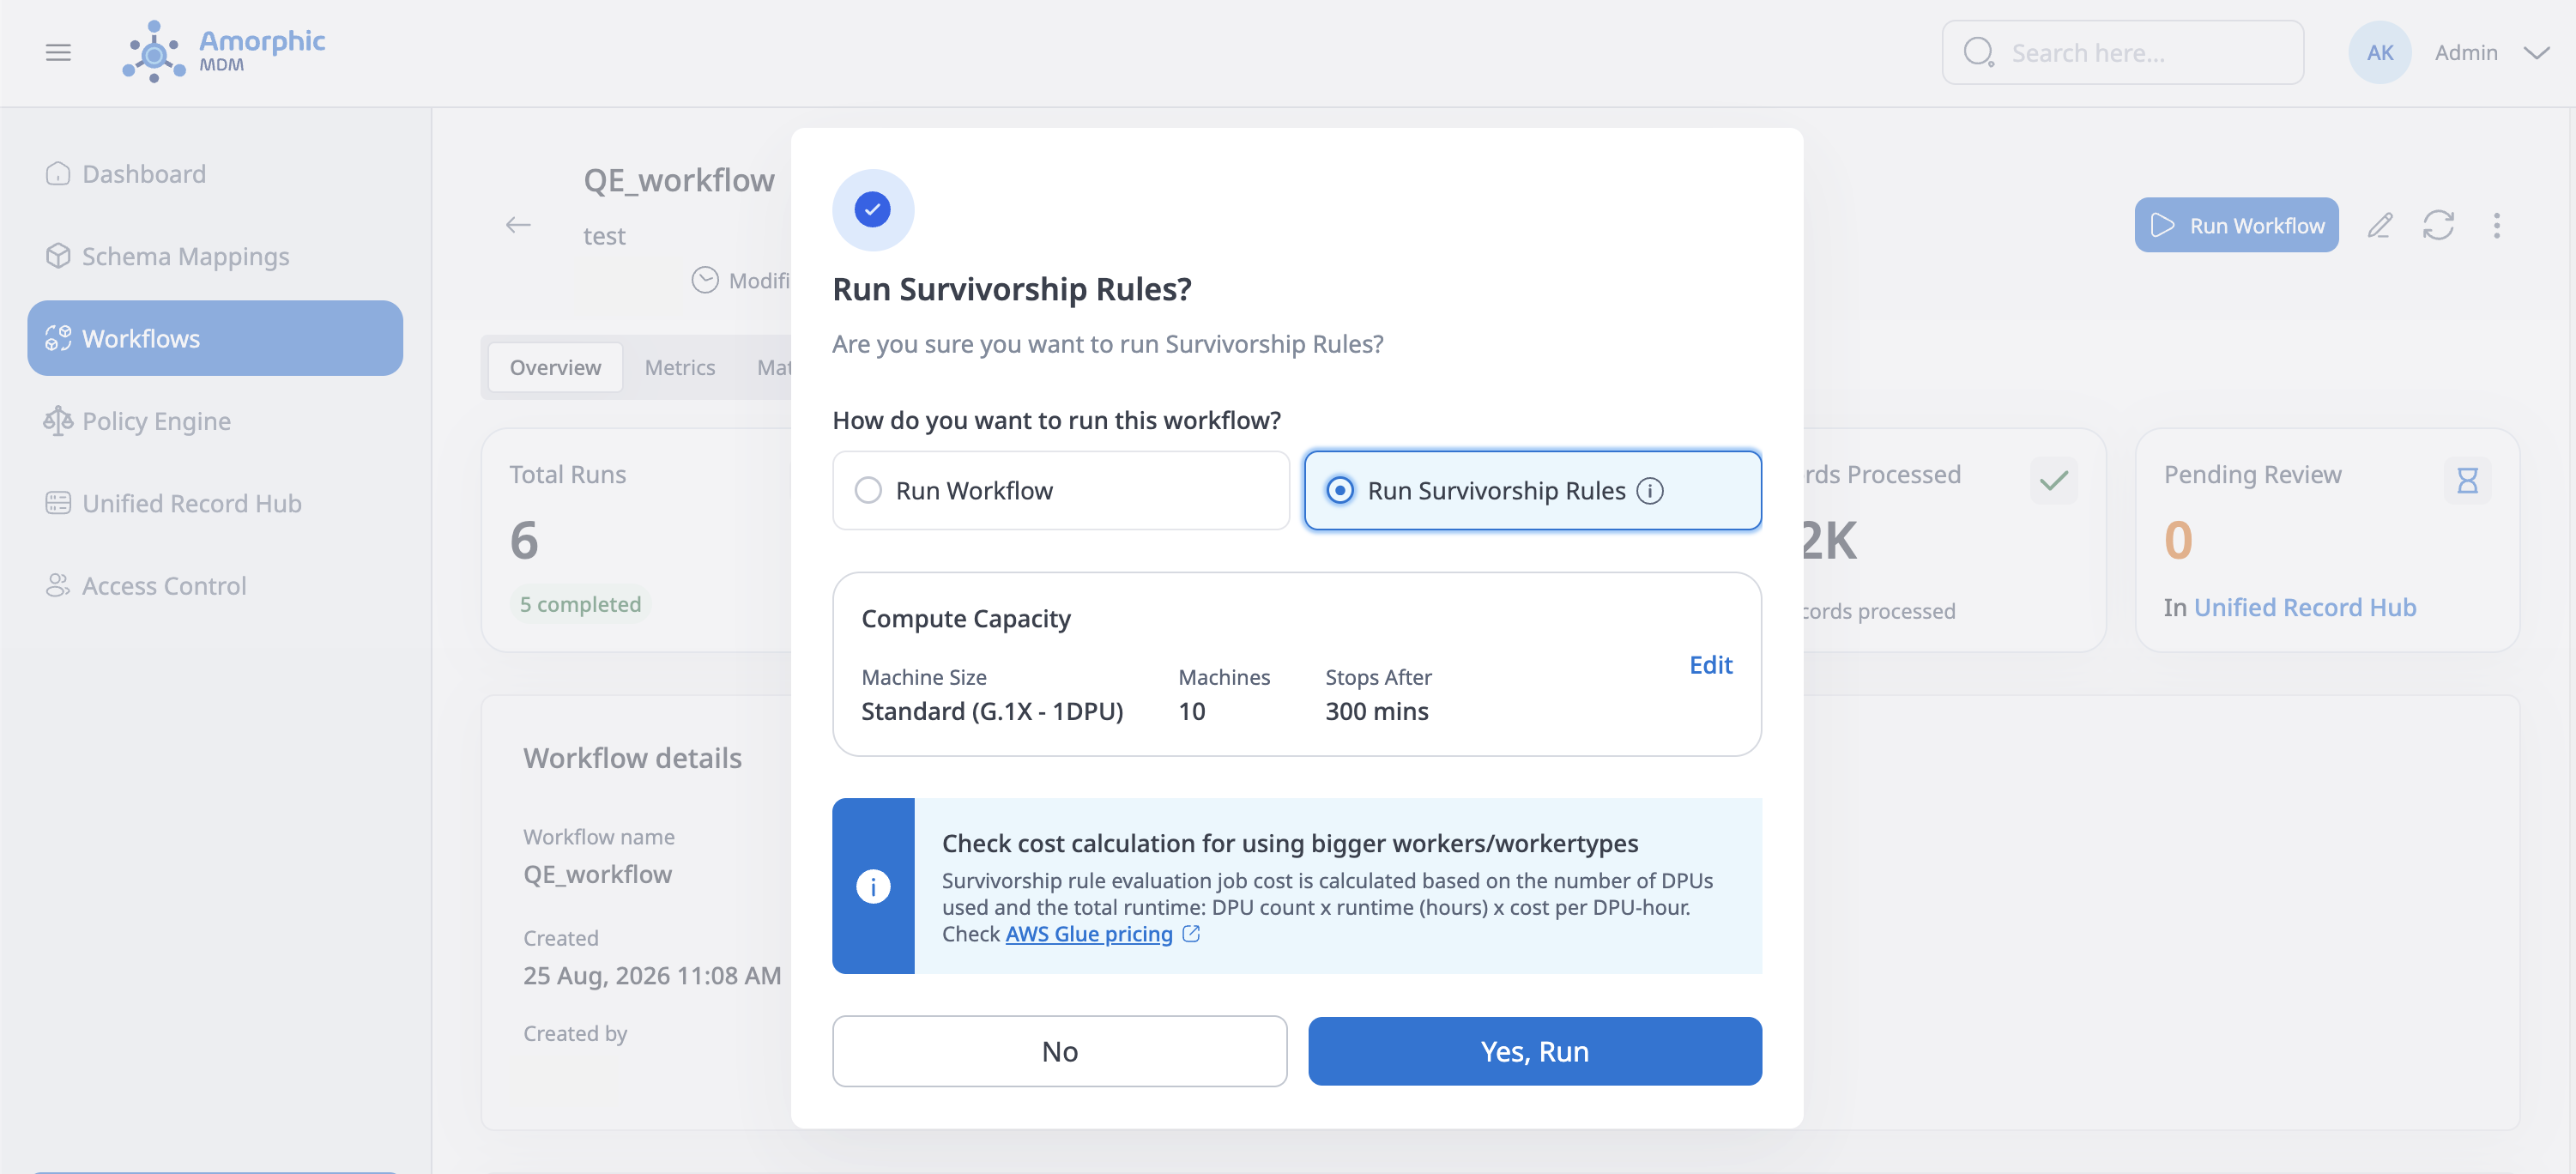
- In the Run Workflow? dialog, choose how to run it under How do you want to run this workflow?:
- Run Workflow performs the full run, including entity resolution matching
- Run Survivorship Rules reapplies the survivorship rules to the last successful full run's matching output, without matching again. See Run Survivorship Rules.
- Review the Compute Capacity summary, and select Edit to change it for this run only
- Select Yes, Run
- Monitor progress in the Run history tab
Automatic Execution
For workflows with Automatic/Full Processing cadence:
- The workflow runs automatically when you add or update data inputs
- No manual intervention is required
- Execution is triggered by data changes in the source datasets
Run Survivorship Rules
Run Survivorship Rules reapplies the current survivorship configuration to the matching output of the workflow's most recent successful full run. The matching step is skipped: the records are not submitted to AWS Entity Resolution again. Use it after adjusting a survivorship strategy, to see the effect on the unified master records the workflow has already produced.
The following conditions apply:
- The run reuses the Entity Resolution output of the latest successful full run of that workflow. Input records added since that run are not included; a full run is required to pick those up.
- At least one successful full workflow run must have completed. Without one there is no matching output to reapply rules to, and the request is rejected.
- The workflow must be in AVAILABLE status.
- Only one survivorship rule run per workflow can be in progress at a time.
- Each survivorship rule run appears as its own execution in the Run history tab, marked as a survivorship run. A survivorship run is never used as the source for a later survivorship rule run, so the matching output always comes from a full run.
A survivorship rule run skips AWS Entity Resolution, so it incurs no Entity Resolution charge. Only the AWS Glue time for the job is billed. This makes it substantially cheaper than a full run for iterating on survivorship strategies. See FAQs for the cost breakdown.
Compute Capacity for a single run
The Run Workflow? dialog shows the Compute Capacity the run will use, summarised as Machine Size, Machines, and Stops After. Select Edit to expand the fields, adjust Worker Type, No. of Workers, or Timeout (minutes), then click Yes, Run.
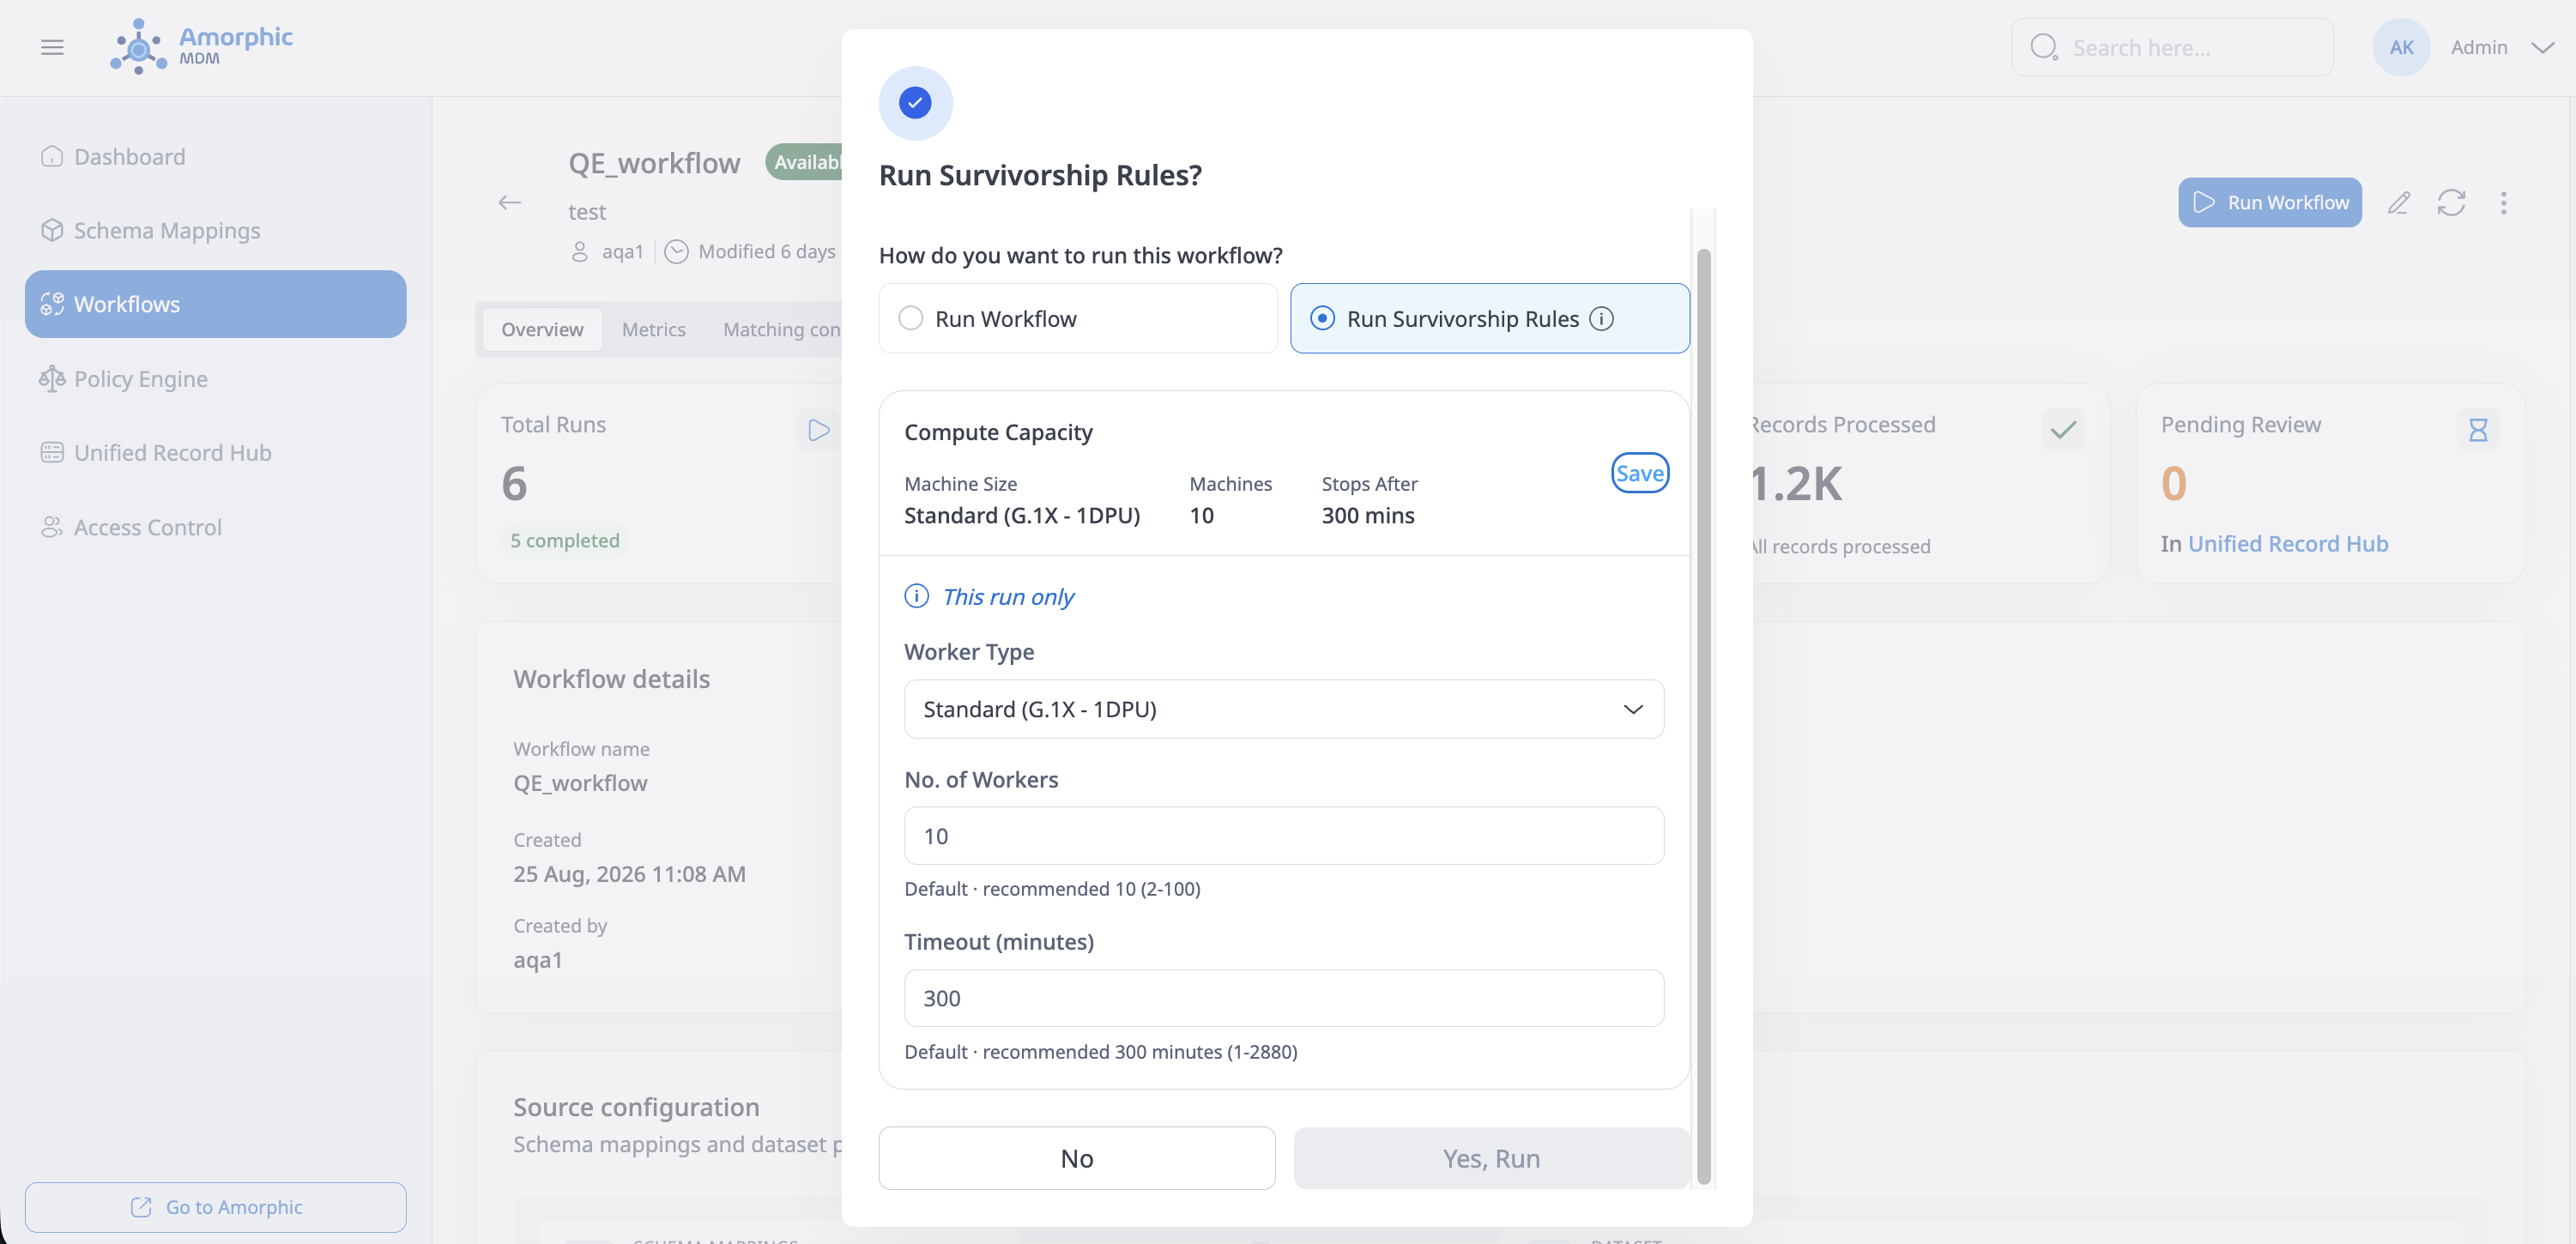
An edit made in the run dialog applies to that run alone, as the This run only label indicates. The workflow's stored Compute Capacity is unchanged, and the next run reverts to it. To change the capacity for every run, edit the workflow's Compute Capacity instead.
This is the way to give a single large run more capacity, for example a one-off backfill that needs a larger machine size, without permanently raising the cost of routine runs. Each setting is resolved independently: a value supplied for the run takes precedence, then the value stored on the workflow, then the default. Changing No. of Workers alone therefore keeps the stored Worker Type.
Compute Capacity is available for both run options, Run Workflow and Run Survivorship Rules.
Monitoring Workflow Execution
-
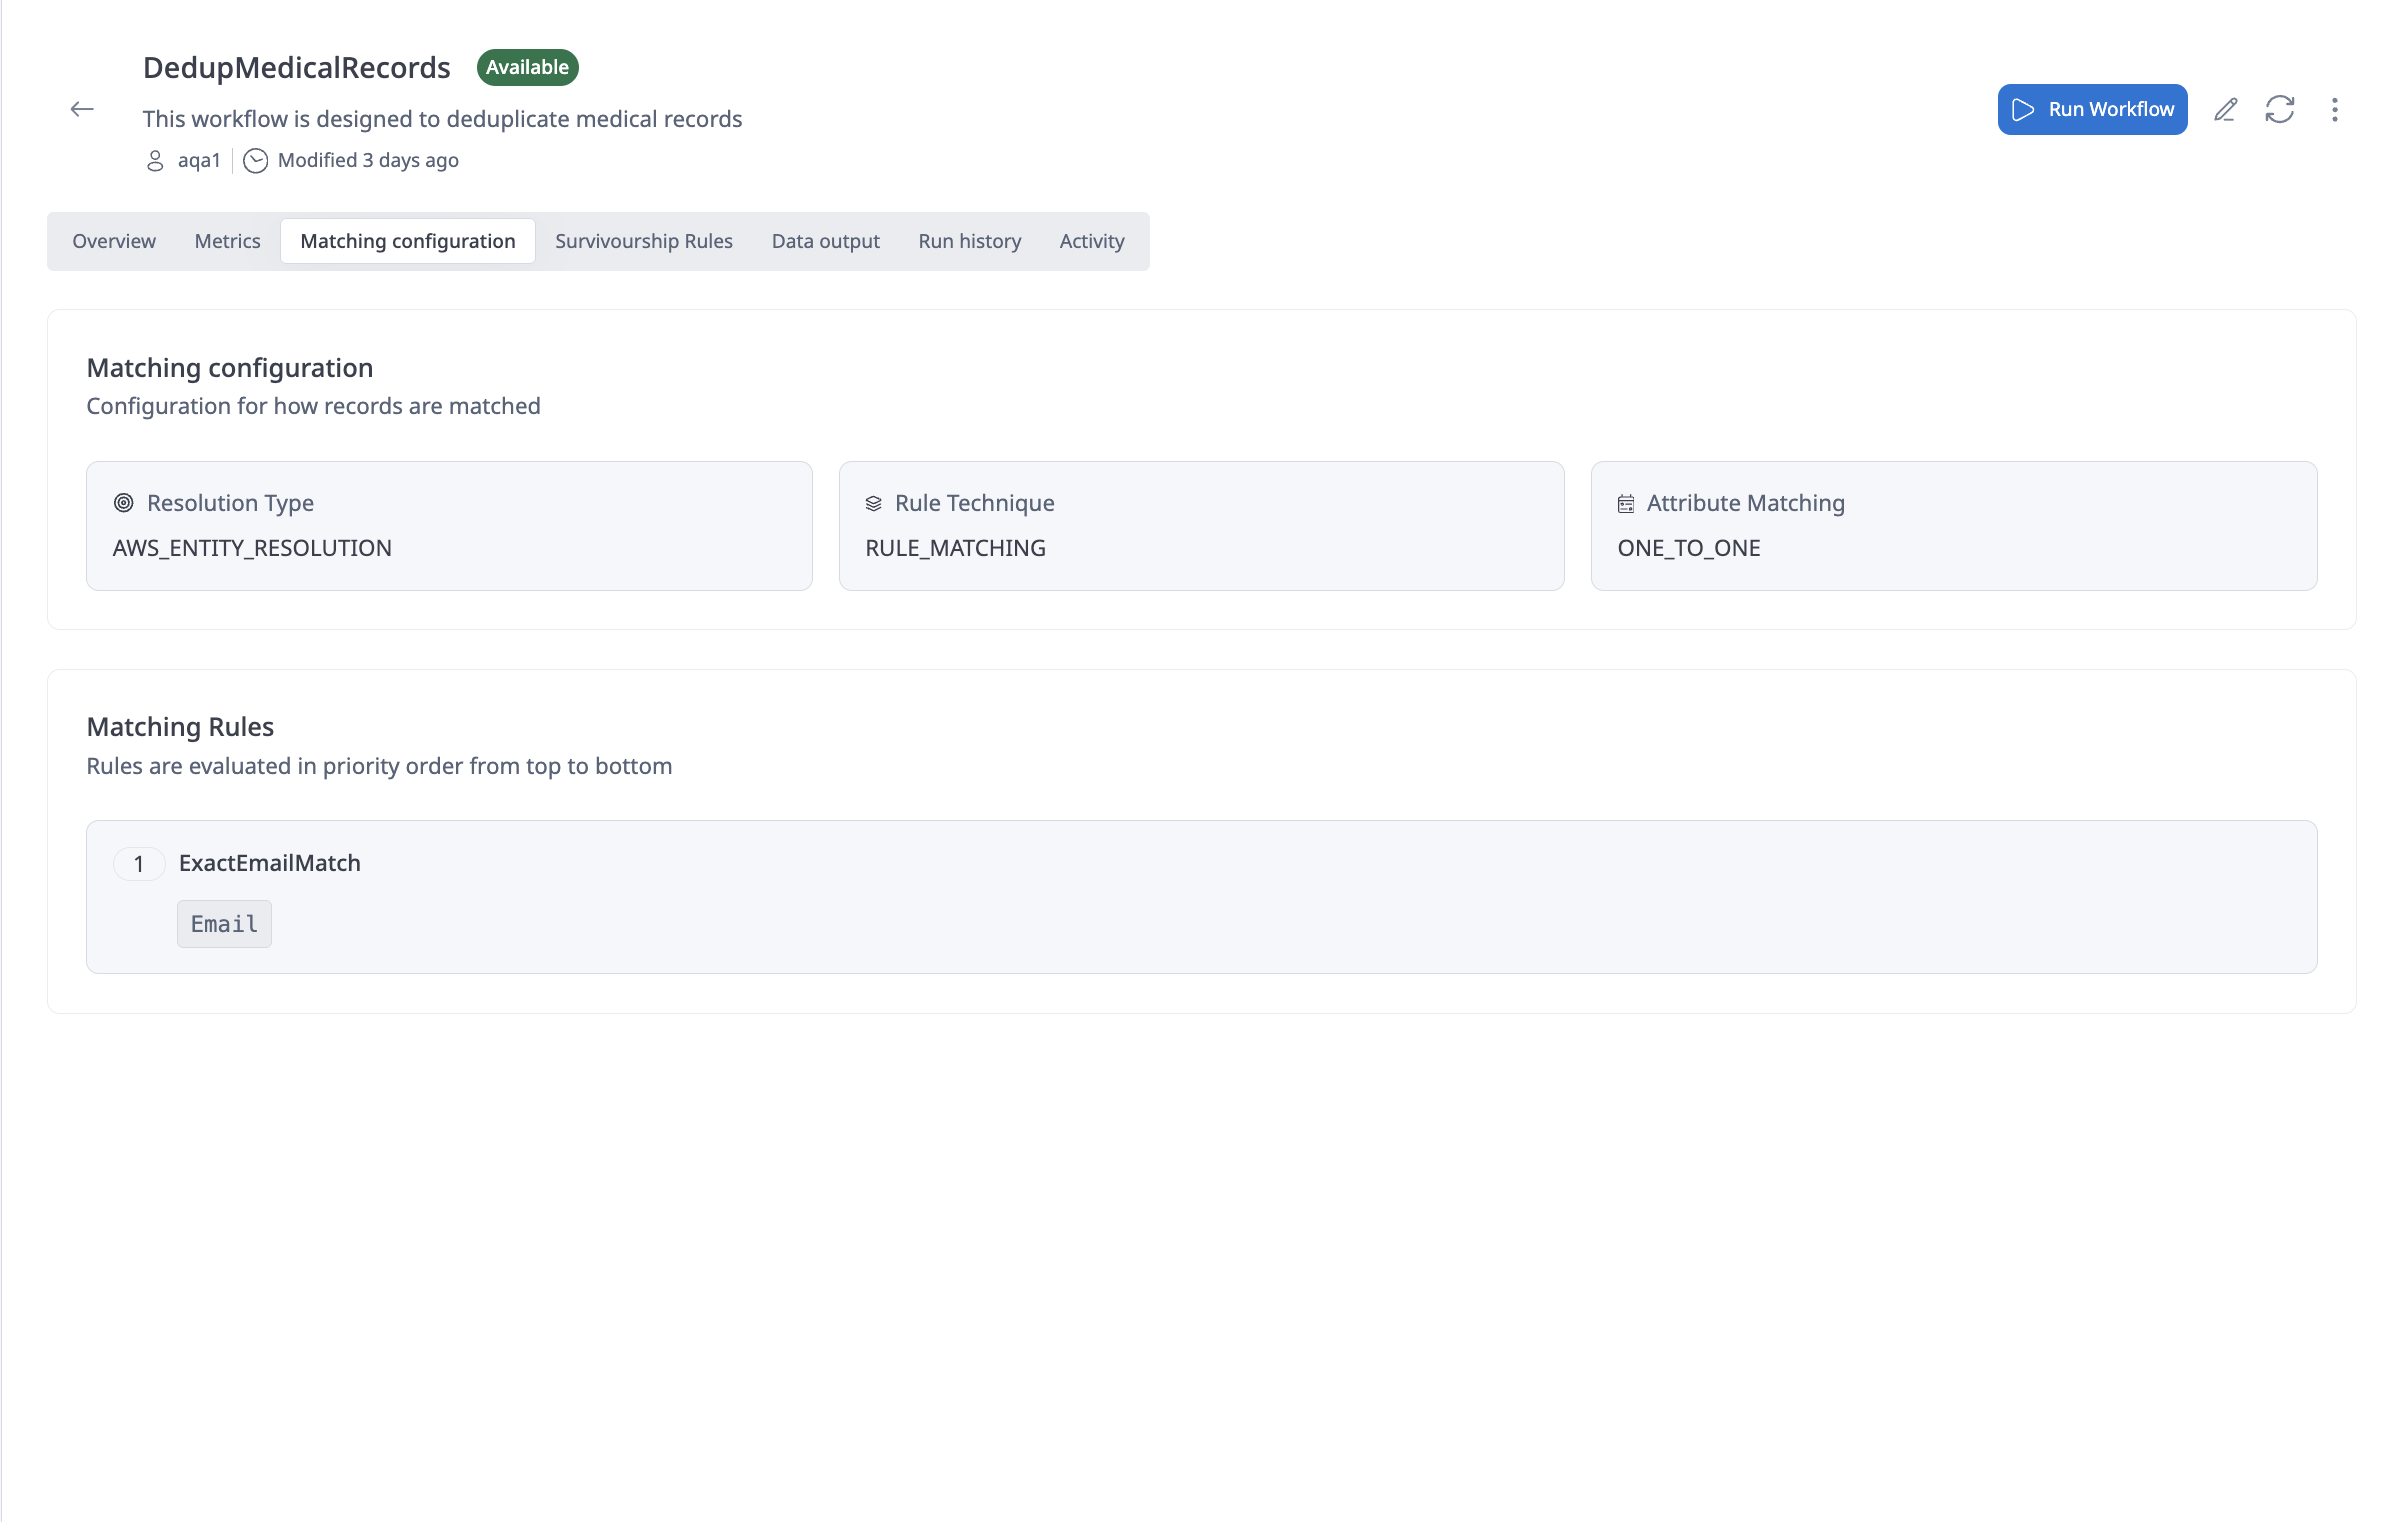
Matching configuration: On the workflow details page, the Matching configuration tab shows how the workflow is set up for matching:
-
Resolution Engine, Resolution Type and Attribute Matching: The first part displays the Resolution Type (e.g., AWS Entity Resolution), Rule Technique (rule-based matching or ml-based matching) that are used to match records and Attribute Matching (One-to-One or Many-to-Many).
-
Matching rules: The second part lists the Matching Rules that are evaluated in priority order from top to bottom. For each rule you can see the rule name and which match keys (e.g., Email, Address) are used for that rule.
-
-
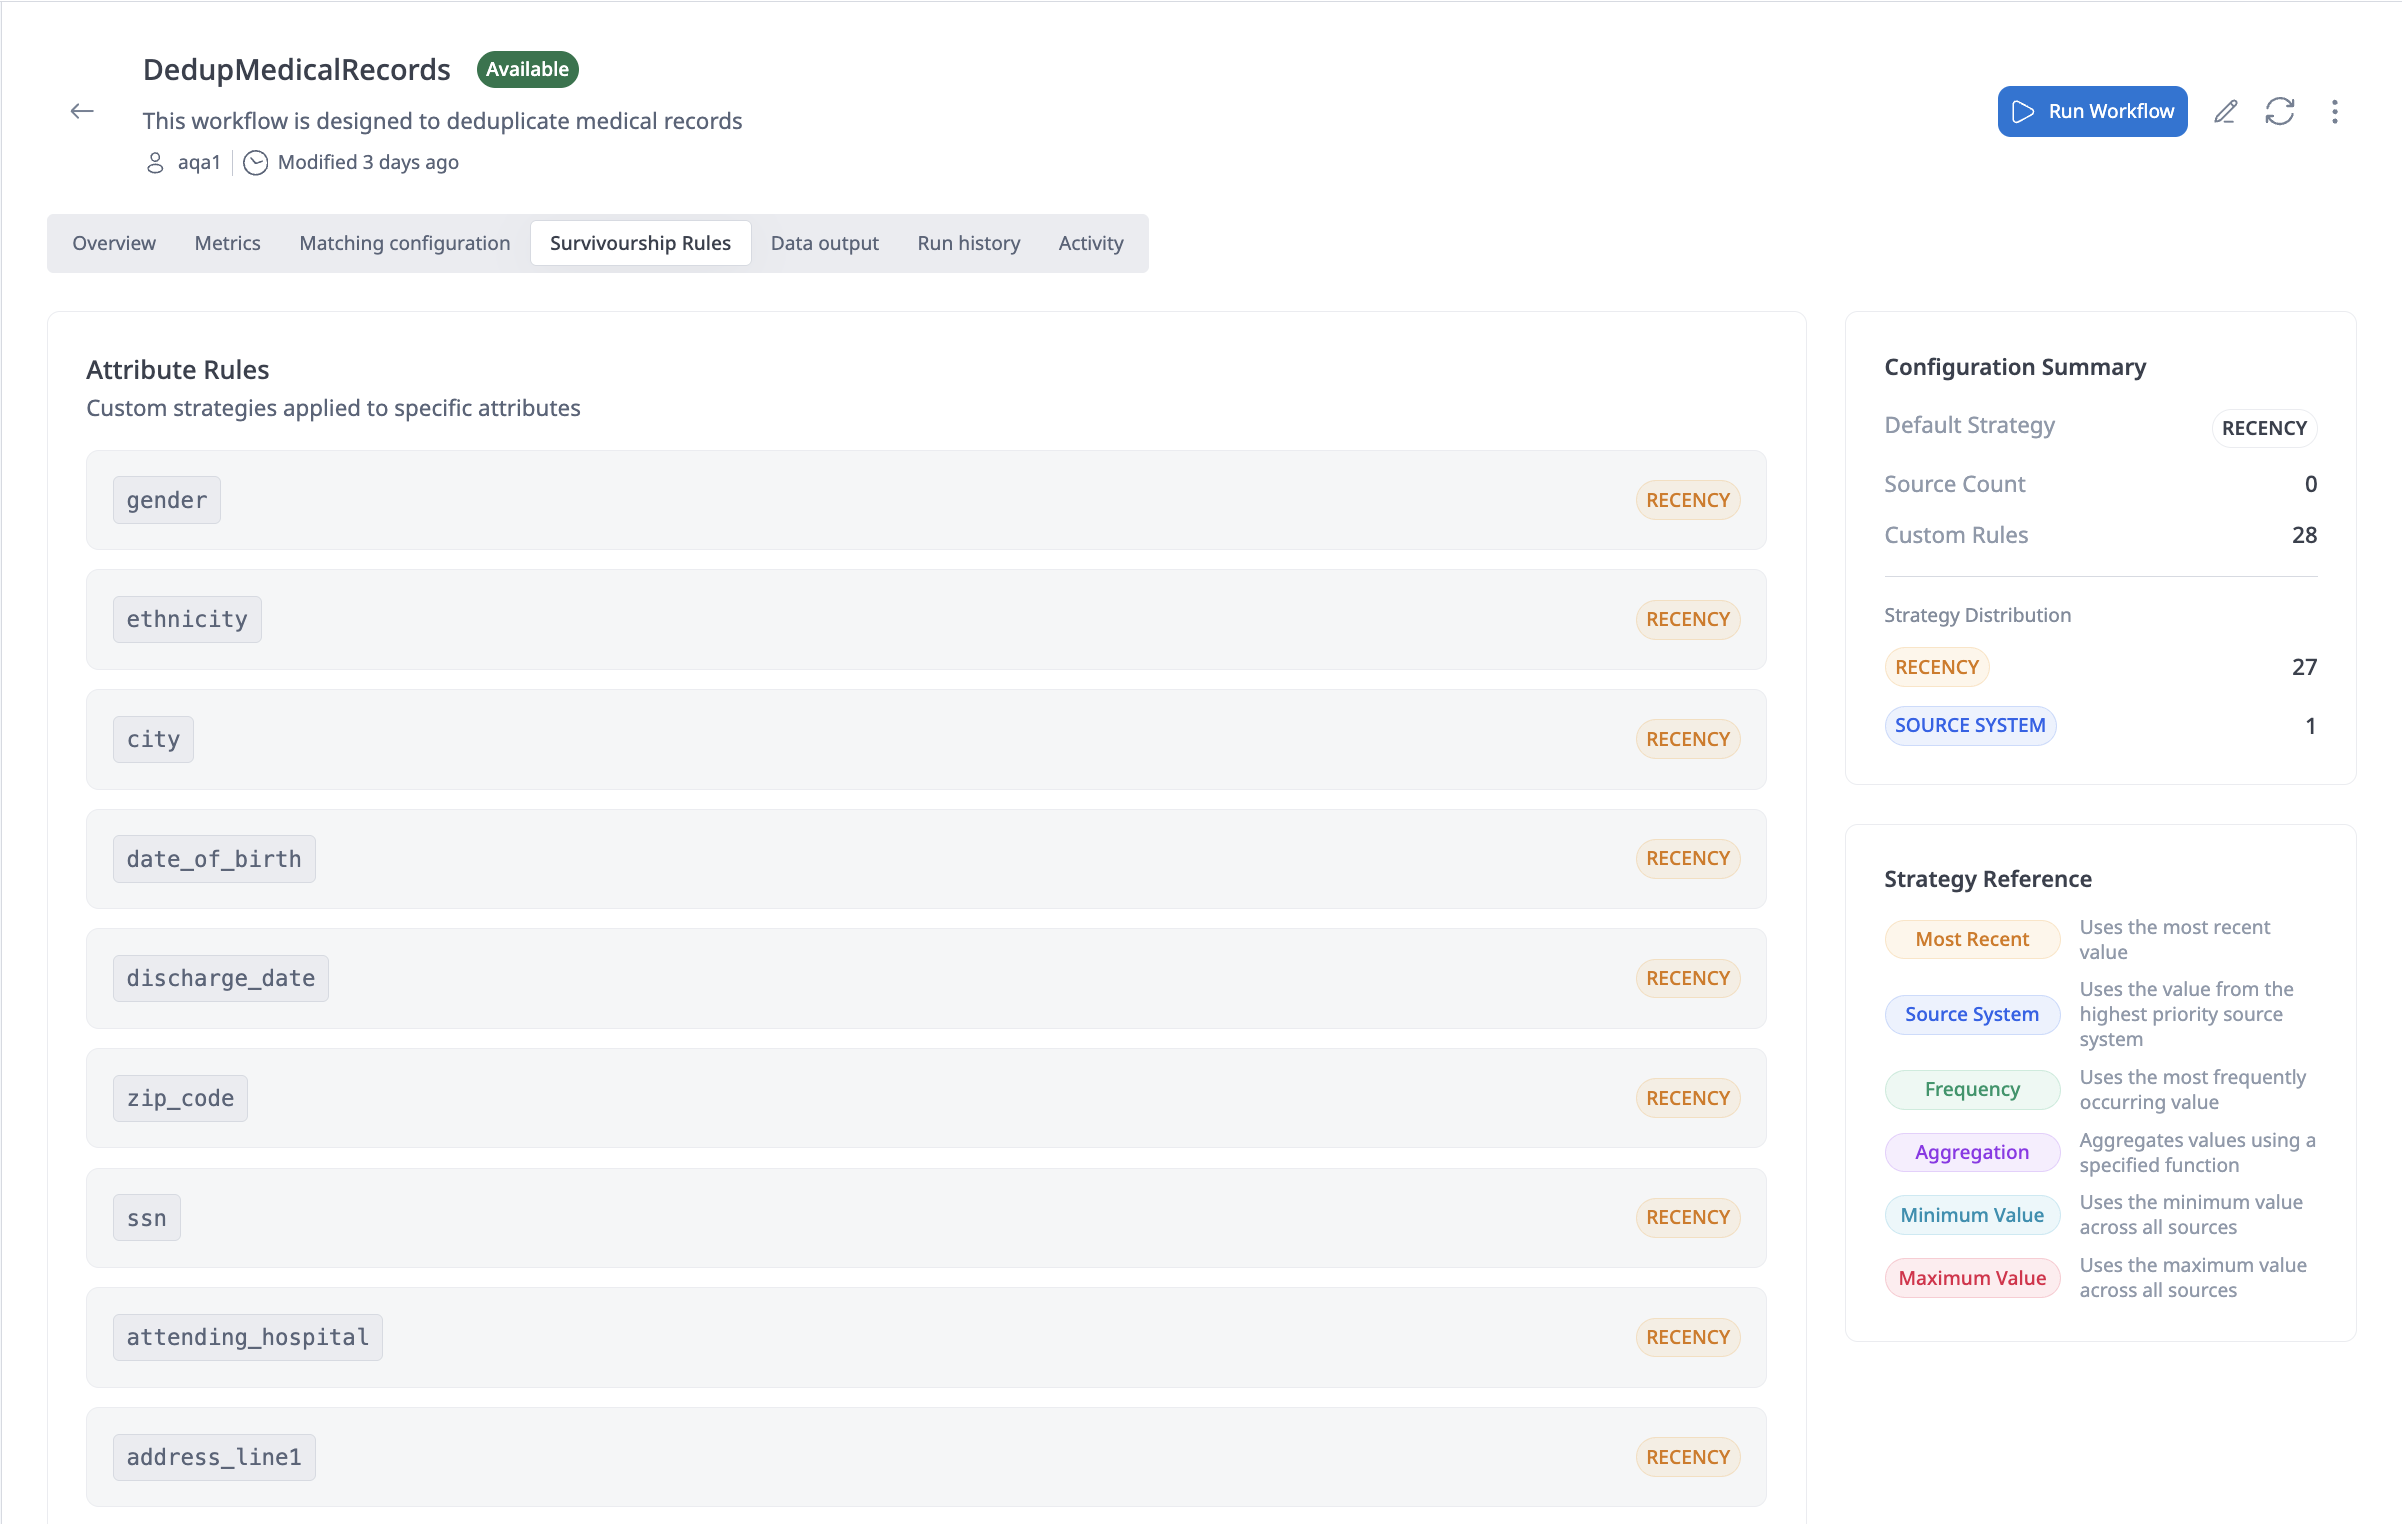
Survivorship rules: The Survivorship Rules tab on the workflow details page shows how values for each attribute will be chosen after matching when multiple source records are merged into a unified master record. Attribute Rules list each attribute (e.g.,
first_name,city,email,surname) and the survivorship strategy applied to it (e.g., FREQUENCY—use the most frequently occurring value). This is where you can see or adjust which strategy is used per attribute.
- Run History Tab: View the complete history of workflow executions. Optionally filter by date range; long histories support pagination.
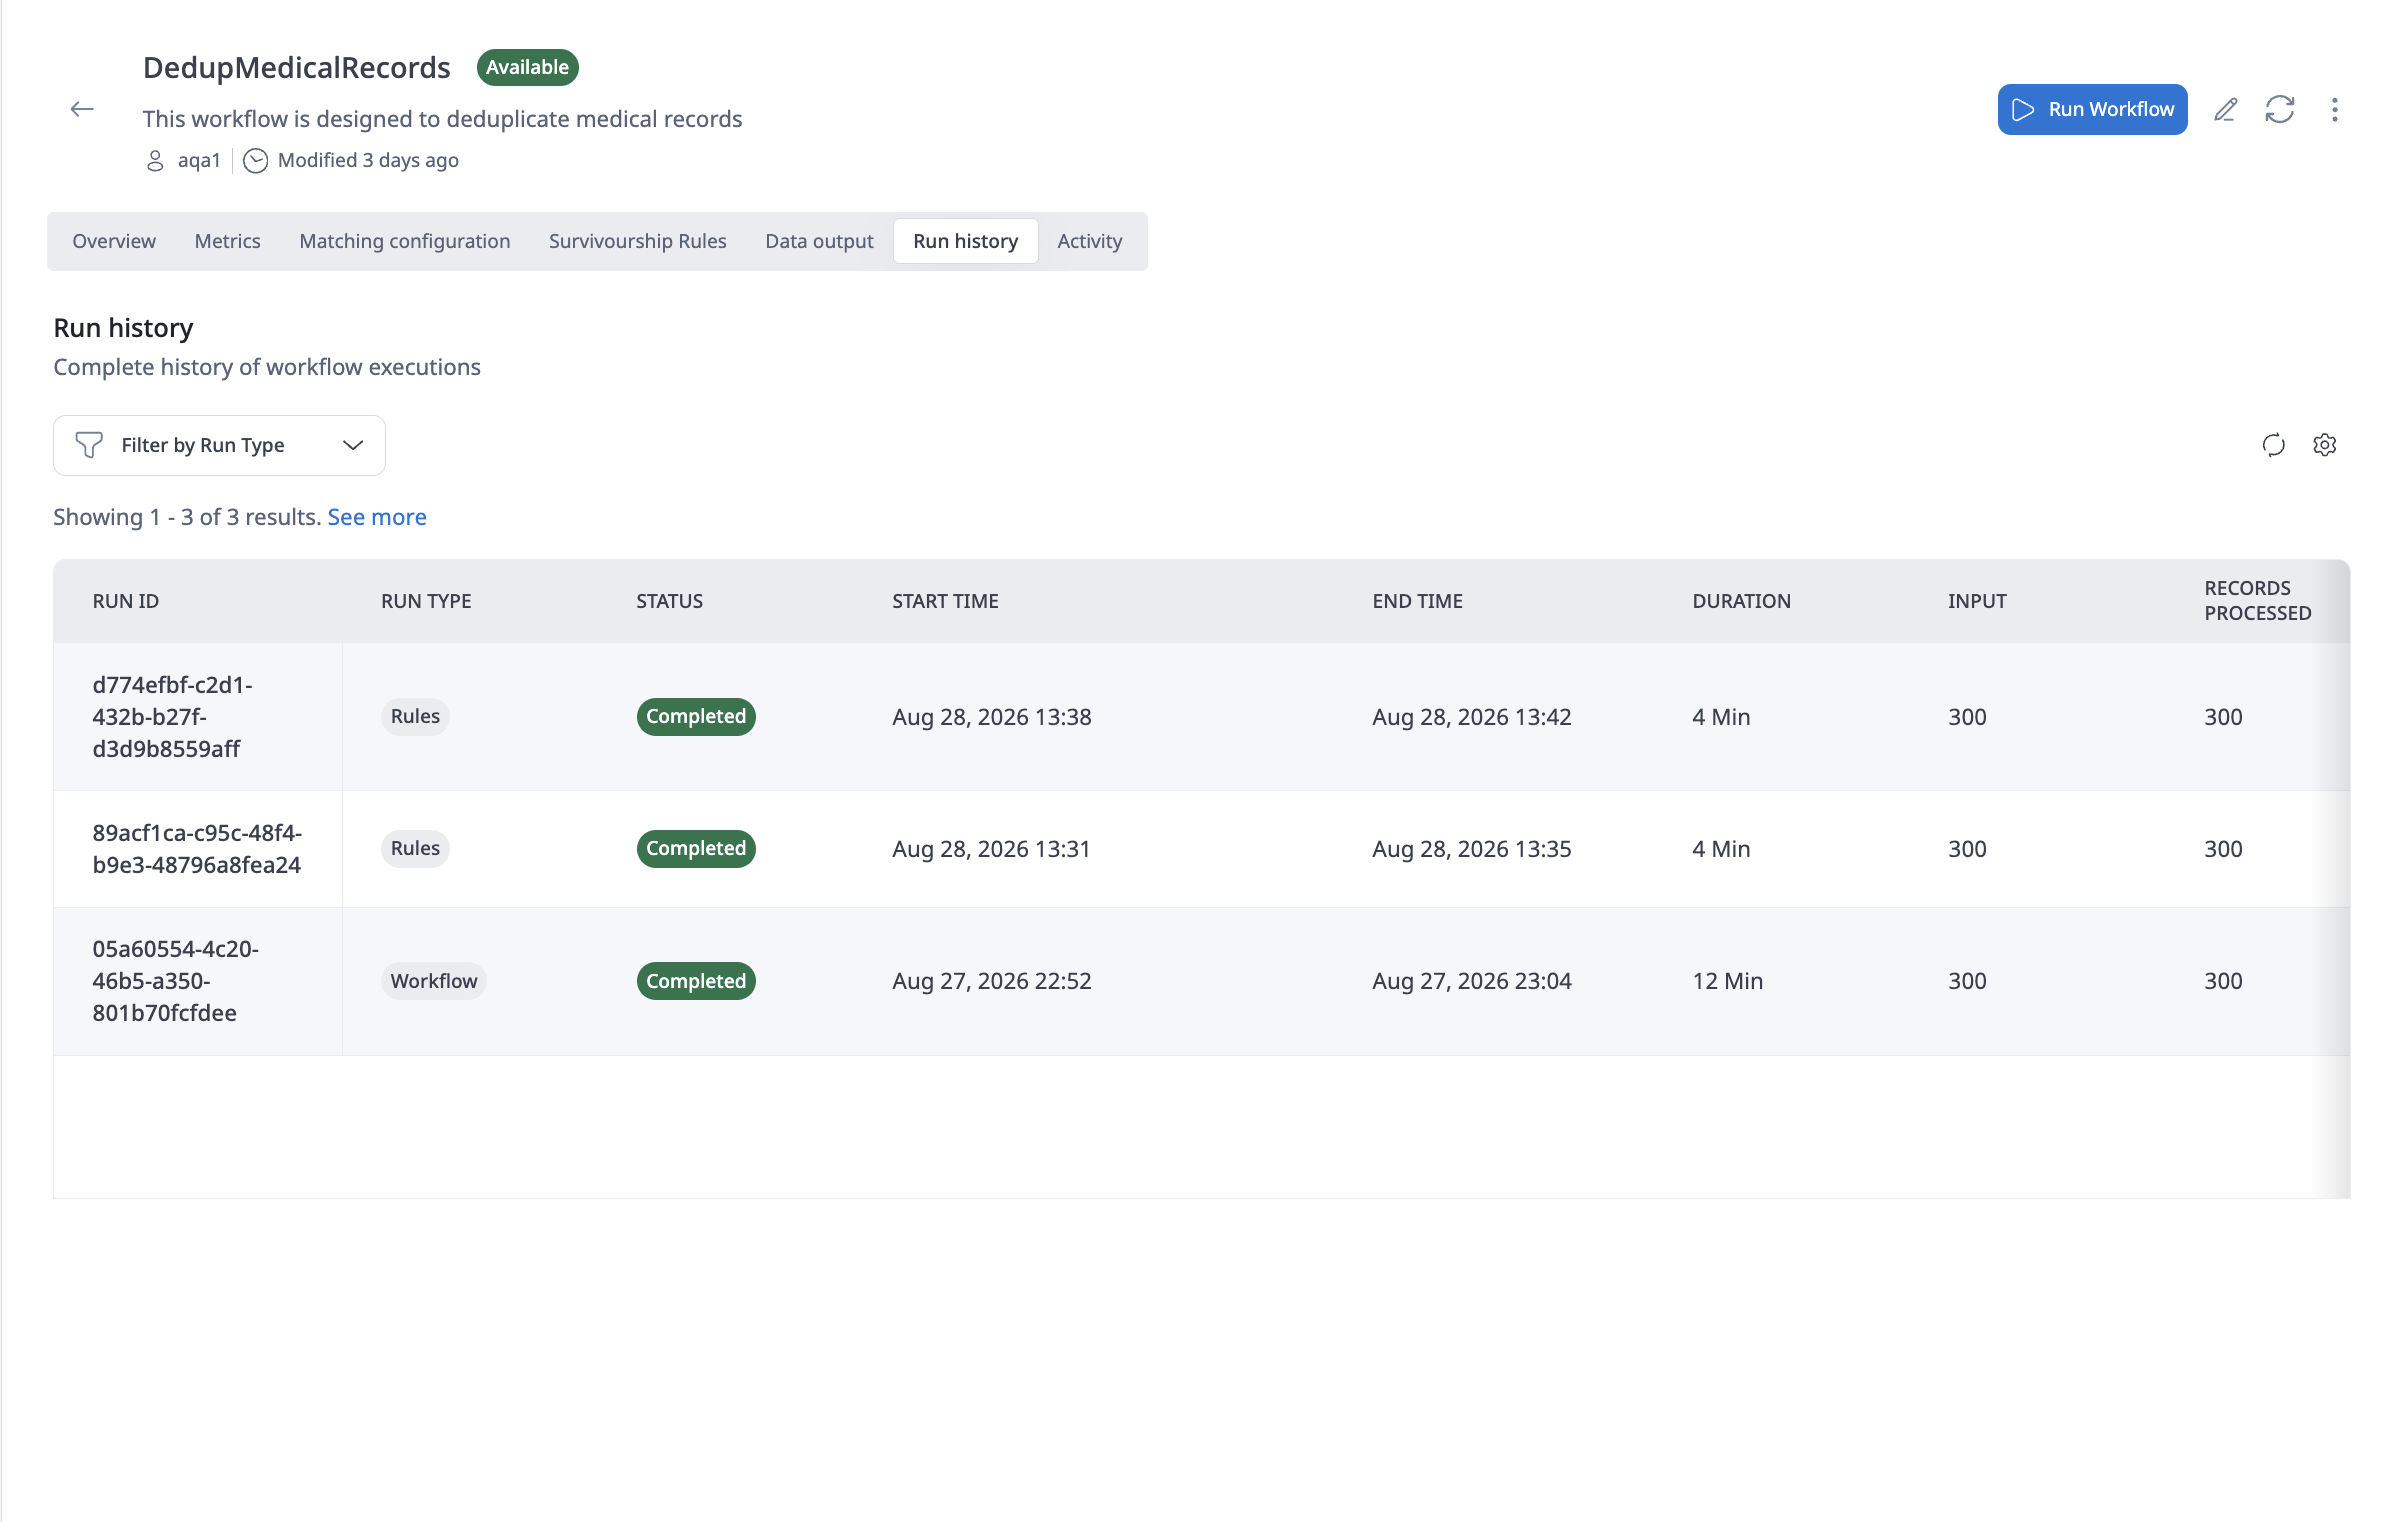
- Run ID: Unique identifier for each execution
- Status: Current status (Running, Completed, Failed)
- Start Time: When the workflow execution began
- End Time: When the workflow execution completed
- Duration: Total execution time (hours when shown)
- Input: Number of input records processed
- Records Processed: Number of records successfully processed
- Golden / Matched IDs: Number of unified master records or unique matches identified
- Compute Capacity: The machine size, machine count, and timeout the run actually used, including any per-run override
- Reviewed: Stewardship actions associated with the run when available
- Activity Tab: View recent changes and events for the workflow, including:
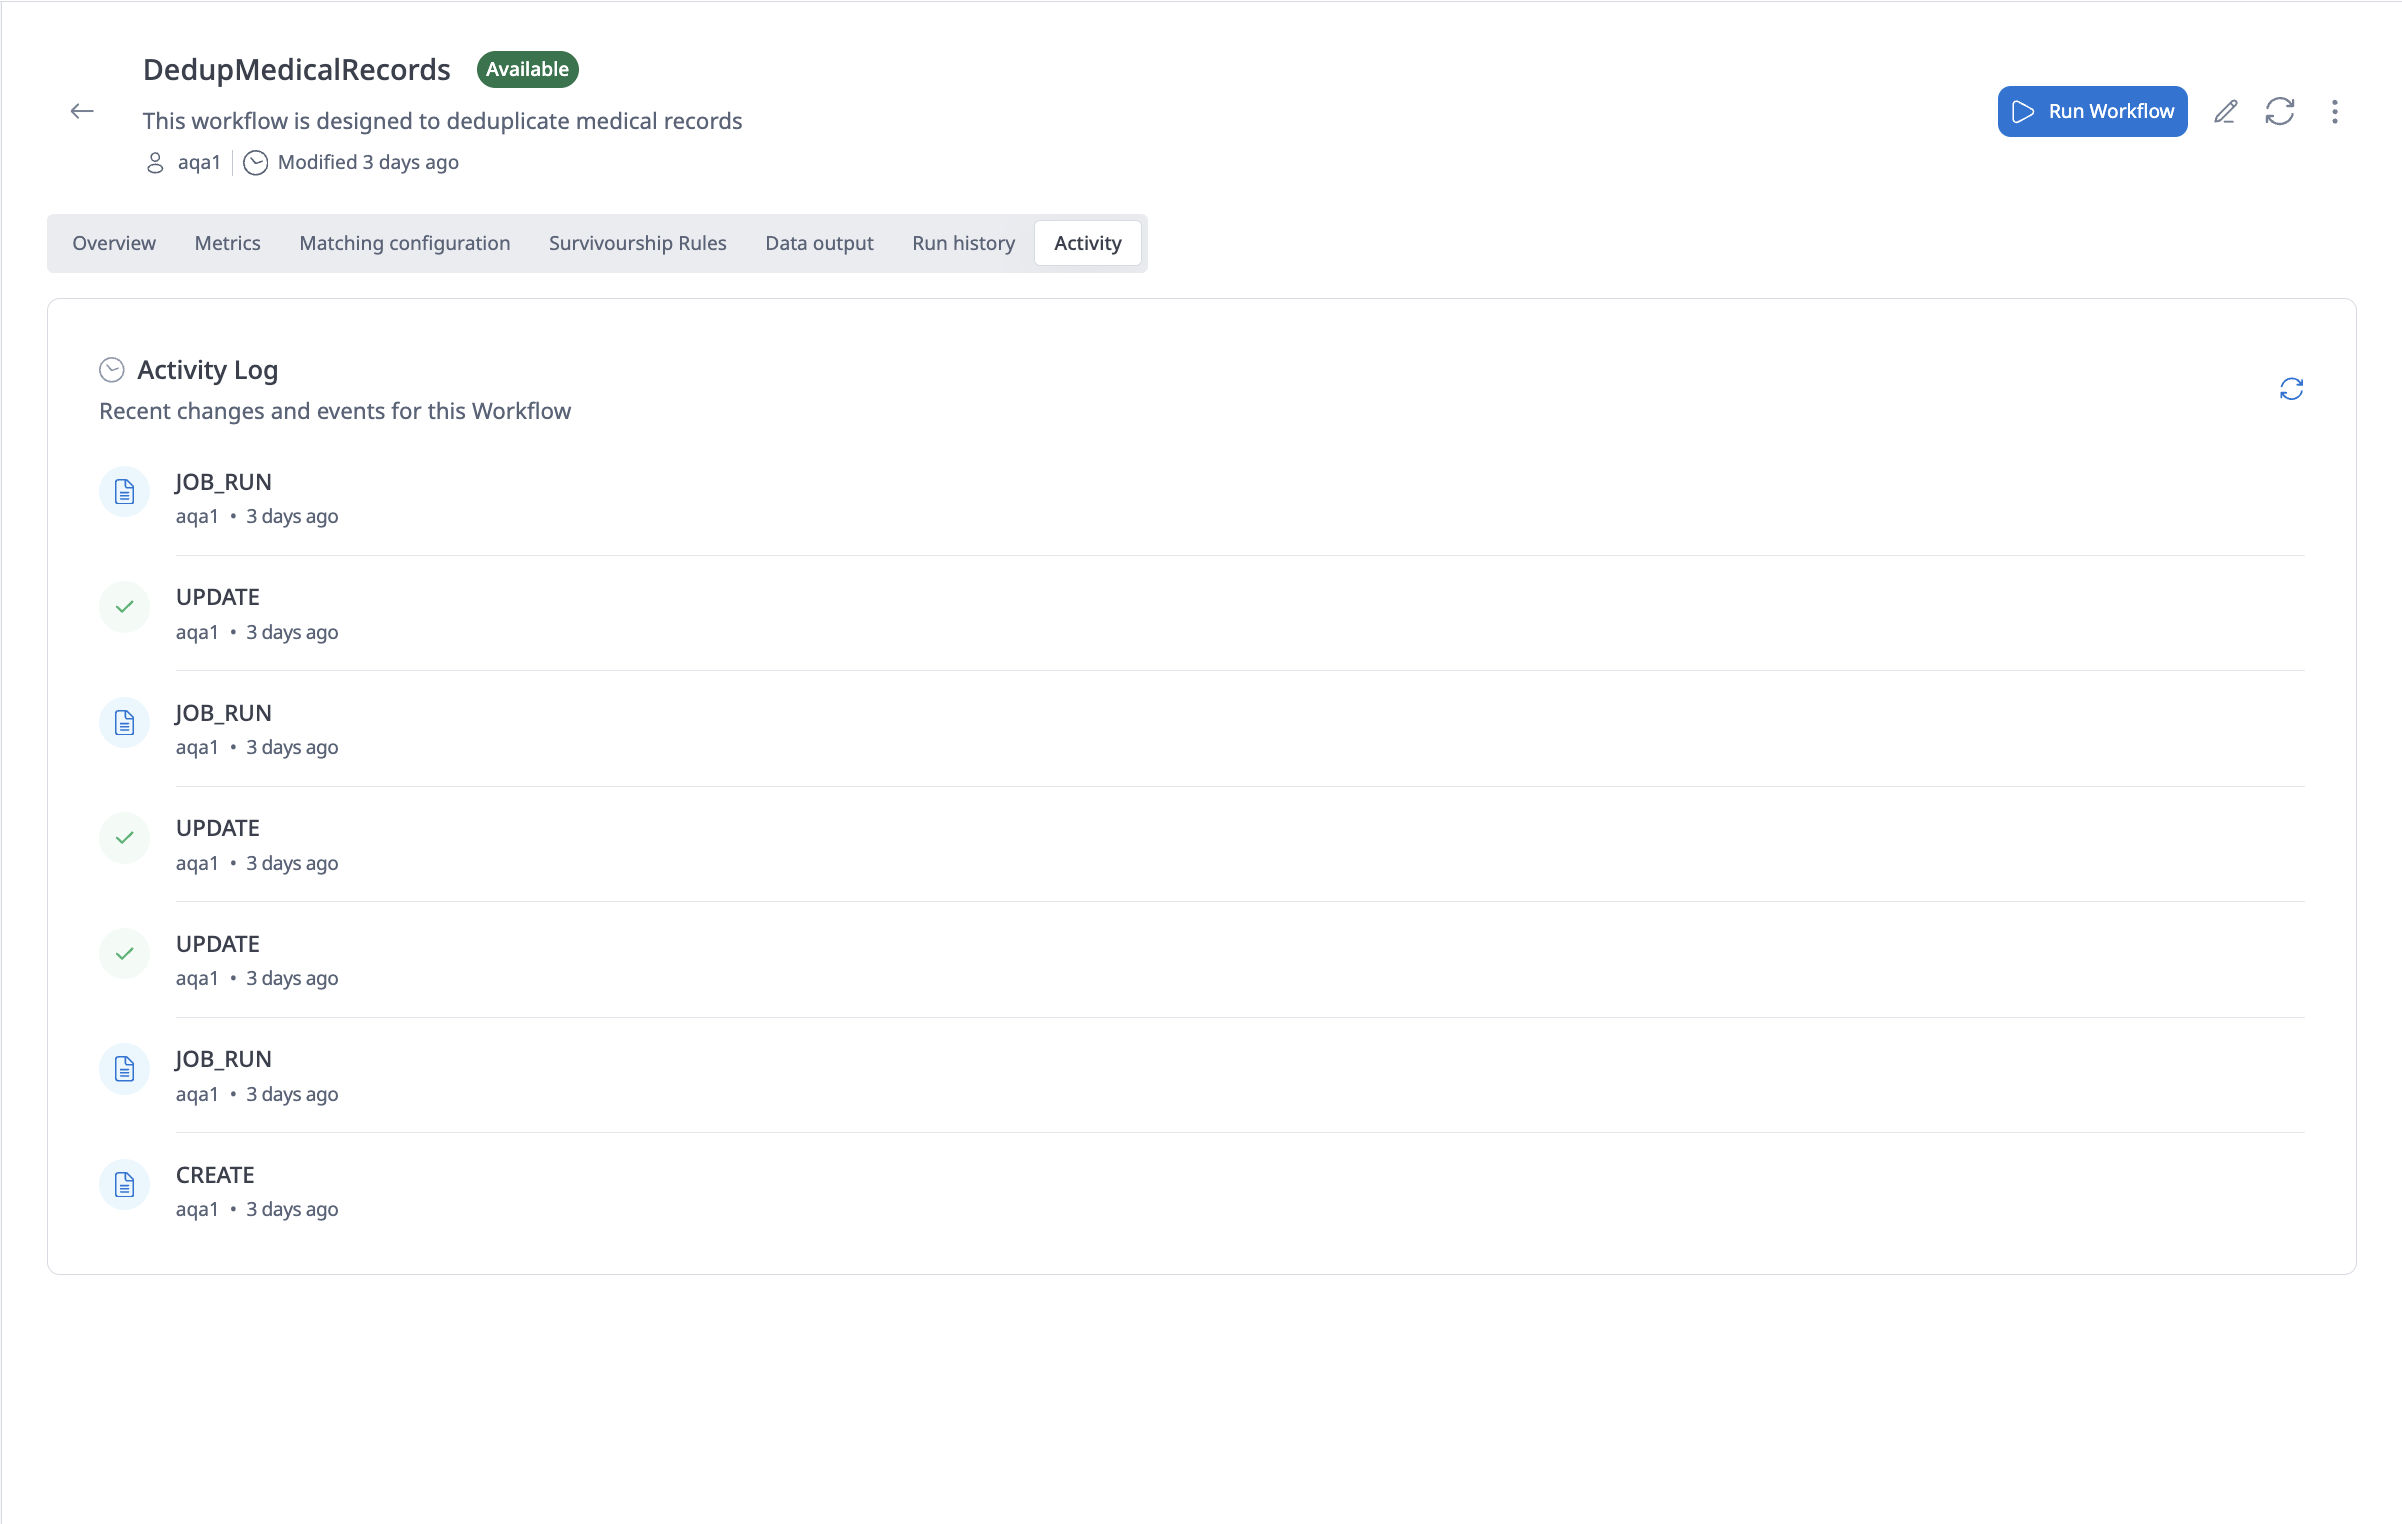
- Workflow updates
- Workflow publications
- Workflow creation
- User actions and timestamps
- Overview Tab: View key performance metrics for this workflow. Metrics are updated as runs finish and as stewards publish or review records, so tiles stay fast even for large golden datasets.
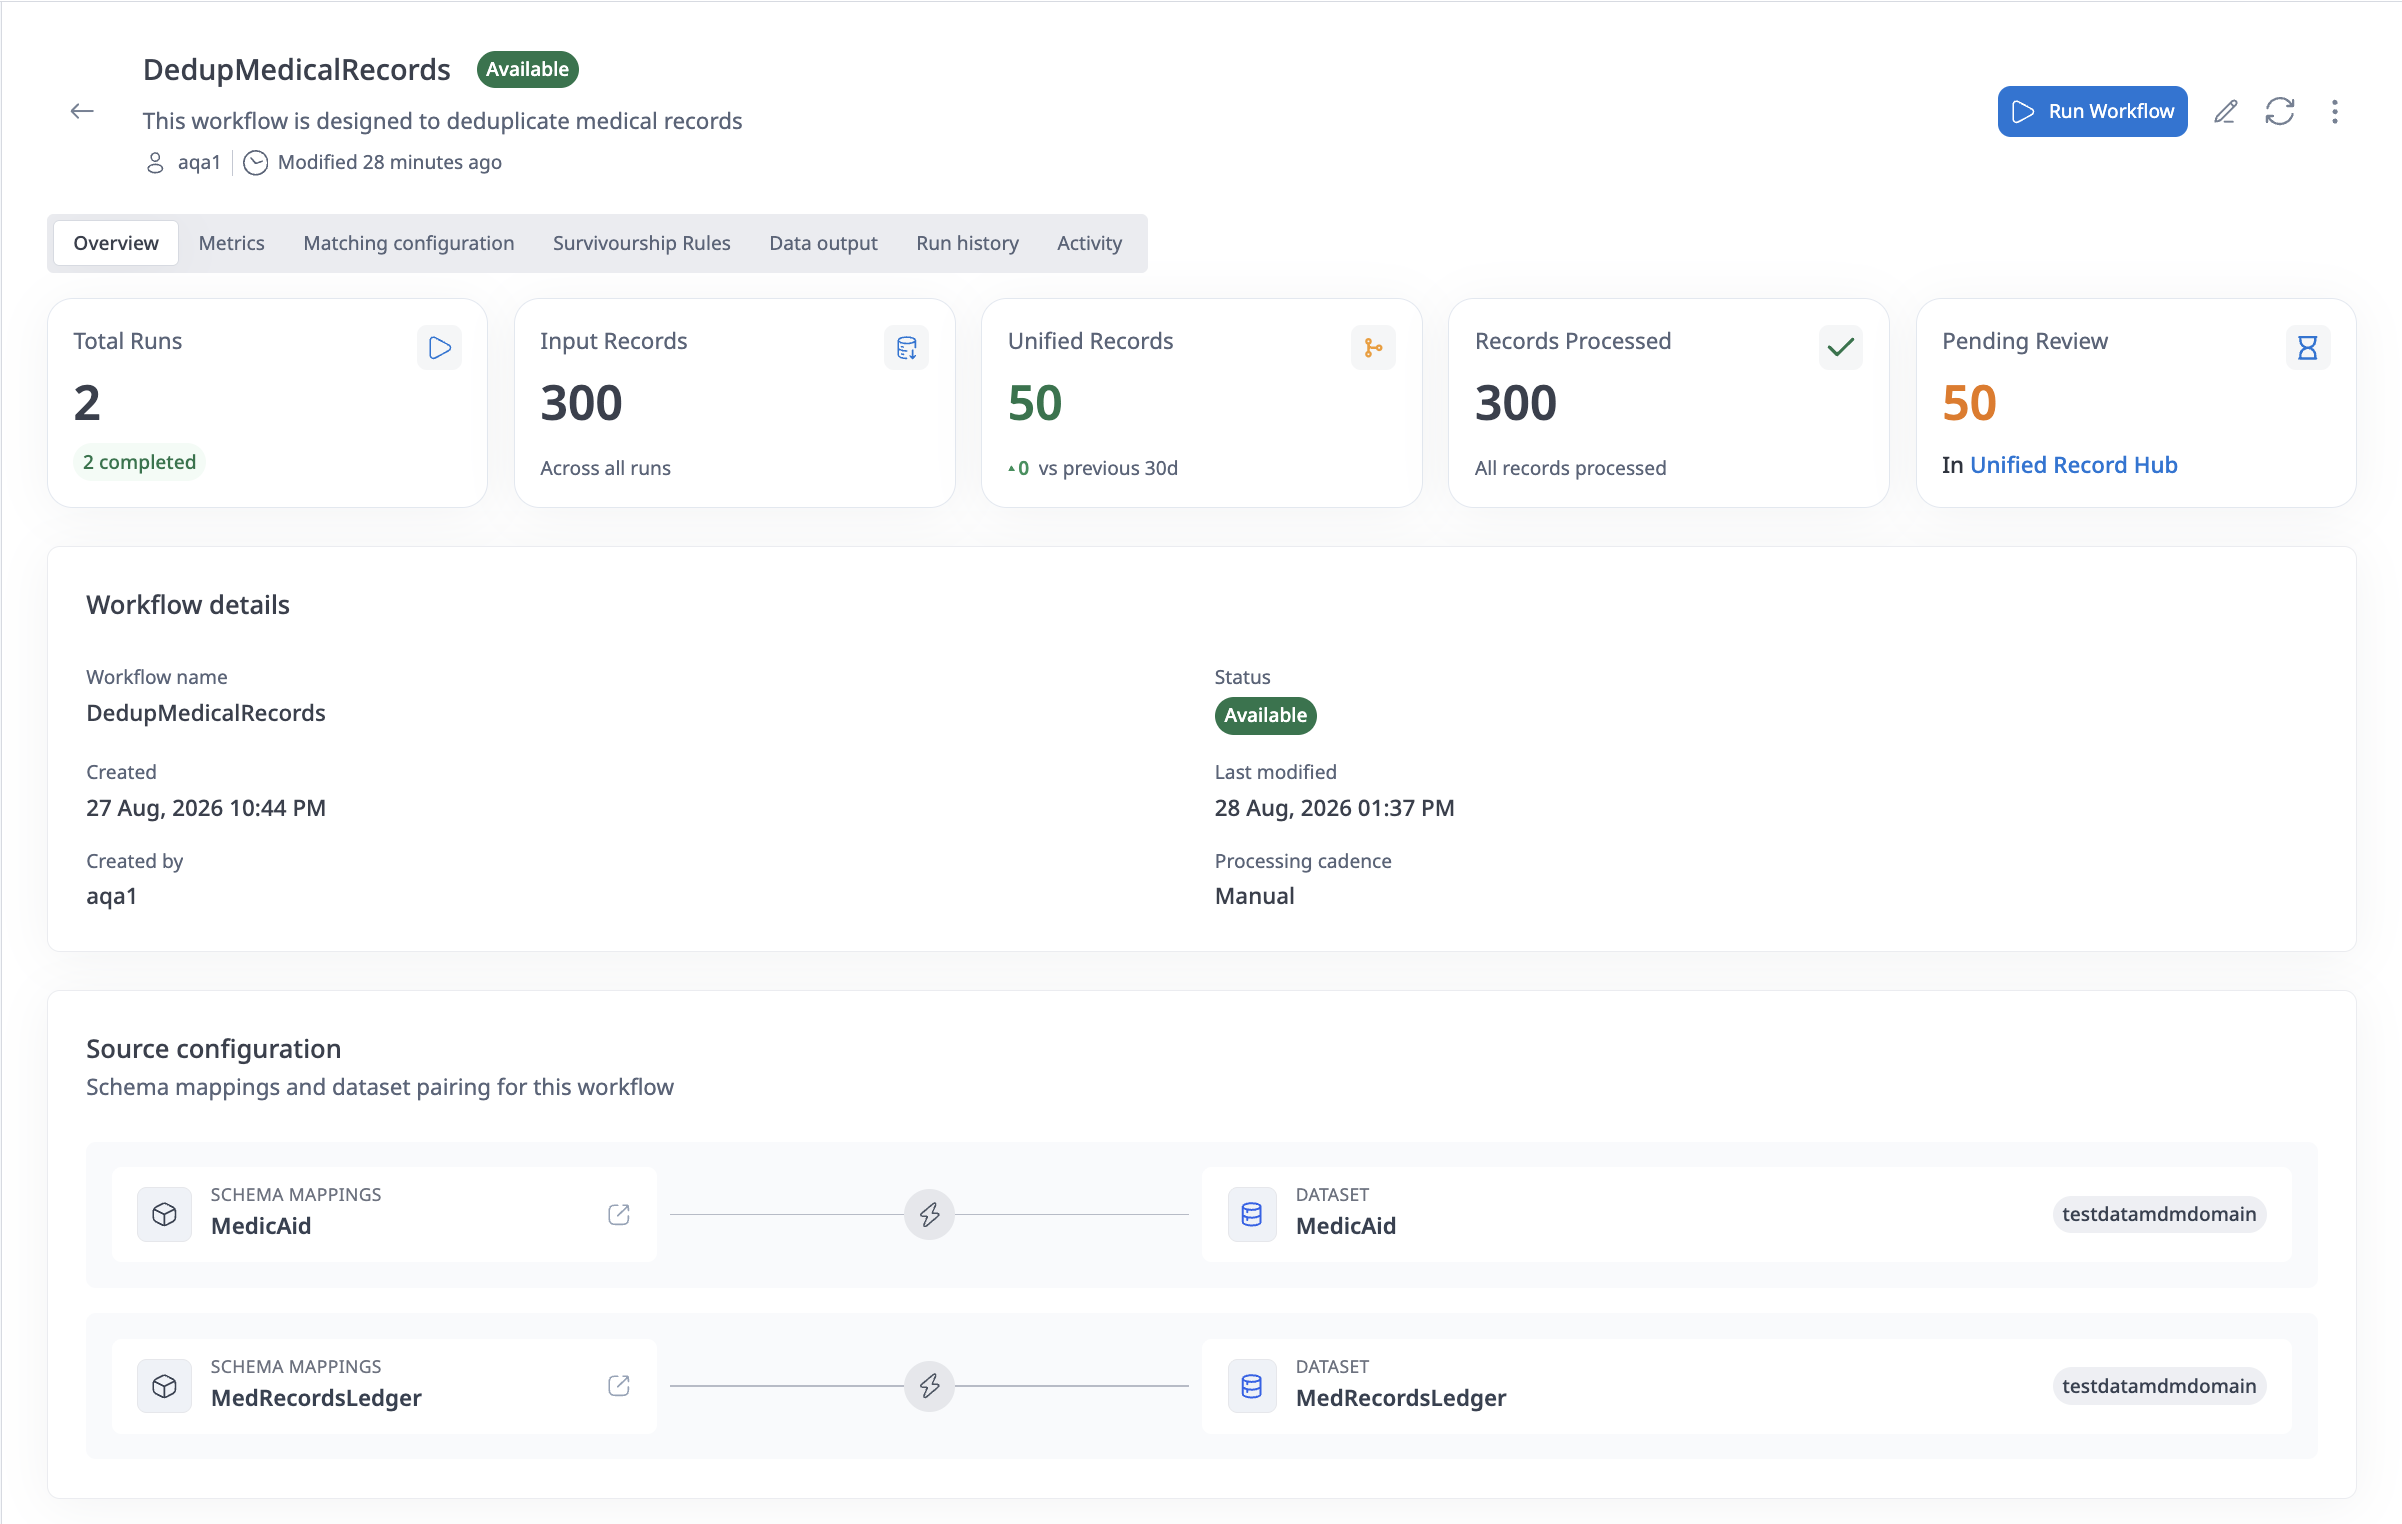
KPI tiles
- Total Runs — Executions of this workflow (with Completed, Failed, and in-progress counts when available)
- Total Input Records — Cumulative source records processed
- Total Golden Records — Distinct unified master records produced
- Records Processed / Records Not Processed — Successful vs skipped or unprocessed inputs
- Total Execution Time — Cumulative run hours (and average hours per run when shown)
- Published — Golden records published for use
- Pending Review — Records awaiting stewardship in Unified Record Hub
- Review completion — Share of review items completed vs still pending (when shown)
Trends and charts
- Time series — Filter by date range and Day or Month granularity to compare Input records vs Golden created, plus published / pending backlog over time
- Execution history — Status mix over time (for example completed vs failed runs) and a breakdown of run outcomes
- Winning / conflict reasons — Distribution of survivorship outcomes (for example Frequency, Source System, Recency) that explain which rule won when attributes conflicted
Runs
- Filter the run list by start and end date
- Each run can show status, start time, input / golden counts, reviewed volume, and execution hours
- Large histories are paginated; load the next page when more runs are available
Prefer a dedicated output dataset per workflow. If several workflows share one output table, metrics and review items for those workflows are combined and can be misleading. See Metrics for a consolidated reference of workflow and Policy Engine metrics.
Workflow Execution Status
Workflows can have the following statuses:
- Running: The workflow is currently executing
- Completed: The workflow execution finished successfully
- Failed: The workflow execution encountered an error and did not complete
How to update an ER Workflow
You can update an ER Workflow to modify its configuration:
- Navigate to the Workflows page
- Find the workflow you want to update
- Click the Edit icon in the Actions column, or open the workflow details page and click the "Edit" button
- The workflow creation wizard will open with your current configuration
- Navigate through the steps to modify any settings:
- Update workflow name or description
- Modify entity mappings
- Change matching technique settings
- Adjust survivorship rules
- Update output destination
- Click "Save" or "Update Workflow" to save your changes
When a workflow is updated:
- Changes to entity mappings may require re-running the workflow
- Changes to matching rules only affect new workflow runs, and existing unified master records are not updated retroactively
- Changes to survivorship strategies also do not update existing unified master records automatically, but they can be applied to the records from the last run with Run Survivorship Rules, without repeating the matching step
- A full run is required to bring in input records added since the last run
Editing Workflow Details
- Workflow Name: Can be updated, but must remain unique. Only letters (A–Z, a–z), numbers, hyphens, and underscores are allowed.
- Description: Can be updated at any time
- Entity Mappings: Can add or remove entity mappings, but removing mappings may affect existing runs
Editing Matching Configuration
- Resolution Type: Can be changed, but may require reconfiguration of matching rules
- Rule Type: Only Simple is supported in the current version (not editable).
- Processing Cadence: Can be changed at any time
- Matching Rules: Can add, remove, or modify rules. Rule priority can be reordered.
Editing Survivorship Rules
- Default Strategy: Can be changed at any time
- Source Priority: Can be reordered at any time
- Attribute Rules: Can add, remove, or modify attribute-specific strategies
After editing any of these, use Run Survivorship Rules to apply the new configuration to the unified master records from the last full run. A full workflow run is only needed to bring in new input records.
Editing Output Configuration
- Output Destination: Can be changed, but writing to a different dataset will create new records rather than updating existing ones
- Output Fields: Can modify which fields are included, hidden, or hashed
How to delete an ER Workflow
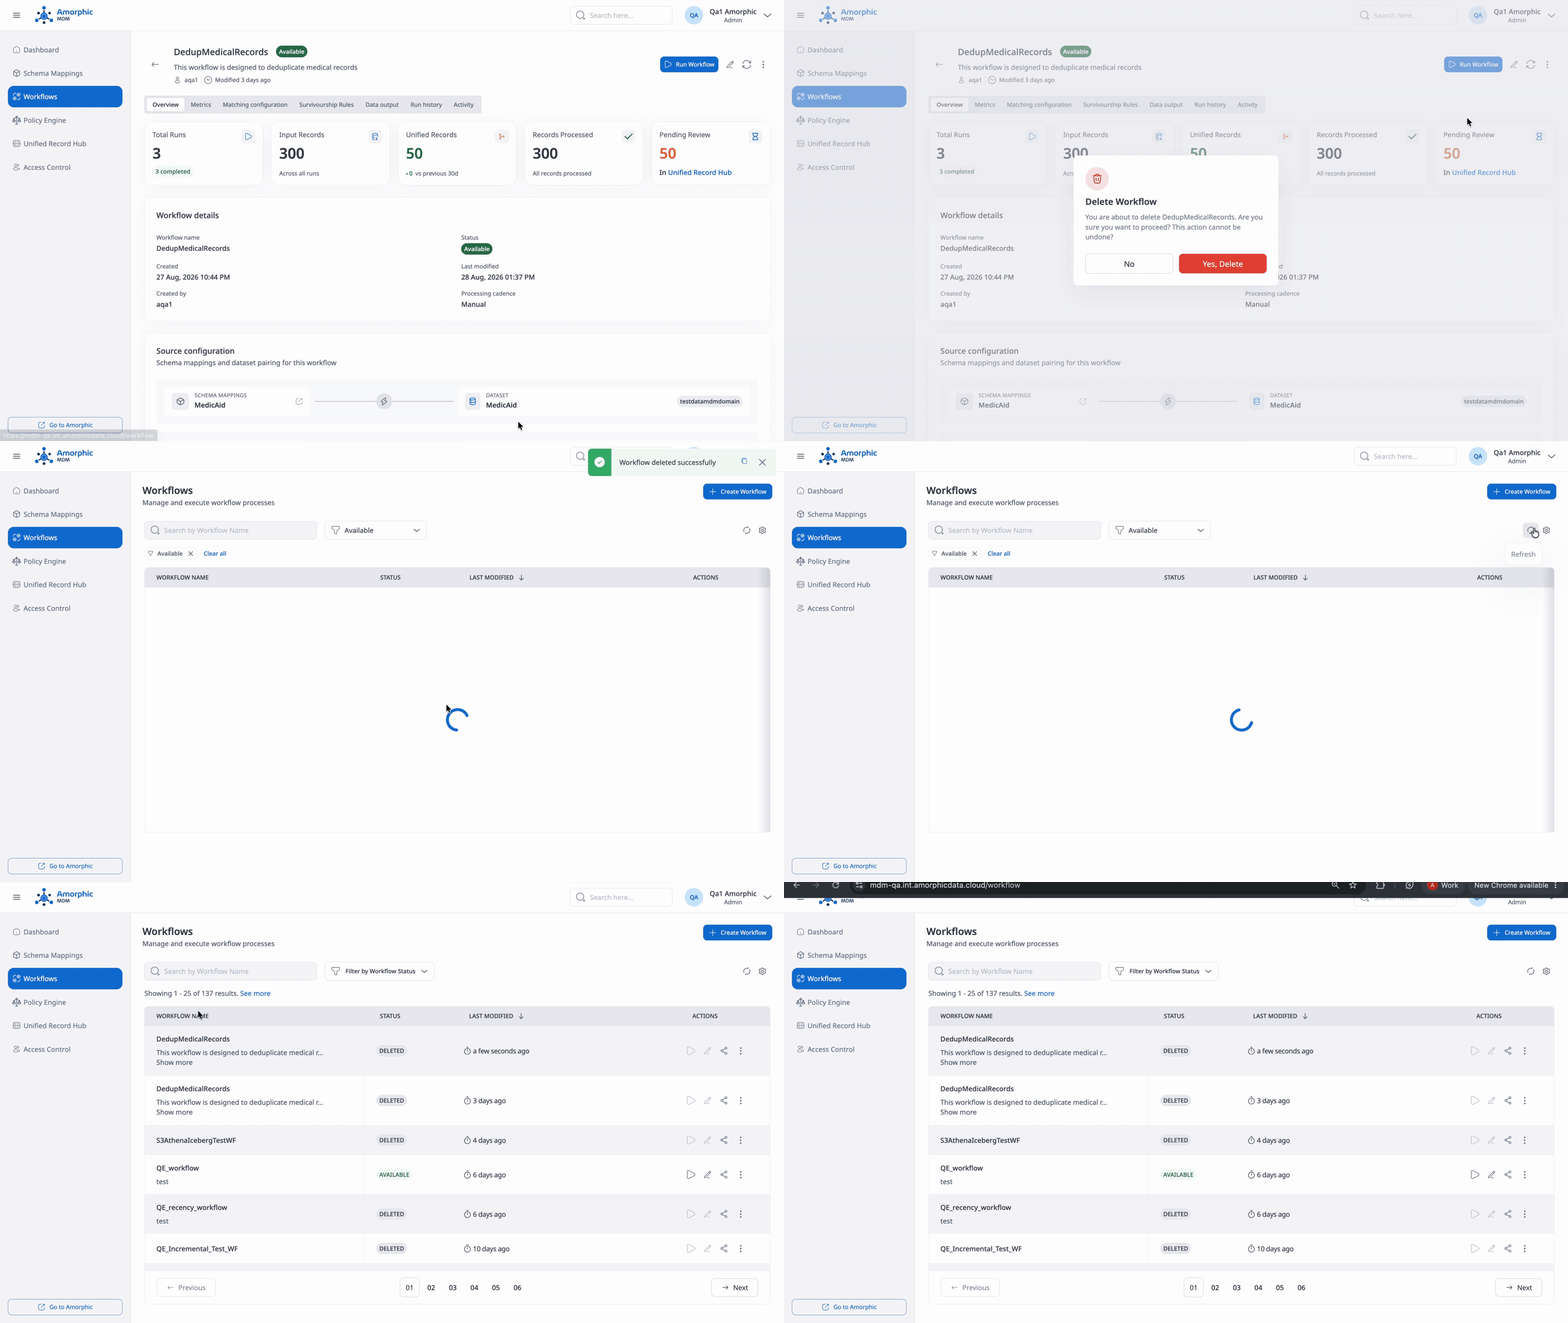
To delete an ER Workflow:
- Navigate to the Workflows page
- Find the workflow you want to delete
- Click the three vertical dots (ellipsis) icon in the Actions column
- Select "Delete" from the dropdown menu
- Confirm the deletion in the dialog that appears
Deleting a workflow:
- Cannot be undone
- Unified Master Records and workflow metadata remain intact; only backend services are cleaned up
- Does not delete the output datasets or unified master records that were created by the workflow
- Does not delete the run history (historical execution records may be retained for audit purposes)
Data Engineers and Admins can delete workflows. Data Stewards and App Viewers cannot delete workflows.
Custom option to Run Survivorship Rule
When you run a workflow, you can choose a custom Run Survivorship Rule option instead of a full workflow run. This option skips the Entity Resolution (ER) matching job and applies survivorship rules directly on the output of a previous ER run.
Use this option when:
- Source data has not changed, and you only need to re-apply updated survivorship rules
- Survivorship strategies or attribute rules were changed after a successful ER run
- You want to regenerate unified master records without re-running matching
How it works
- Open the run confirmation dialog from the workflow list or the workflow details page.
- Select Run Survivorship Rule as the run type.
- Confirm the run.
The system reuses the Entity Resolution output (ERJobId) from the latest eligible prior execution and starts a survivorship-only job. Matching is not re-executed.

Prerequisites and behavior
- At least one prior workflow execution with a completed Entity Resolution job is required. If no reusable ER output exists, the survivorship-only run is blocked.
- The workflow must be in Available status.
- A survivorship-only run cannot start while another survivorship rule job (or a conflicting full run) is already in progress for the workflow.
- For incremental workflows, a full manual run may be restricted after the first successful execution, but a survivorship-only re-run remains available so updated rules can still be applied.
Survivorship-only runs are marked as survivorship runs in execution history and do not replace a full ER workflow run when source data or matching rules have changed. Use a normal workflow run in those cases.