
JDBC Advanced data load
To perform Advanced data migration, users need to create dataflow within the JDBC datasource. A advanced data load dataflow in Amorphic can be set up using the "Add Dataflow" option, which is available on the Datasource Details page under the "Dataflow" tab.
As part of Amorphic advanced data load, datasets are not required to be created already as a pre-requisite. When user creates a dataflow then datasets will be created as part of the dataflow and will be used for data ingestion. The user needs to toggle the 'CreateDataset' option during dataflow creation. These datasets are tightly coupled with the dataflow and cannot be used for normal data upload either from UI or any other process.
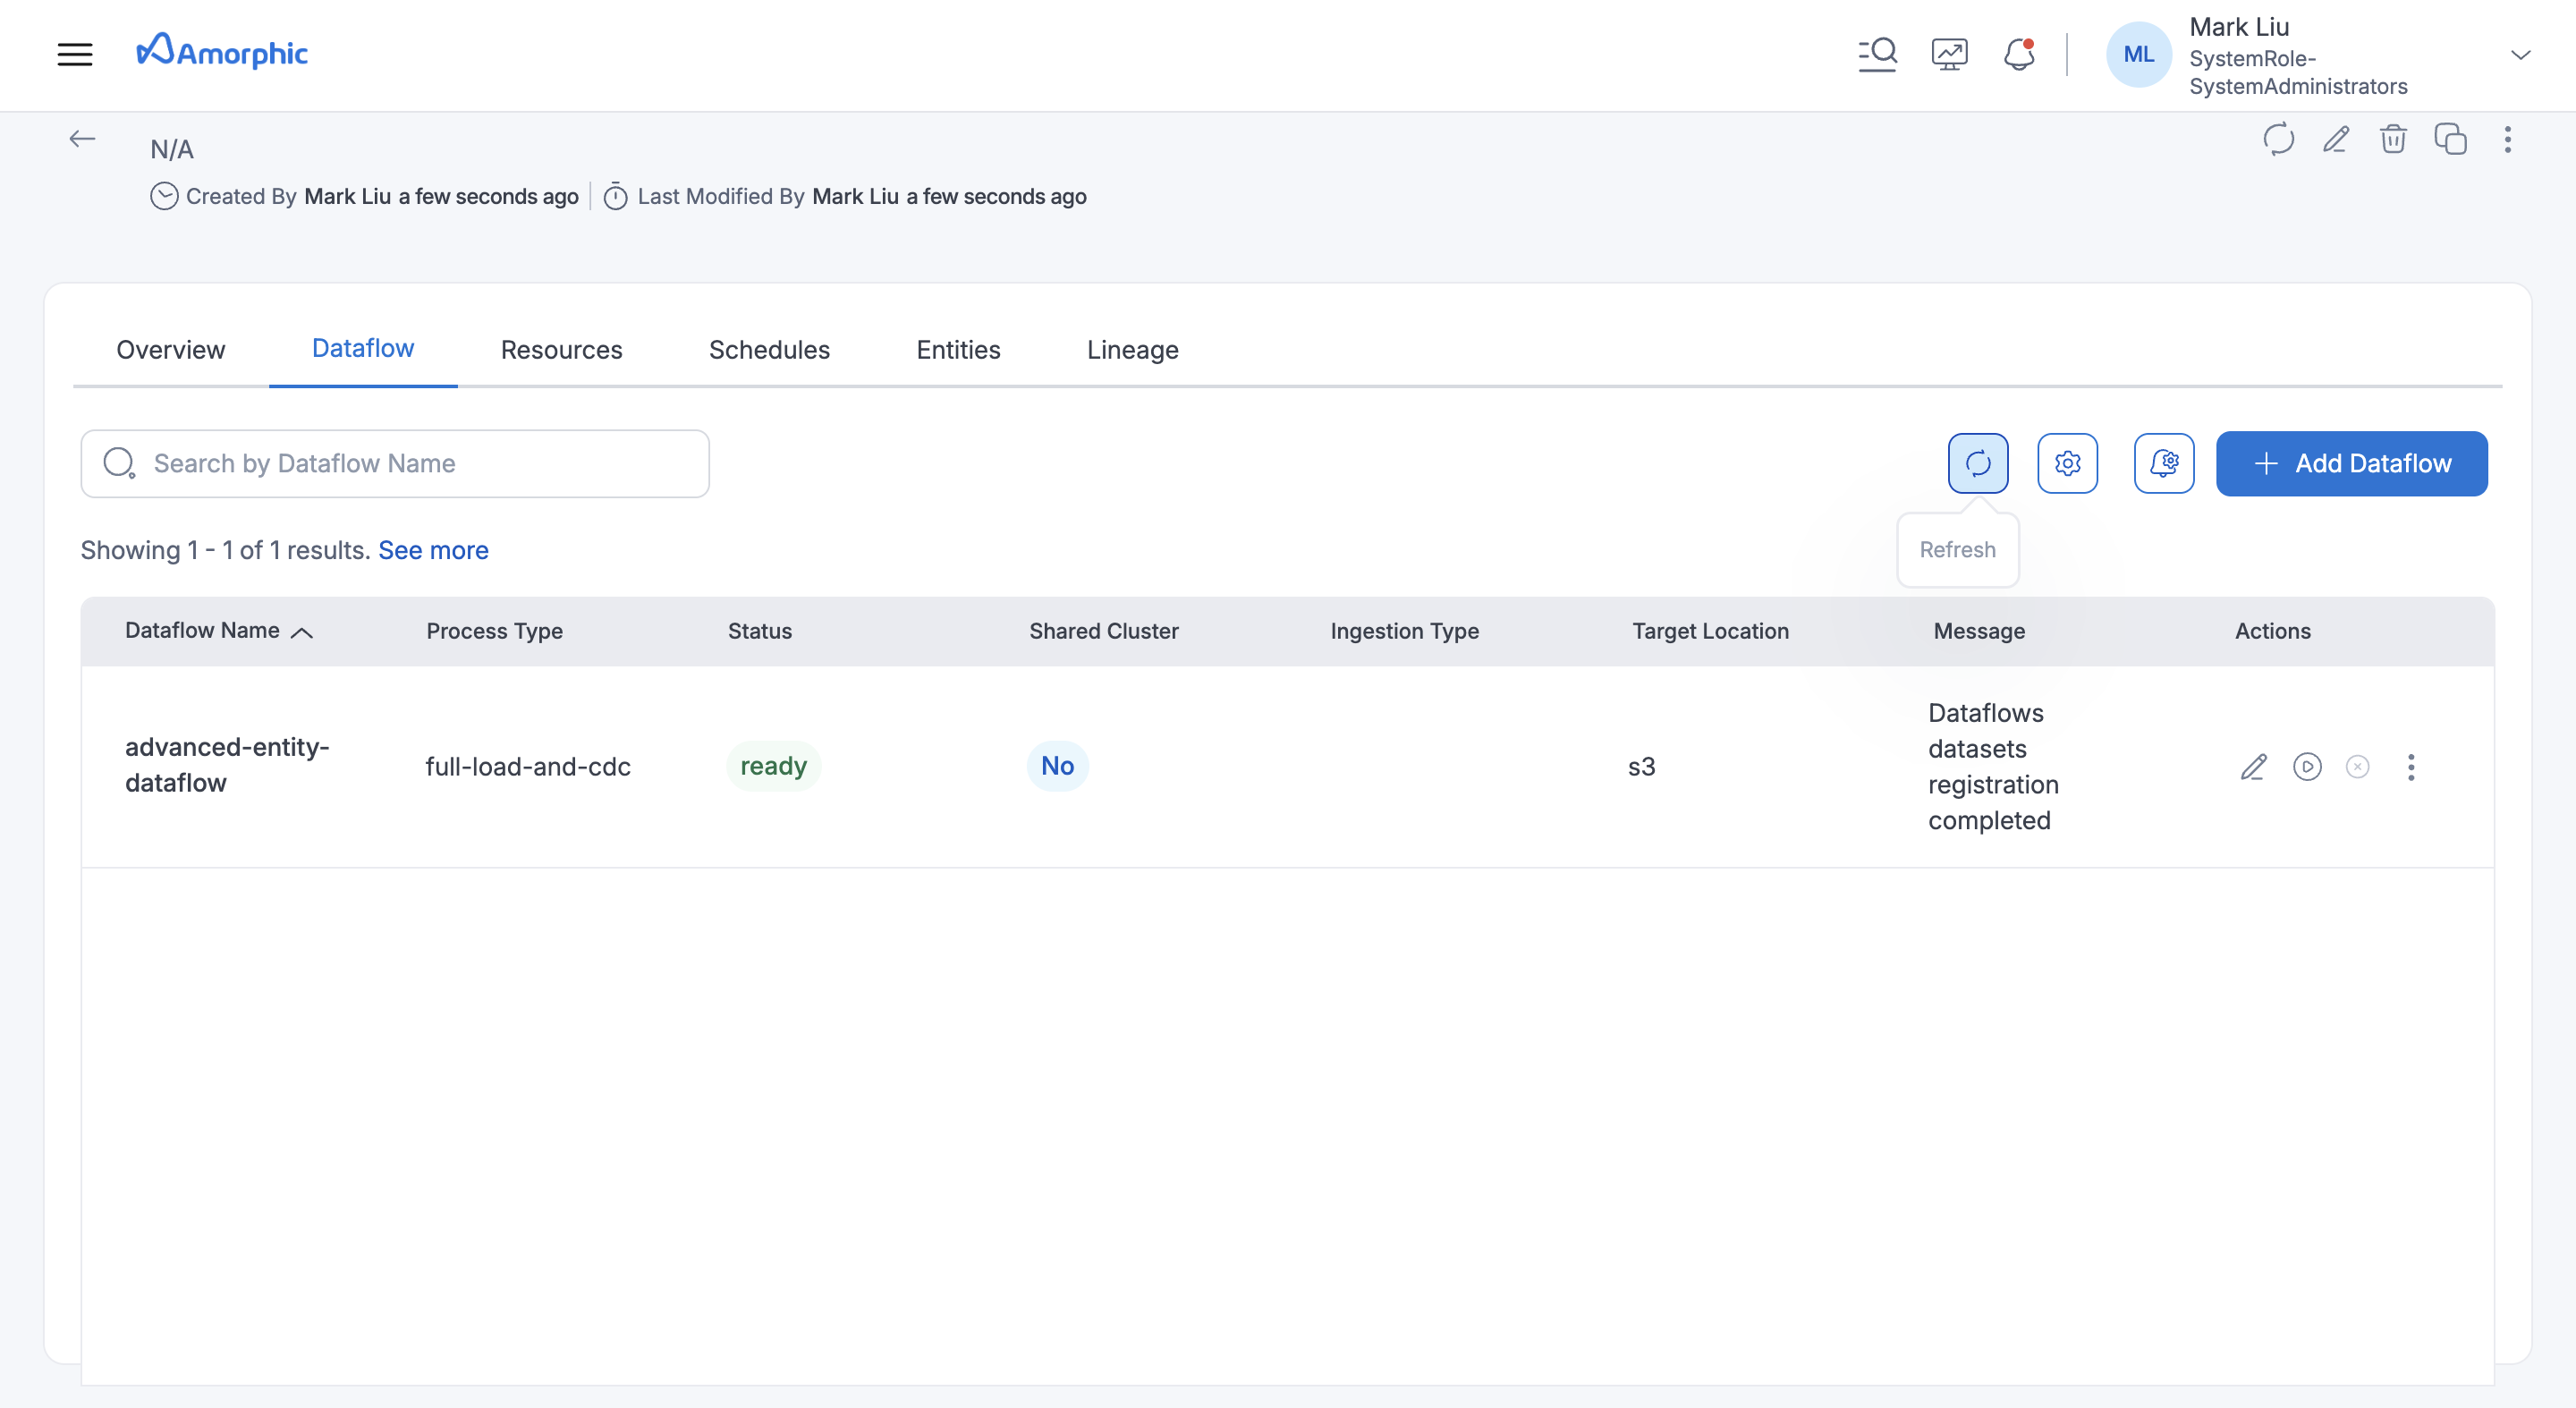
The following picture depicts the dataflows page in Amorphic
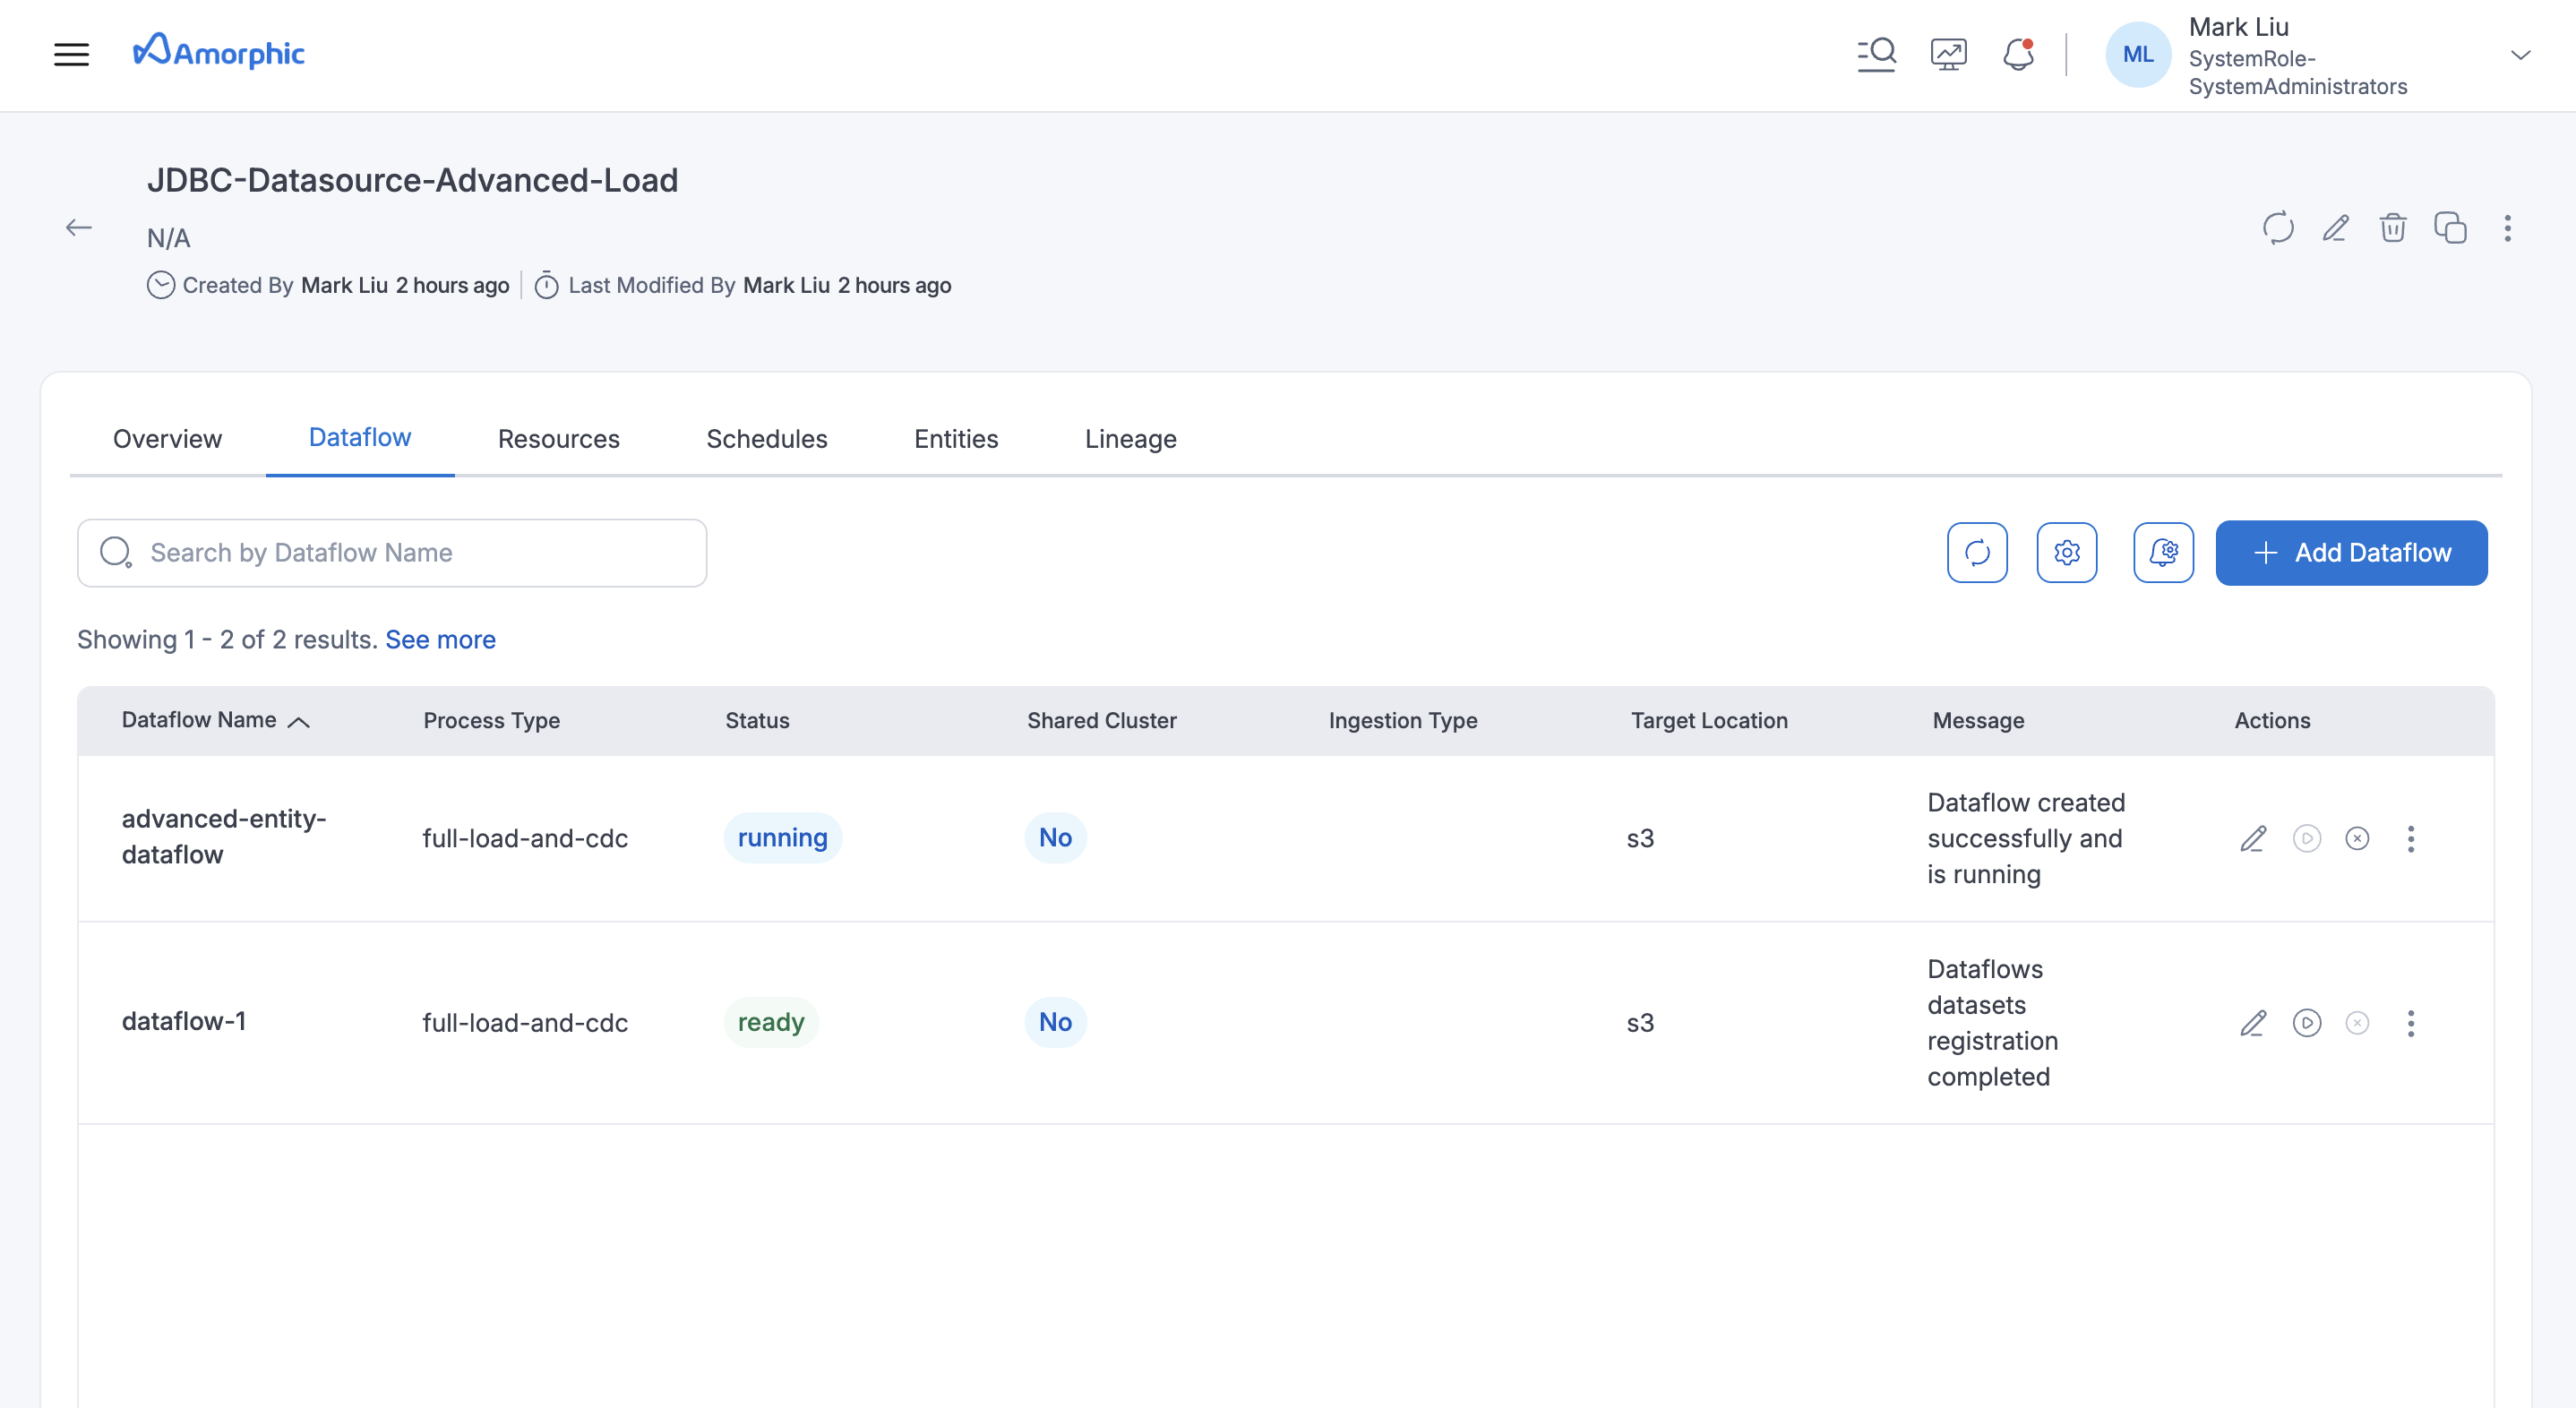
Dataflows
Dataflow refers to a unit of work that migrates data from a source database to a target database.
The steps for creating the dataflows are outlined below.
How to create a Dataflow
Below are the steps that are required to create a advanced data load dataflow in Amorphic.
Dataflow Specifications
-
Dataflow Name: Name of the dataflow to be used, an identifier of the dataflow. -
Process Type: Full Load, Change Data Capture (CDC) & Full Load and CDC- Full Load : This option simply migrates the data from your source database to your target database.
- Full load and CDC (Migrate existing data and replicate ongoing changes) : This option performs a full data load while capturing changes on the source. After the full load is complete, captured changes are applied to the target and henceforth.
- CDC only (Replicate data changes only) : In this option, only ongoing data changes are captured.
-
Target Location: Select the target where the data has to be migrated.Note- For S3Athena target types, the file will include headers by default when create dataset is set to True.
- For S3Athena target types with Parquet format, if using an existing dataset the user needs to add the following columns to the dataset.
__ts_ms(type:timestamp)__op(type:string)target_location(type:string)
-
Data Format: Data Format is used to determine the target data format of a dataflow. For S3 target dataflows the format is JSON. For S3Athena target dataflows the format can be JSON or Parquet (Iceberg). -
Shared Cluster: If a shared cluster should be used for a dataflow then this option should be selected as Yes and a dropdown appears where user can select one of the shared clusters that are available. This is an optional field and will be defaulted to No if no option is specified.
Dataset Specs
-
Create Datasets for each table: Set this option to True to create new datasets as the targets. Disable this option to select existing Amorphic datasets as the targets for each source table. This setting applies on a per-dataflow basis and affects all selected source tables. For more details, refer to the Ingestion Configuration section below. -
Target Table Preparation Mode: Indicates how the target dataset should be handled when the load starts.-
S3 and S3Athena with JSON format support Truncate and Append. Truncate deletes existing data in the dataset before load; Append adds data to existing.
-
S3Athena with Parquet (Iceberg) supports Append and Cdc. For process type full-load-and-cdc or cdc, only Cdc is allowed; for full-load, both Append and Cdc are allowed.
NoteThis is an optional field. If the user opts to select existing Amorphic datasets instead of creating new ones during dataflow creation and no option is selected for this attribute, it will default to Append in the backend.
-
Table(s) selection
- Select all the tables that are needed to be loaded into Amorphic.
- Schemas and tables can be filtered if necessary with the filter on the top.
- After selecting the tables, click on Next which is at the end of the page to proceed with the metadata edit/update.
Ingestion Configuration
The user can configure data ingestion in the dataflow with two options: 'Create Datasets' set to true or false.
1. Dataflows Involving the Creation of New Datasets
-
Informations in this page will be used as metadata to register the datasets in Amorphic.
Dataset Name: This option is used to edit the Dataset Name's in bulk by adding prefix/suffix to the generated names.Dataset Description: Edit the generated description by using this option.Domain: Edit domain for the datasets.Keywords: Edit Keywords for the datasets.
2. Dataflows Using Existing Amorphic Datasets
Dataset Name: This option is used to select the dataset in Amorphic where the data needs to be ingested. User can select the datasets based on selected target location. For example, If user selects S3 as target location then only S3 datasets are applicable. For S3 and S3Athena datasets, only append-type datasets can be selected, while for Redshift datasets, both append and update (latest record) types can be selected.
-
Users should ensure they select the correct dataset when using CreateDataset as False for the Dataflows.
-
For S3Athena dataflows with Parquet format, only Iceberg datasets should be selected, and users should choose CDC datasets for CDC-type dataflows and Append datasets for Append-type dataflows
-
For S3Athena dataflows with JSON format, only datasets with
SerDe= OpenXJSONSerDe should be selected.
-
In case of S3 target location whole schema can also be selected instead of individual selection.
-
Enable Filters, Transforms: This option will enable additional config that can be applied either on the source tables or on the target data while running the dataflow and during the data ingestion.Source Table
id name description manager_id budget created_at 123 John Doe {"address": {"city": "Los Angeles", "zip": "90001"}} M789 2000 2025-05-20 07:53:39 456 Alice Ray {"address": {"city": "New York", "zip": "10001"}} M234 1000 2025-05-19 04:23:30 125 Bob Lee {"address": {"city": "Chicago", "zip": "60601"}} M321 1500 2025-05-21 02:53:13
The table shown above represents the source table. All the following filter and transformation rules will be applied to this source table, and the resulting output will be referred to as the target table
Filter & Transformation Rules
-
Filter rules are used to filter the data while ingesting the data to Amorphic. Below are the rules that are supported during ingestion.
- Filter Records by Expression
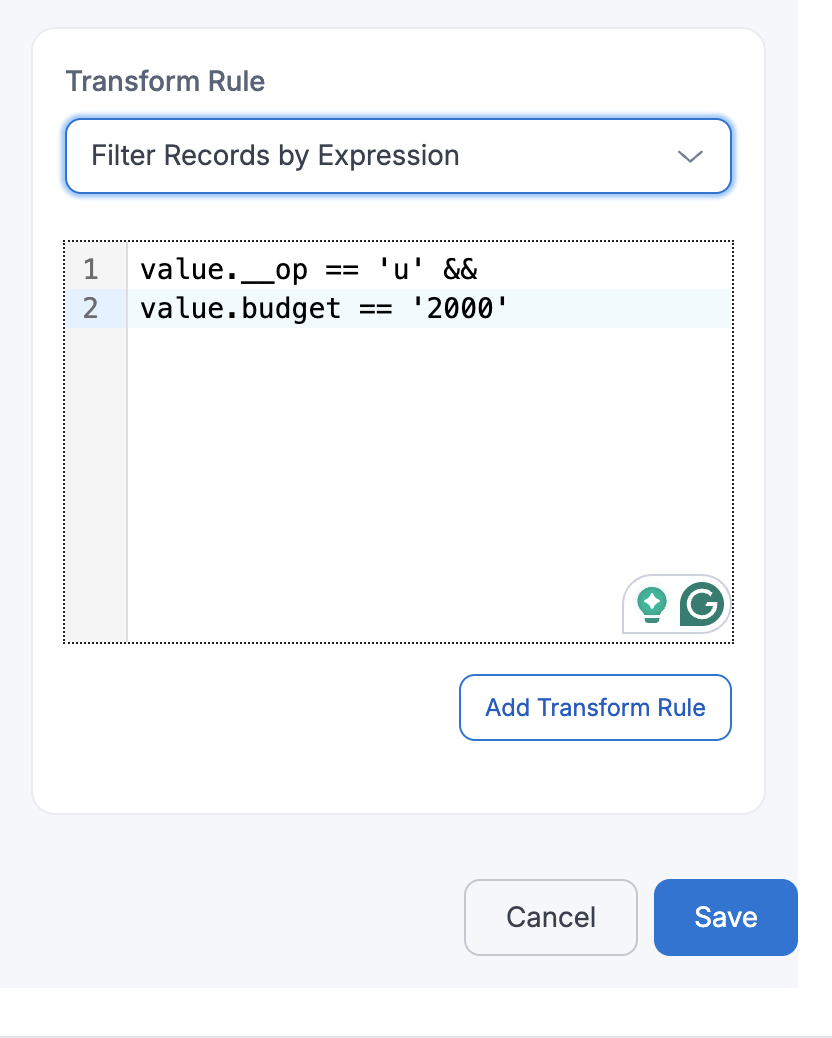
If a user applies FilterRecordsByExpression with
Expression=value.__op == 'u' && value.budget == '2000', then only update (u) events where thebudgetfield equals2000will be captured and passed downstream.id name description manager_id budget created_at 123 John Doe {"address": {"city": "Los Angeles", "zip": "90001"}} M789 2000 2025-05-20 07:53:39 -
Transformation rules are used to modify the column names or datatype of the table while ingesting the data to target, below is the list of transformation rules that are available.
- Add New Column
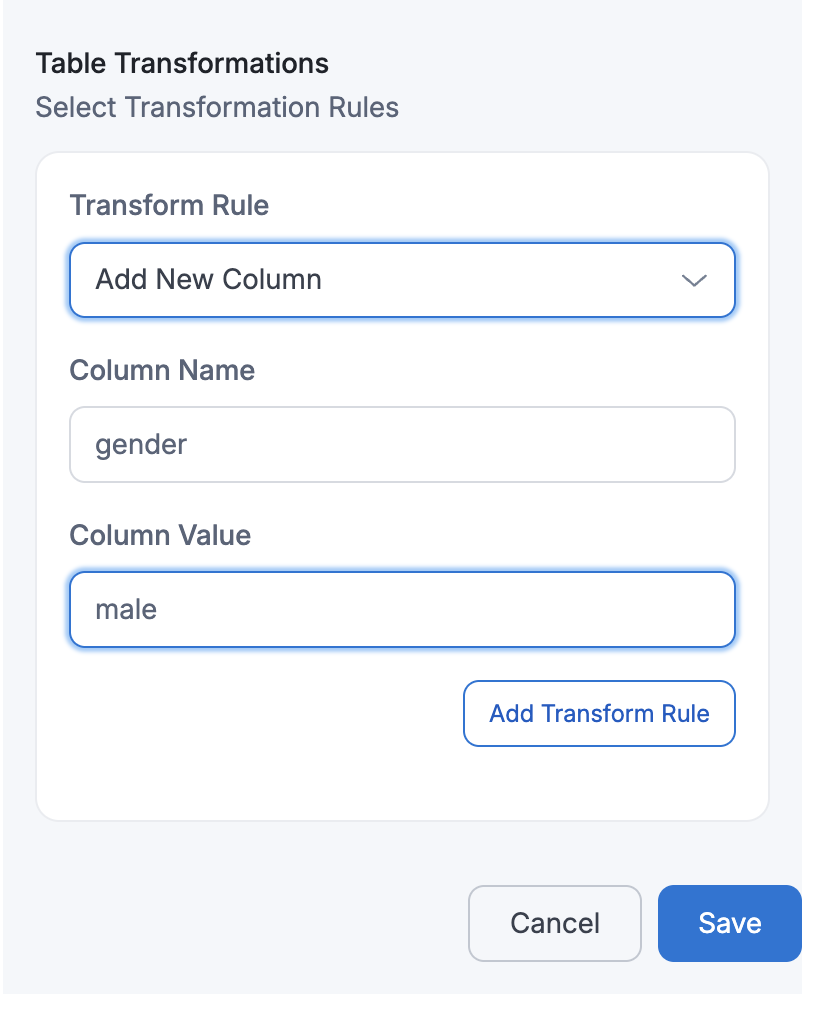
If a user performs Add New Column with
Column Name=genderandColumn Value=male, then the target table will contain an additional column namedgender, where every row will have the valuemale.Target Table:
id name description manager_id budget gender created_at 123 John Doe {"address": {"city": "Los Angeles", "zip": "90001"}} M789 2000 male 2025-05-20 07:53:39 456 Alice Ray {"address": {"city": "New York", "zip": "10001"}} M234 1000 male 2025-05-19 04:23:30 125 Bob Lee {"address": {"city": "Chicago", "zip": "60601"}} M321 1500 male 2025-05-21 02:53:13 - Rename Column
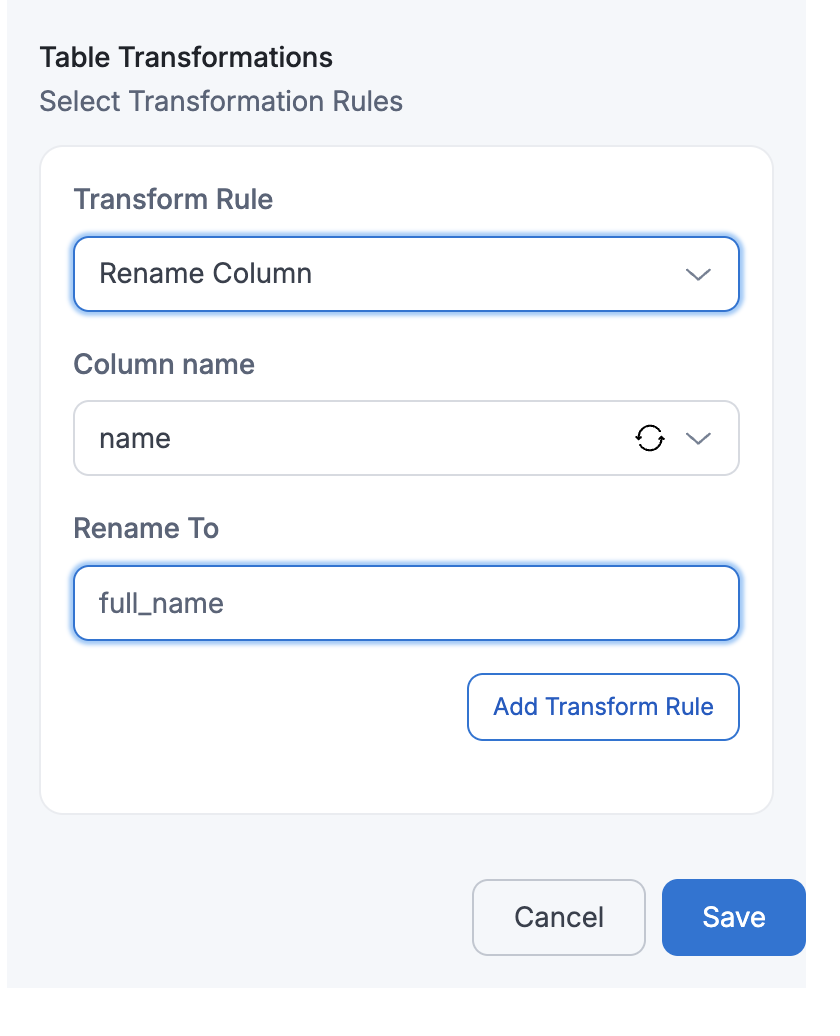
If a user performs Rename Column with
Column Name=nameandRename To=full_name, then the columnnamein the target table will be renamed tofull_name.Target Table:
id full_name description manager_id budget created_at 123 John Doe {"address": {"city": "Los Angeles", "zip": "90001"}} M789 2000 2025-05-20 07:53:39 456 Alice Ray {"address": {"city": "New York", "zip": "10001"}} M234 1000 2025-05-19 04:23:30 125 Bob Lee {"address": {"city": "Chicago", "zip": "60601"}} M321 1500 2025-05-21 02:53:13 - Include Column

If a user selects Include Column with
Column Name=name, then only thenamecolumn will be retained in the target table, and all other columns will be excluded.Target Table:
name John Doe Alice Ray Bob Lee - Mask Sensitive Data
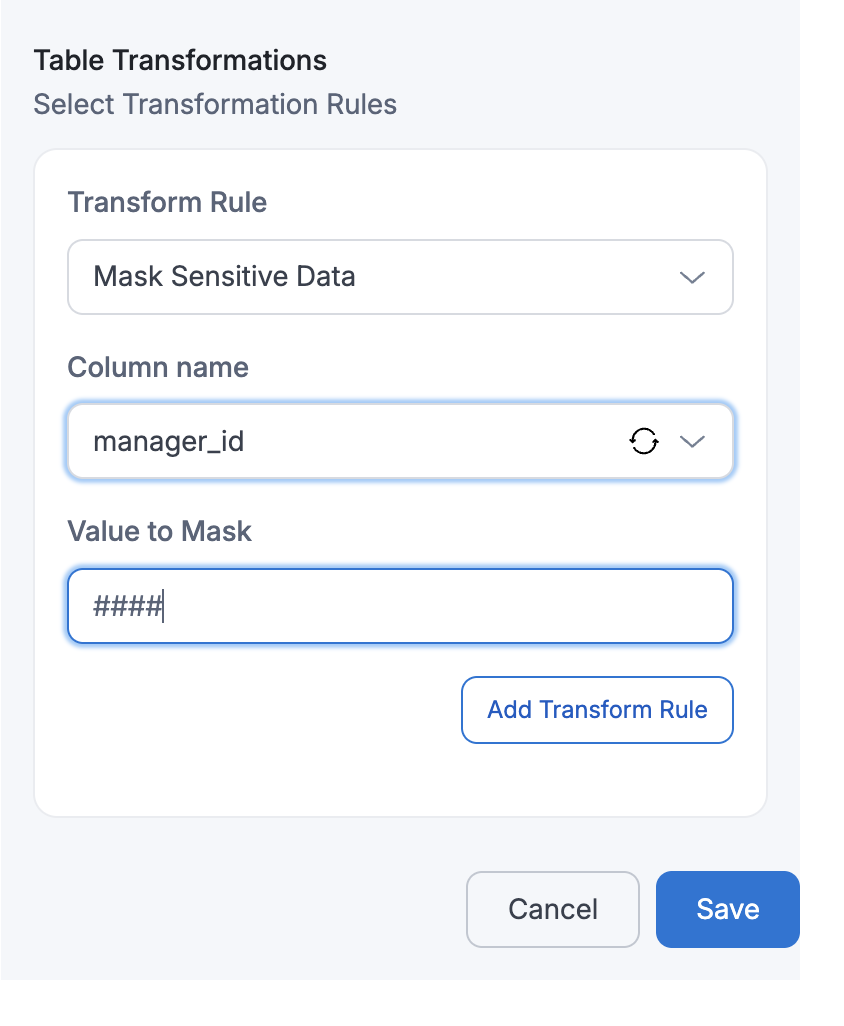
If a user applies Mask Sensitive Data on
Column Name=manager_id, then the manager_id values in the target table will be replaced with masked values(e.g., ####).Target Table:
id full_name description manager_id budget created_at 123 John Doe {"address": {"city": "Los Angeles", "zip": "90001"}} #### 2000 2025-05-20 07:53:39 456 Alice Ray {"address": {"city": "New York", "zip": "10001"}} #### 1000 2025-05-19 04:23:30 125 Bob Lee {"address": {"city": "Chicago", "zip": "60601"}} #### 1500 2025-05-21 02:53:13 - Flatten Nested Fields
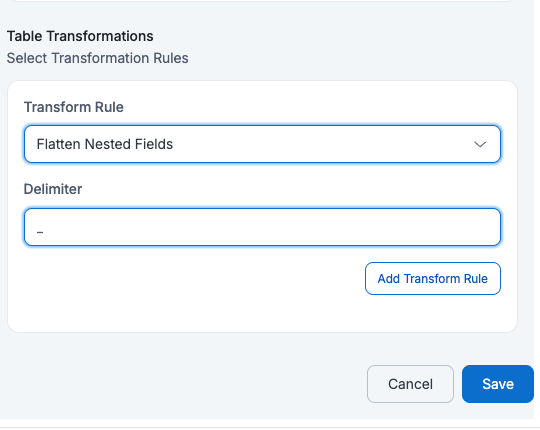
If a user applies Flatten Nested Fields with
Delimeter=_then all nested fields will be flattened into a single level with field names separated by _Target Table:
id full_name description_address_city description_address_zip manager_id budget created_at 123 John Doe Los Angeles 90001 M789 2000 2025-05-20 07:53:39 456 Alice Ray New York 10001 M234 1000 2025-05-19 04:23:30 125 Bob Lee Chicago 60601 M321 1500 2025-05-21 02:53:13 - Convert Time Stamp
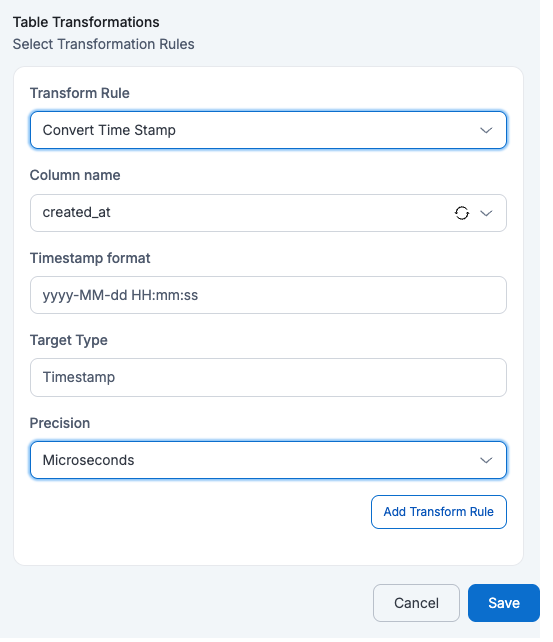
If a user applies Convert Time Stamp on
created_atwithTimestamp Format=yyyy-MM-dd HH:mm:ss,Target Type=TimestampandPrecision=Microseconds, then that column in the target table will be explicitly aTimestamptype which keeps precision upto Microseconds (e.g., 2025-08-21 14:23:45.123456)Target Table:
id full_name description manager_id budget created_at 123 John Doe {"address": {"city": "Los Angeles", "zip": "90001"}} M789 2000 2025-05-20 07:53:39.234 456 Alice Ray {"address": {"city": "New York", "zip": "10001"}} M234 1000 2025-05-19 04:23:30.345 125 Bob Lee {"address": {"city": "Chicago", "zip": "60601"}} M321 1500 2025-05-21 02:53:13.542 - Change Column Case
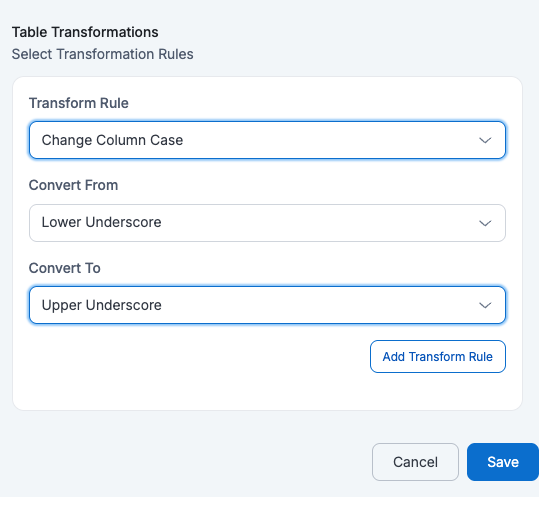
If a user applies Change Column Case with
Convert From=Lower UnderscoreandConvert To=Upper Underscore, then all column names in the table will be converted from lower case with underscores to upper case with underscores.ID NAME DESCRIPTION MANAGER_ID BUDGET CREATED_AT 123 John Doe {"address": {"city": "Los Angeles", "zip": "90001"}} M789 2000 2025-05-20 07:53:39 456 Alice Ray {"address": {"city": "New York", "zip": "10001"}} M234 1000 2025-05-19 04:23:30 125 Bob Lee {"address": {"city": "Chicago", "zip": "60601"}} M321 1500 2025-05-21 02:53:13 - Extract Nested Fields
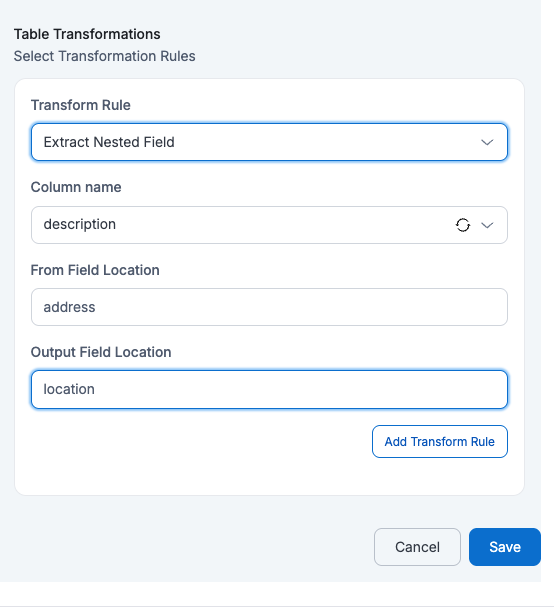
If a user applies Extract Nested Field on
Column Name=descriptionwithFrom Field Location=addressandOutput Field Location=address, then the address field inside the nested description column will be extracted into a new column.id name description manager_id budget created_at address 123 John Doe {"address": {"city": "Los Angeles", "zip": "90001"}} M789 2000 2025-05-20 07:53:39 {"city": "Los Angeles", "zip": "90001"} 456 Alice Ray {"address": {"city": "New York", "zip": "10001"}} M234 1000 2025-05-19 04:23:30 {"city": "New York", "zip": "10001"} 125 Bob Lee {"address": {"city": "Chicago", "zip": "60601"}} M321 1500 2025-05-21 02:53:13 {"city": "Chicago", "zip": "60601"} - Rename Columns by Pattern
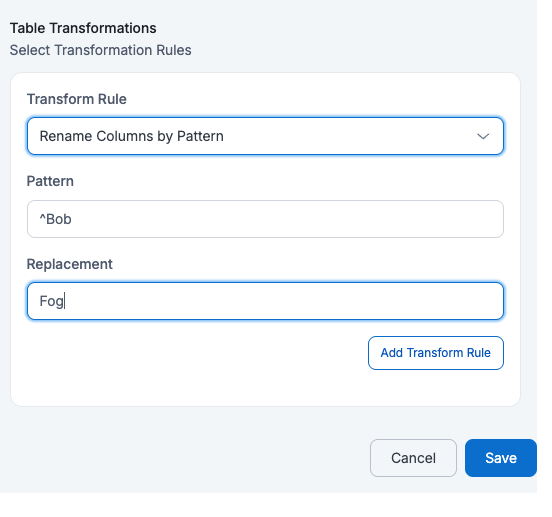
If a user applies Rename Columns by Pattern with
Pattern=^managerandReplacement=supervisorthen all column names that start with manager will be renamed by replacing manger with supervisorid name description supervisor_id budget created_at 123 John Doe {"address": {"city": "Los Angeles", "zip": "90001"}} M789 2000 2025-05-20 07:53:39 456 Alice Ray {"address": {"city": "New York", "zip": "10001"}} M234 1000 2025-05-19 04:23:30 125 Bob Lee {"address": {"city": "Chicago", "zip": "60601"}} M321 1500 2025-05-21 02:53:13 - Add Current Timestamp
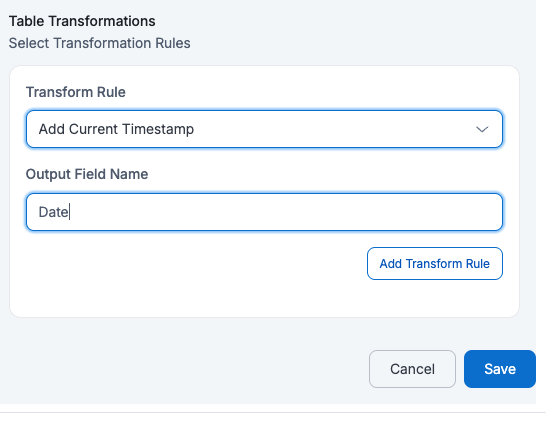
If a user applies Add Current Timestamp with
Output Field Name=Date, then the target table will have an extra columnDatewith the current timestamp added to every row.id name description manager_id budget created_at Date 123 John Doe {"address": {"city": "Los Angeles", "zip": "90001"}} M789 2000 2025-05-20 07:53:39 2025-07-12 06:55:23 456 Alice Ray {"address": {"city": "New York", "zip": "10001"}} M234 1000 2025-05-19 04:23:30 2025-07-12 06:57:35 125 Bob Lee {"address": {"city": "Chicago", "zip": "60601"}} M321 1500 2025-05-21 02:53:13 2025-07-12 06:56:39 - Hash Value
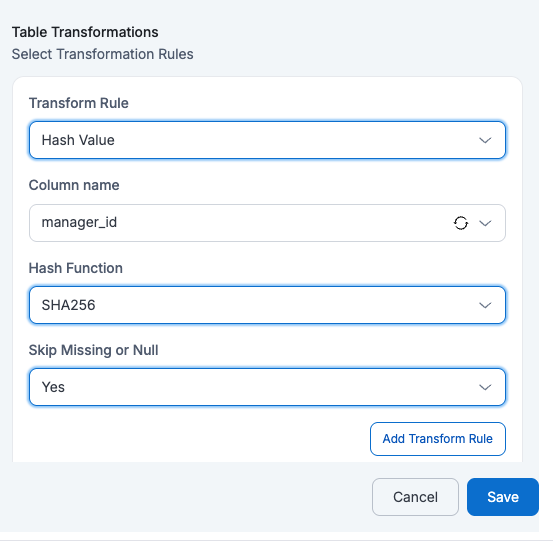
If a user applies Hash Value on
Column Name=manager_id, then themanager_idvalues will be replaced with their hashed values (e.g., SHA-256) in the target table. Skip Missing or Null as Yes will skip the empty values and Skipping Missing or Null as No will perform hash on Null Values
| id | name | description | manager_id | budget | created_at |
|---|---|---|---|---|---|
| 123 | John Doe | {"address": {"city": "Los Angeles", "zip": "90001"}} | 3c1e…a92f | 2000 | 2025-05-20 07:53:39 |
| 456 | Alice Ray | {"address": {"city": "New York", "zip": "10001"}} | dfe8…f12b | 1000 | 2025-05-19 04:23:30 |
| 125 | Bob Lee | {"address": {"city": "Chicago", "zip": "60601"}} | 7b91…d4f0 | 1500 | 2025-05-21 02:53:13 |
- Concatenate Field
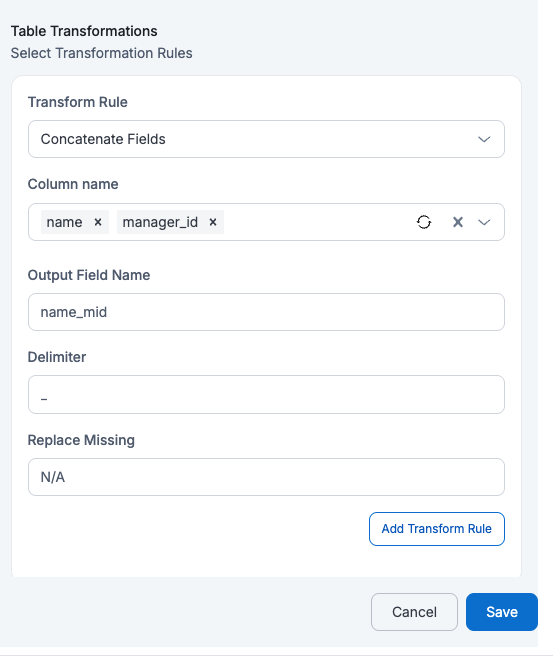
If a user applies Concatenate Fields on Column Names = name and manager_id with Output Field Name = name_mid and Delimiter = "_" and Replace Missing = "N/A", then a new column name_mid will be created by combining both fields separated by an underscore, replacing any missing value with N/A.
| id | name | description | manager_id | budget | created_at | name_mid |
|---|---|---|---|---|---|---|
| 123 | John Doe | {"address": {"city": "Los Angeles", "zip": "90001"}} | M789 | 2000 | 2025-05-20 07:53:39 | John Doe_M789 |
| 456 | Alice Ray | {"address": {"city": "New York", "zip": "10001"}} | M234 | 1000 | 2025-05-19 04:23:30 | Alice Ray_M234 |
| 125 | Bob Lee | {"address": {"city": "Chicago", "zip": "60601"}} | M321 | 1500 | 2025-05-21 02:53:13 | Bob Lee_M321 |
- Convert to LowerCase

If a user applies Convert to LowerCase on Column Name = name, then all values in the name column will be converted to lowercase in the target table.
| id | name | description | manager_id | budget | created_at |
|---|---|---|---|---|---|
| 123 | john doe | {"address": {"city": "Los Angeles", "zip": "90001"}} | M789 | 2000 | 2025-05-20 07:53:39 |
| 456 | alice ray | {"address": {"city": "New York", "zip": "10001"}} | M234 | 1000 | 2025-05-19 04:23:30 |
| 125 | bob lee | {"address": {"city": "Chicago", "zip": "60601"}} | M321 | 1500 | 2025-05-21 02:53:13 |
- Convert to UpperCase
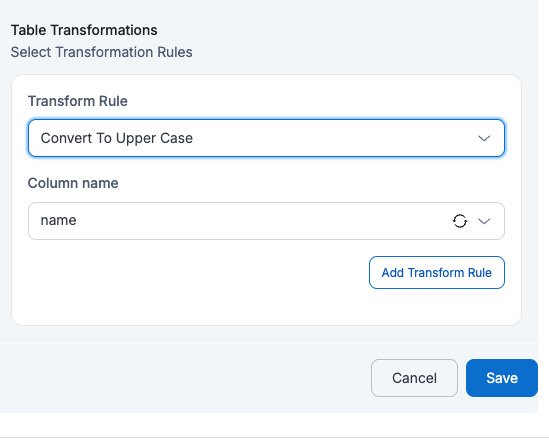
If a user applies Convert to UpperCase on Column Name = name, then all values in the name column will be converted to uppercase in the target table.
| id | name | description | manager_id | budget | created_at |
|---|---|---|---|---|---|
| 123 | JOHN DOE | {"address": {"city": "Los Angeles", "zip": "90001"}} | M789 | 2000 | 2025-05-20 07:53:39 |
| 456 | ALICE RAY | {"address": {"city": "New York", "zip": "10001"}} | M234 | 1000 | 2025-05-19 04:23:30 |
| 125 | BOB LEE | {"address": {"city": "Chicago", "zip": "60601"}} | M321 | 1500 | 2025-05-21 02:53:13 |
- Custom Scripted Transform

If a user applies Custom Scripted Transform on the Column Name = budget with the given Expression = def transform(value) { if (value == null) return null; return value*0.90; }, then each value will be transformed by multiplying it by 0.90, effectively reducing a 10% budget, while keeping null values unchanged.
| id | name | description | manager_id | budget | created_at |
|---|---|---|---|---|---|
| 123 | John Doe | {"address": {"city": "Los Angeles", "zip": "90001"}} | M789 | 1800 | 2025-05-20 07:53:39 |
| 456 | Alice Ray | {"address": {"city": "New York", "zip": "10001"}} | M234 | 900 | 2025-05-19 04:23:30 |
| 125 | Bob Lee | {"address": {"city": "Chicago", "zip": "60601"}} | M321 | 1350 | 2025-05-21 02:53:13 |
- Change Data Type (Only Integer, Float, Boolean & String data types are available for conversion now)
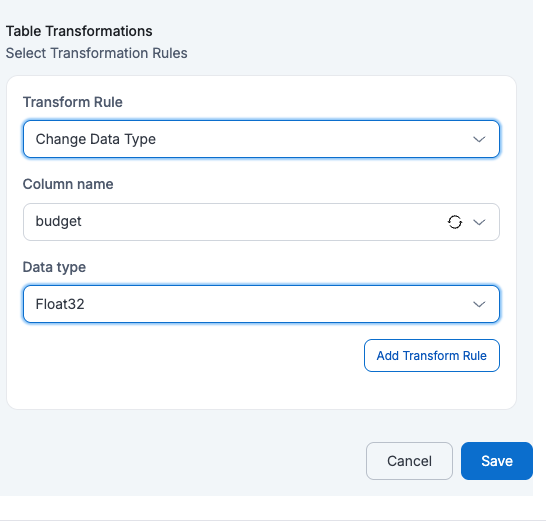
If a user applies Change Data Type on Column Name = budget with Data Type = Float, then the budget column in the target table will be converted from integer to float values.
| id | name | description | manager_id | budget | created_at |
|---|---|---|---|---|---|
| 123 | John Doe | {"address": {"city": "Los Angeles", "zip": "90001"}} | M789 | 2000.0 | 2025-05-20 07:53:39 |
| 456 | Alice Ray | {"address": {"city": "New York", "zip": "10001"}} | M234 | 1000.0 | 2025-05-19 04:23:30 |
| 125 | Bob Lee | {"address": {"city": "Chicago", "zip": "60601"}} | M321 | 1500.0 | 2025-05-21 02:53:13 |
The above transformation rules are applied at table level. At dataflow level, the following transformation rules are supported and are applied to all selected source tables:: Rename Columns by Pattern, Flatten Nested Fields, Add New Column, Add Current Timestamp, Change Column Case. The table-level rules are applied first, followed by the dataflow-level rules.
To apply dataflow-level rules, navigate to Rules and Transformation.

Change Column Case and Rename Columns by Pattern are not applicable for S3Athena targets with Parquet (Iceberg) format.
Please follow the below animation as a reference to create a dataflow.
After successful creation, the dataflow can be started with the 'Start' option
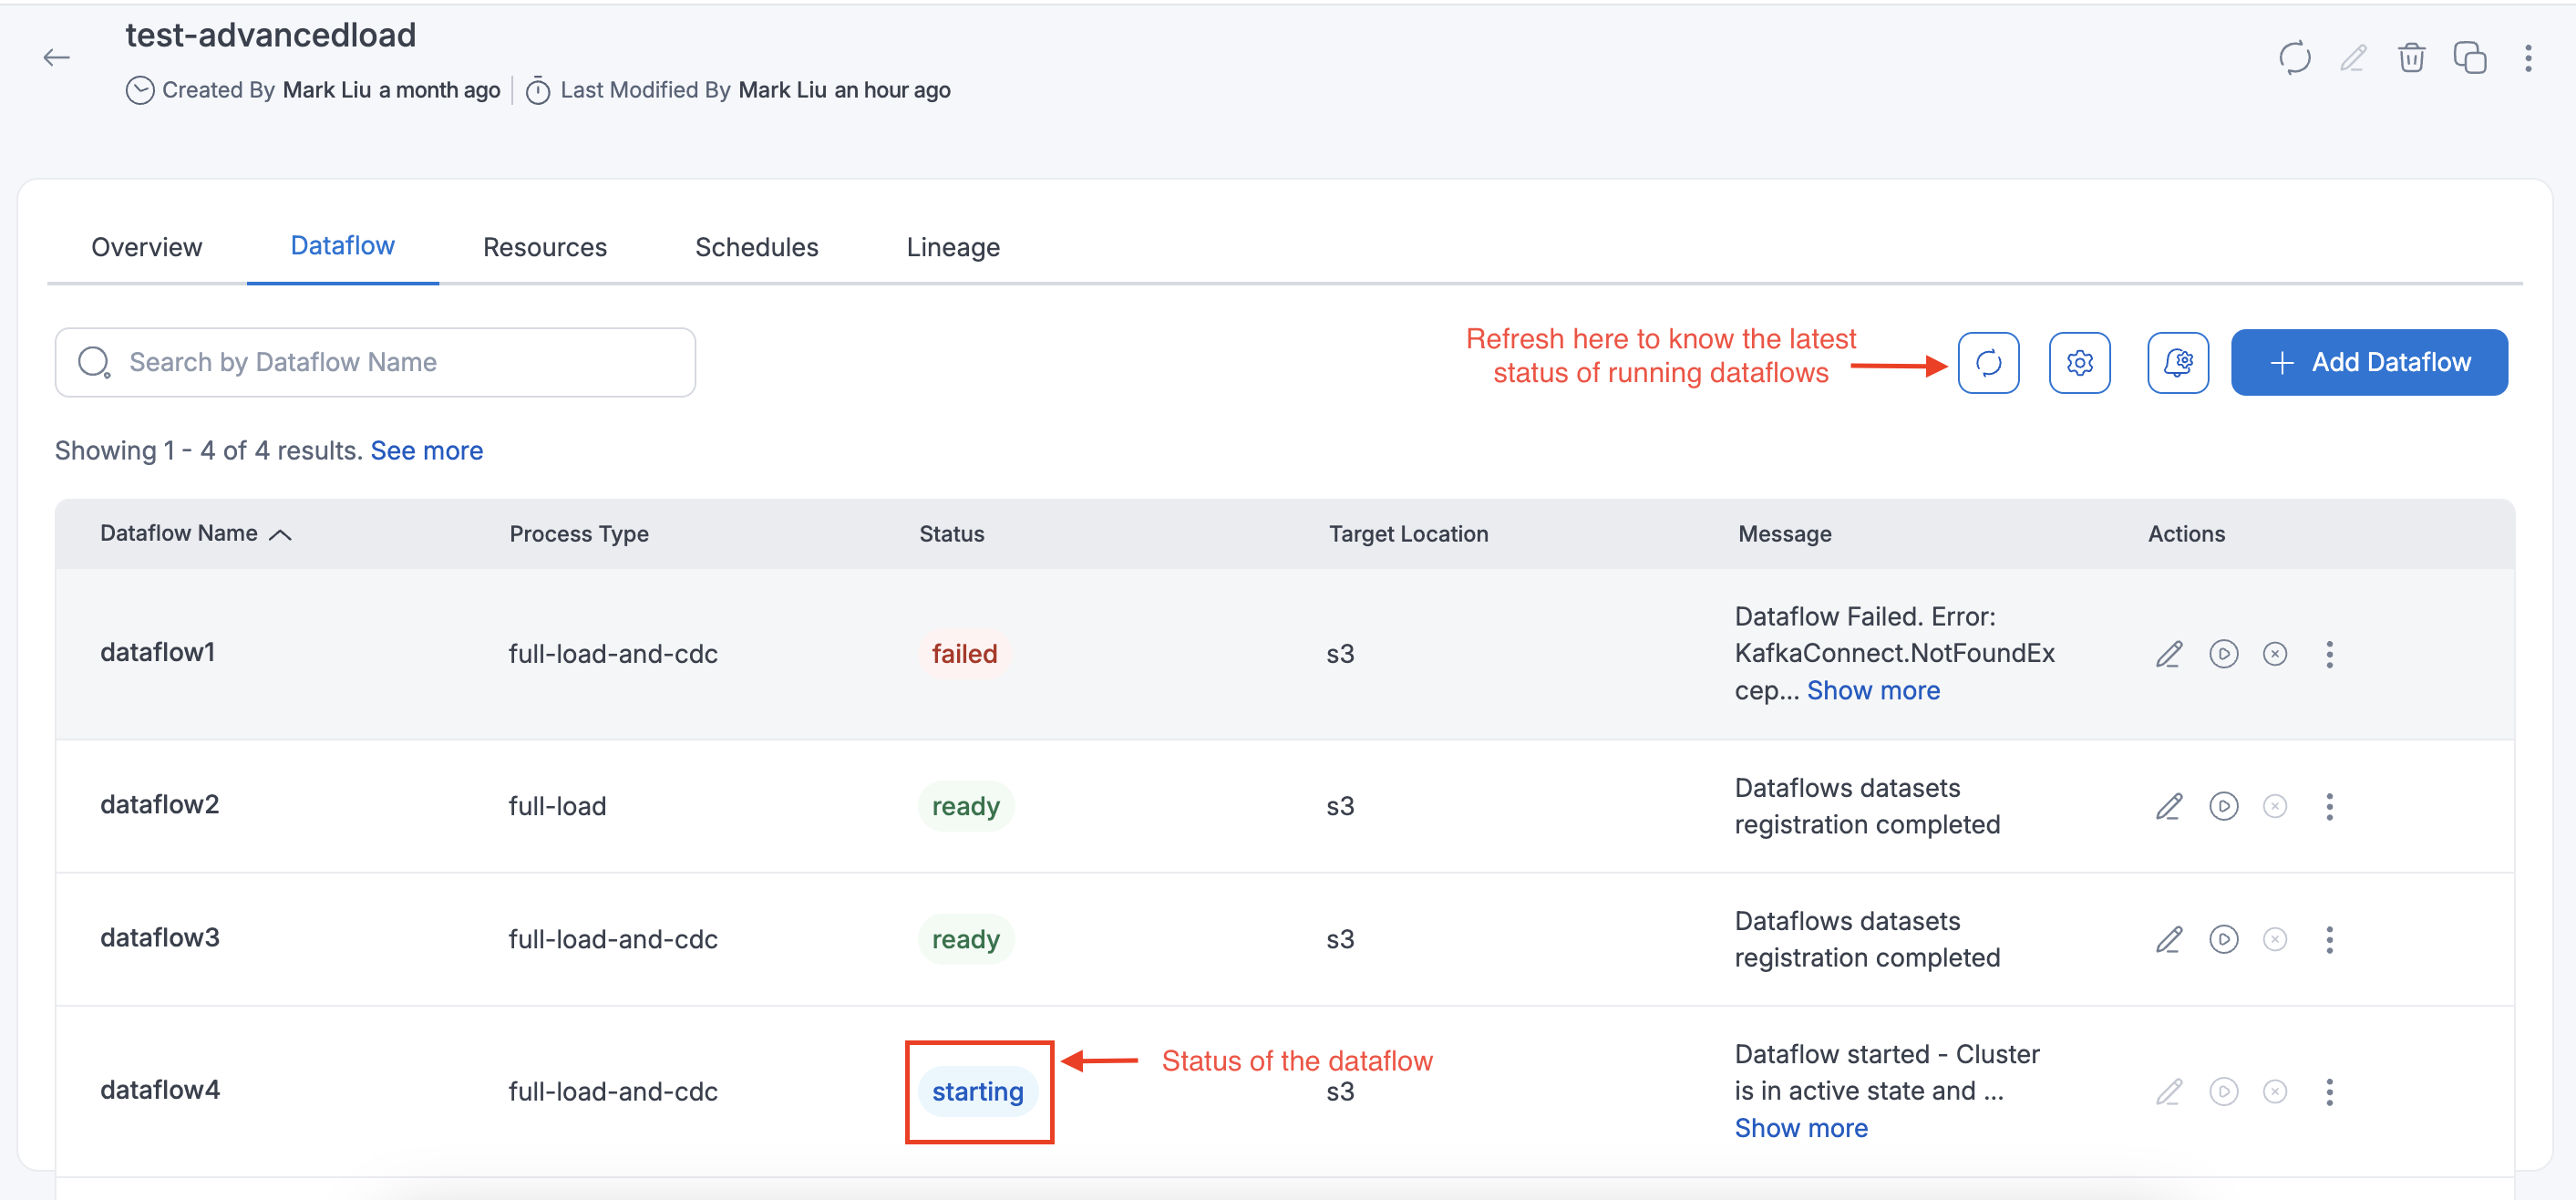
View Dataflow Details
Once the dataflow is started, the status of the dataflow will be changed to starting and once dataflow is created successfully the status will be changed to running. The latest status can be fetched with the page refresh page.
For full-load-and-cdc dataflows, once the snapshot (full load) is completed, the dataflow message will display "Full load completed and CDC in progress", indicating that the full load is complete and replication (cdc) is ongoing. You can use the dataflow details view and refresh the page to see the updated message.
Update Dataflow Details
Dataflow updates are supported when the dataflow state is Completed, Running, Terminated, Ready, or Failed.
Editing TargetTablePrepMode is not supported for S3Athena dataflows with Parquet (Iceberg) format.
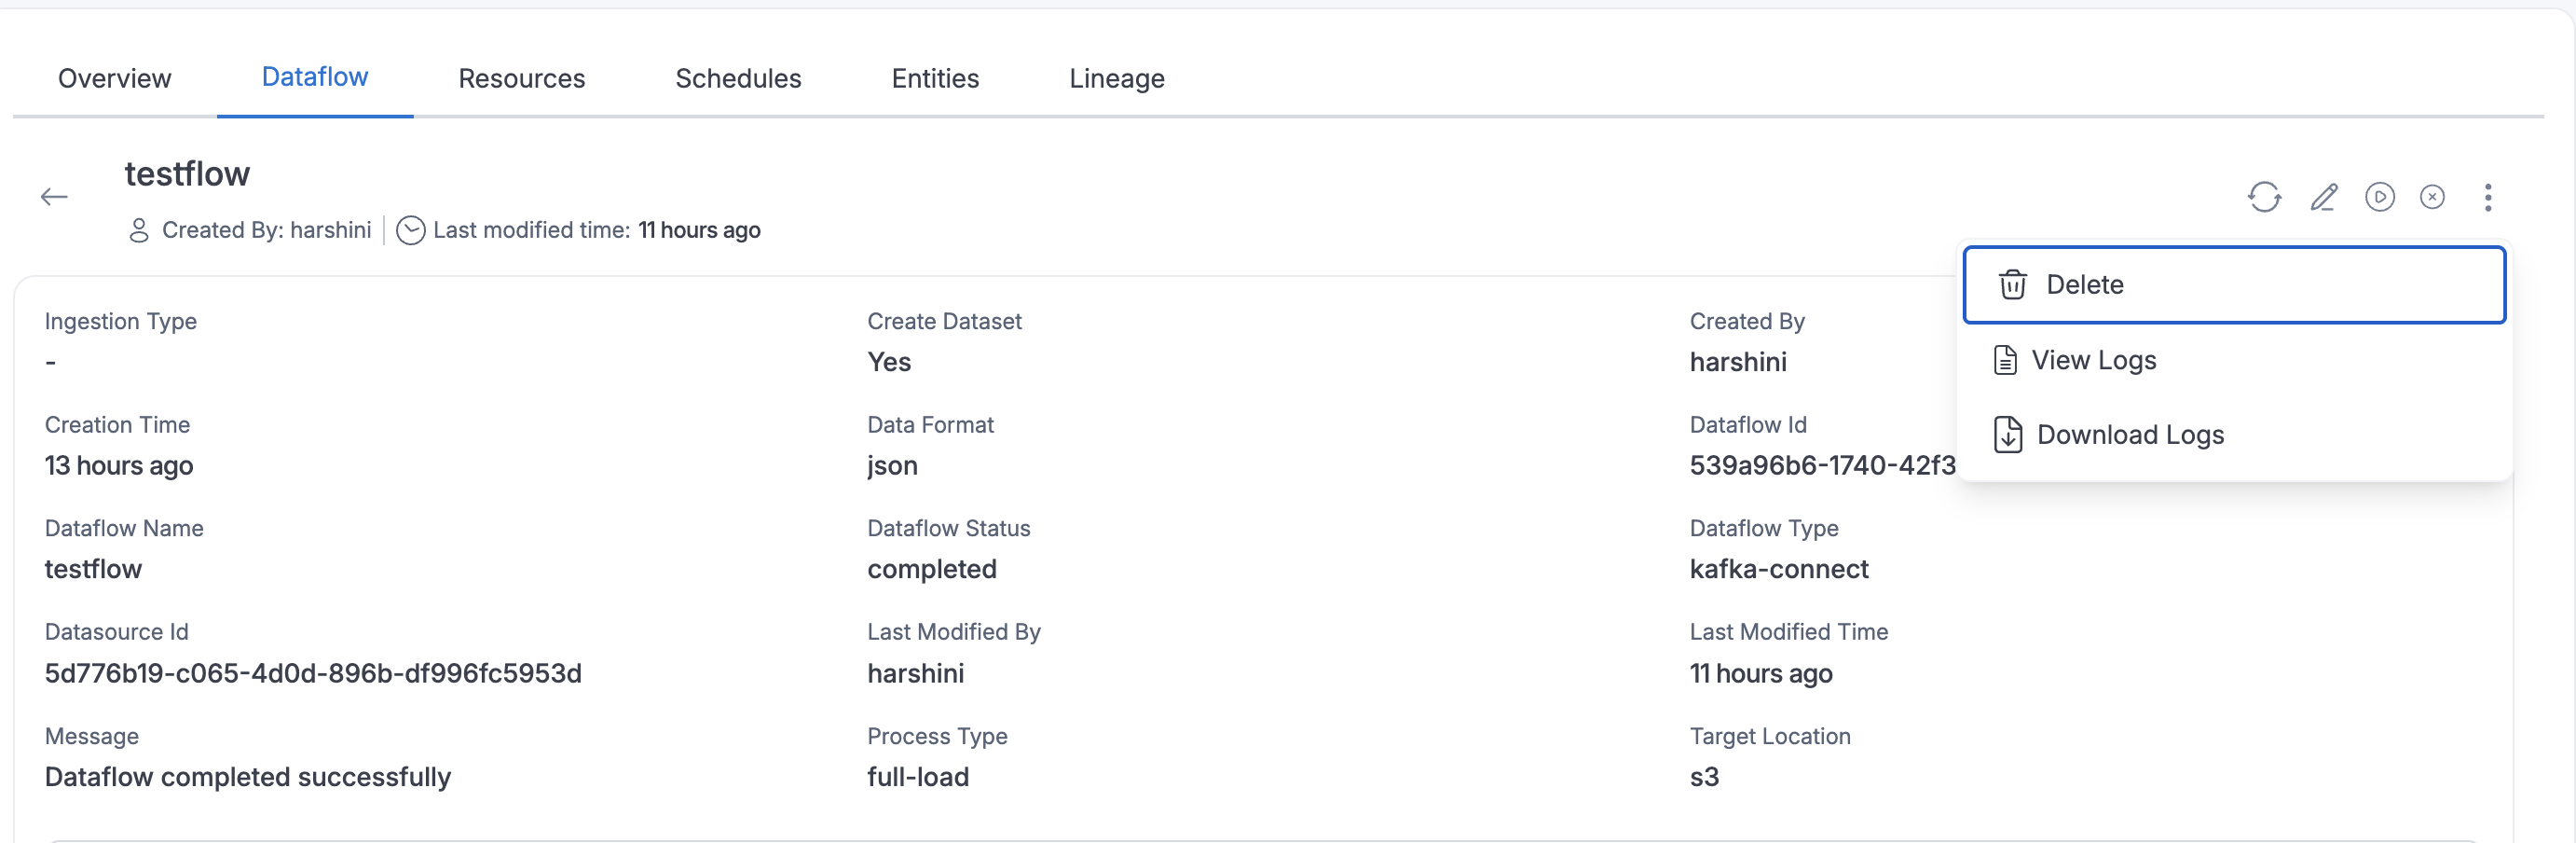
Dataflow Logs
You can view logs and download logs for a dataflow.
To view logs, users can access the logs by clicking the three dots in the top right corner.
To download logs, first generate the logs. Once the logs are generated, an email notification will be sent. After receiving the email notification, you can download the logs.
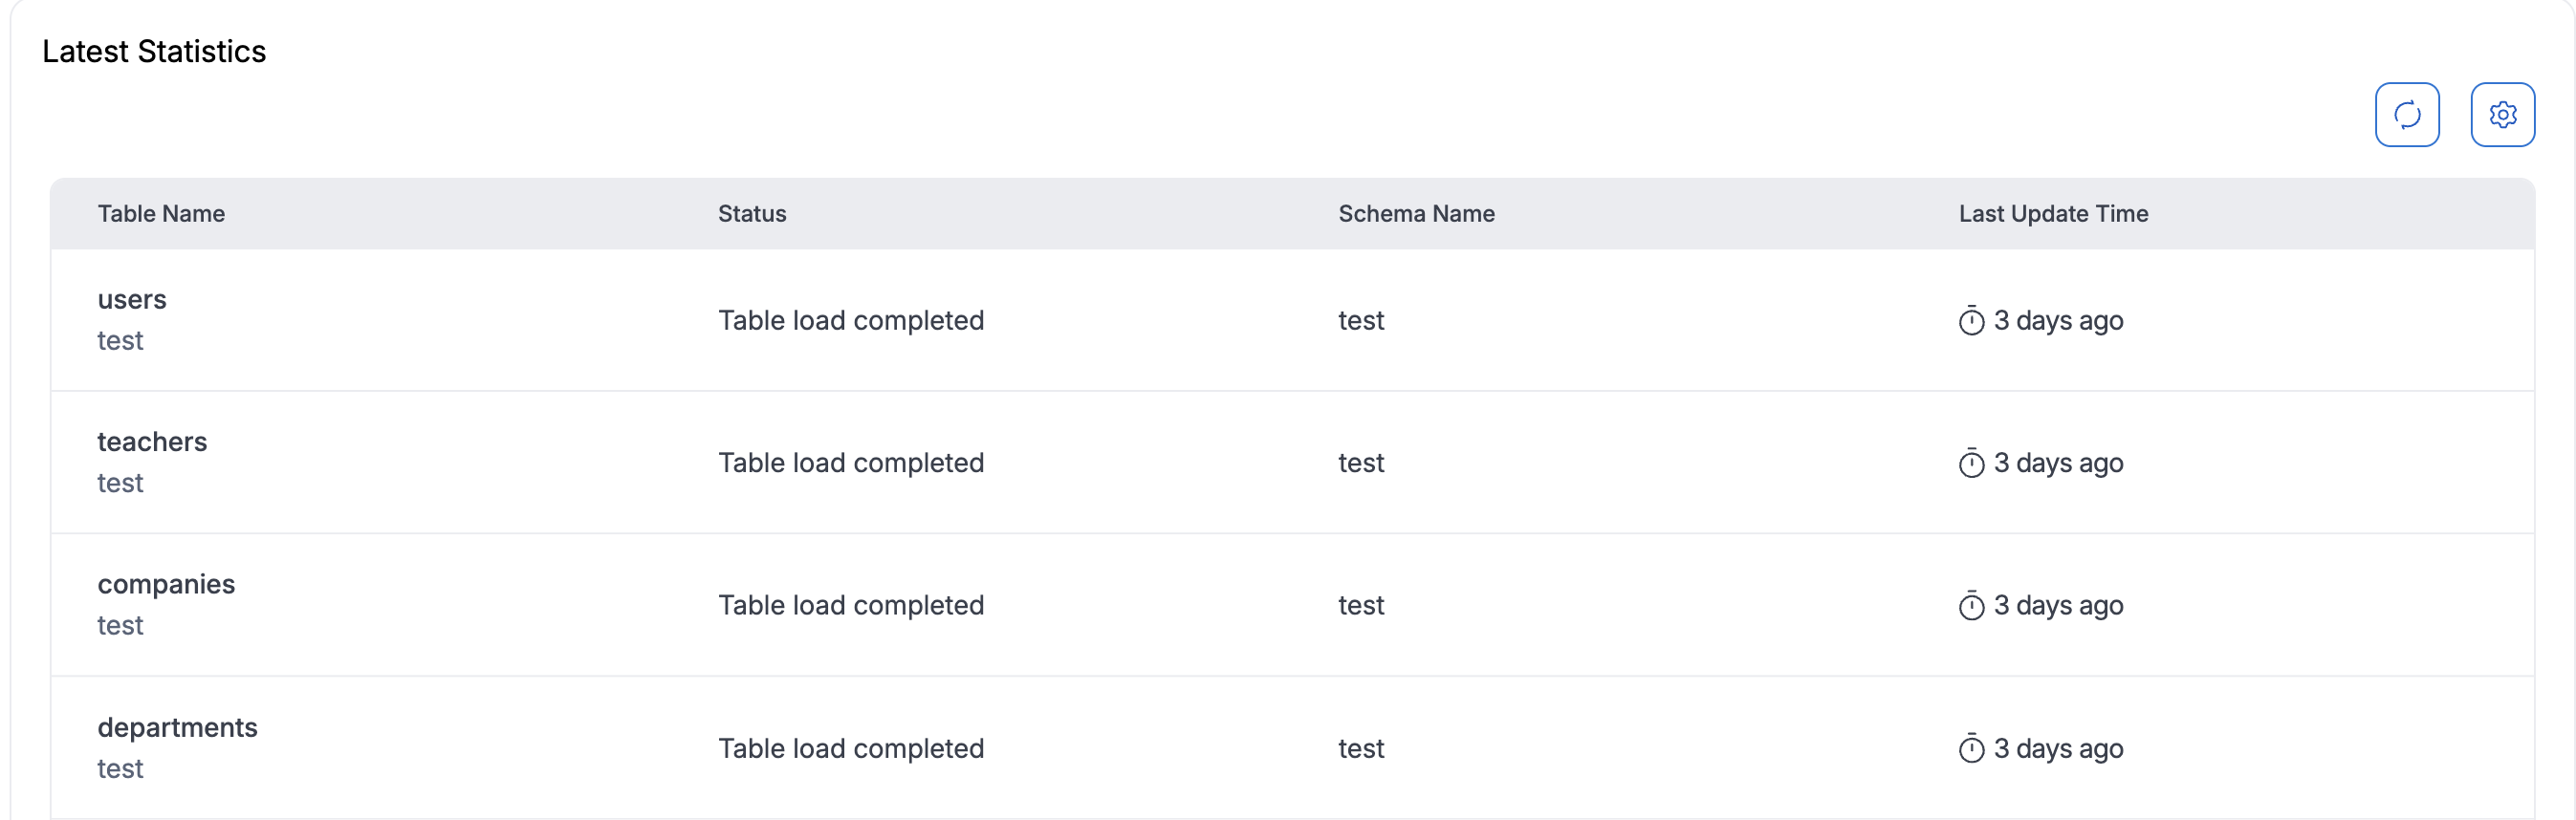
Dataflow Stats
Dataflow stats are supported for JDBC Advanced dataflows. You can view per-table migration statistics by opening the dataflow from the Dataflow Details page. You can also use Download Stats from the More Actions menu (three dots) on the dataflow details page, when that option is available.
For Full Load and Full load and CDC process types, table statistics are available once the dataflow is in the running state.
For Full load and CDC, the statistics view focuses on the full load (snapshot) phase. Ongoing CDC replication metrics are not fully represented in the stats view.
Table statistics are not supported for the CDC process type.
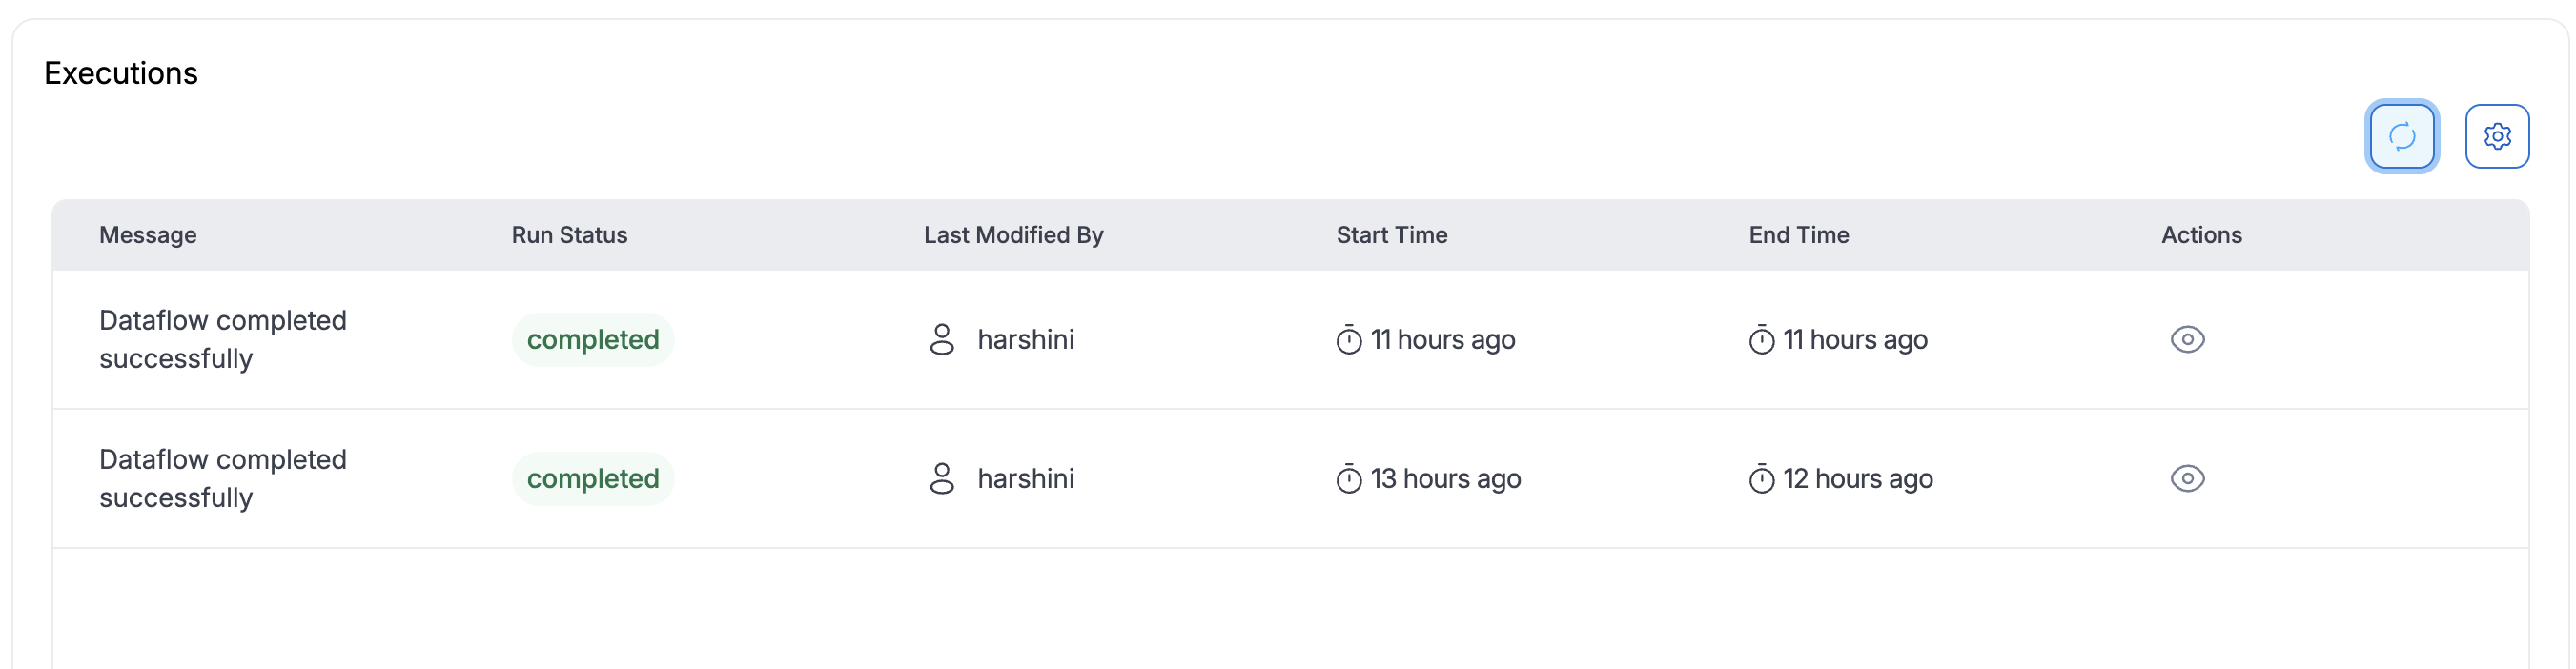
Dataflow Executions
For full-load dataflows, we support execution history.
If you are creating or updating a dataflow through the API and your transformation rules include complex queries, you must encode the TableMappings in base64 and provide the encoded value in the TableMappings attribute.